LEGO Star Wars 3 The Clone Wars: General Grievous p. 4 Story mode
 | ![Afterwards place the second brick onto the pipe on the right [1] and the last one above [2] - General Grievous - p. 4 - Story mode - LEGO Star Wars III: The Clone Wars - Game Guide and Walkthrough](/legostarwarsiiitheclonewars/gfx/word/-1423744296.jpg) |
Afterwards place the second brick onto the pipe on the right [1] and the last one above [2].
 | ![Once you're done, activate the panel with R2-D2 [1] and cross the wet corridor [2] - General Grievous - p. 4 - Story mode - LEGO Star Wars III: The Clone Wars - Game Guide and Walkthrough](/legostarwarsiiitheclonewars/gfx/word/-1423744265.jpg) |
Once you're done, activate the panel with R2-D2 [1] and cross the wet corridor [2].
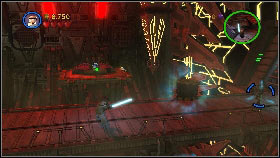
 | ![Time for the second group [1] - General Grievous - p. 4 - Story mode - LEGO Star Wars III: The Clone Wars - Game Guide and Walkthrough](/legostarwarsiiitheclonewars/gfx/word/-1423744234.jpg) |
Time for the second group [1]. Head to the left corridor, destroy the bricks at its end [2] and create a lever using them.
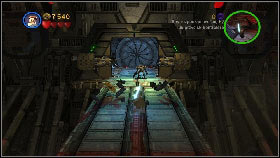
 | ![Mount it into the panel on the right side of the door and use Padme's grappling hook on it [1] - General Grievous - p. 4 - Story mode - LEGO Star Wars III: The Clone Wars - Game Guide and Walkthrough](/legostarwarsiiitheclonewars/gfx/word/-1423744203.jpg) |
Mount it into the panel on the right side of the door and use Padme's grappling hook on it [1]. Approach the panel with C-3PO [2] and activate it. You will have to repeat the sequence showed on the flashing bricks.
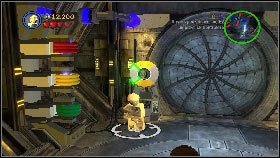
 | ![Move to the next room and deal with the robot [1] - General Grievous - p. 4 - Story mode - LEGO Star Wars III: The Clone Wars - Game Guide and Walkthrough](/legostarwarsiiitheclonewars/gfx/word/-1423744171.jpg) |
Move to the next room and deal with the robot [1]. After a short cutscene switch the groups and destroy the big, mechanical enemy [2].
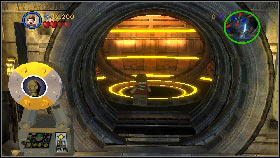
 | ![Use the remaining bricks to create a panel [1], activate it using the robots and head deeper into the corridor - General Grievous - p. 4 - Story mode - LEGO Star Wars III: The Clone Wars - Game Guide and Walkthrough](/legostarwarsiiitheclonewars/gfx/word/-1423744140.jpg) |
Use the remaining bricks to create a panel [1], activate it using the robots and head deeper into the corridor. Eventually you will reach a door with blue and red symbols. Before you start opening it, use the Force to put the plug into the socket on the left [2].
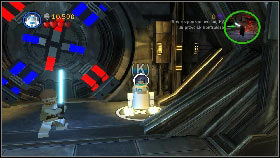 | ![Switch to R2-D2 and use two panels by the door [1] to create a suitable pattern - General Grievous - p. 4 - Story mode - LEGO Star Wars III: The Clone Wars - Game Guide and Walkthrough](/legostarwarsiiitheclonewars/gfx/word/-1423744109.jpg) |
Switch to R2-D2 and use two panels by the door [1] to create a suitable pattern. Note that there are two red and blue pins on the perimeter of the door. Rotate the outer circle with the panel on the right so that the colours match. Afterwards go to the left panel and set the cross in accordance with the colours. In the next room, deal with the enemies and then use the Force on the exploding container on the main terrace and throw it at the secured torpedo dispenser by the left wall [2].
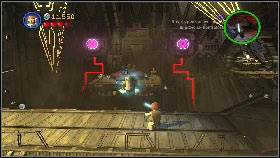 | ![Afterwards use the Force to pick up a torpedo [1] and use it on the purple shield [2] - General Grievous - p. 4 - Story mode - LEGO Star Wars III: The Clone Wars - Game Guide and Walkthrough](/legostarwarsiiitheclonewars/gfx/word/-1423744078.jpg) |
Afterwards use the Force to pick up a torpedo [1] and use it on the purple shield [2]. Repeat this with the second shield.
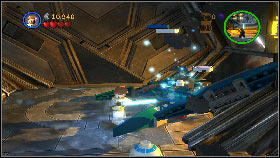
 | ![Afterwards go right and once again use the container to hit the torpedo dispenser's cover [1] and use two torpedoes to destroy the two purple targets [2] - General Grievous - p. 4 - Story mode - LEGO Star Wars III: The Clone Wars - Game Guide and Walkthrough](/legostarwarsiiitheclonewars/gfx/word/-1423744046.jpg) |
Afterwards go right and once again use the container to hit the torpedo dispenser's cover [1] and use two torpedoes to destroy the two purple targets [2].
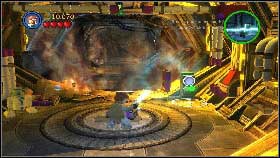
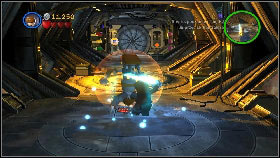
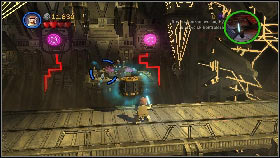
 | ![Return to the middle of the room and activate the panel which was below the barrier with R2-D2 [1] - General Grievous - p. 4 - Story mode - LEGO Star Wars III: The Clone Wars - Game Guide and Walkthrough](/legostarwarsiiitheclonewars/gfx/word/-1423744015.jpg) |
Return to the middle of the room and activate the panel which was below the barrier with R2-D2 [1]. Grievous will appear in the door opposite to the panel. Don't get near him, instead use the Force on one of the nearby objects and throw it at him [2].
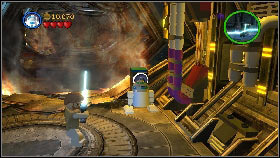
 | ![Afterwards quickly run to him and hit him a few times [1] - General Grievous - p. 4 - Story mode - LEGO Star Wars III: The Clone Wars - Game Guide and Walkthrough](/legostarwarsiiitheclonewars/gfx/word/-1423743984.jpg) |
Afterwards quickly run to him and hit him a few times [1]. More enemies will appear. Defeat them and head to the passage on the left, where Grievous went. Attack him once again with one of the items [2] and hit with the Light Saber afterwards.
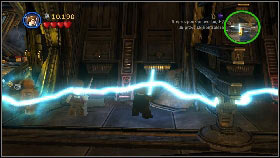
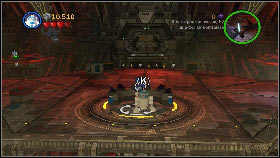
 | ![Enter the newly opened room and use the lever [1] - General Grievous - p. 4 - Story mode - LEGO Star Wars III: The Clone Wars - Game Guide and Walkthrough](/legostarwarsiiitheclonewars/gfx/word/-1423743953.jpg) |
Enter the newly opened room and use the lever [1]. More enemies will appear [2]. Deal with them and head right.
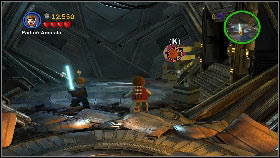
 | ![Once again throw an item at Grievous [1], hit him with the Light Saber and use the lever in the opened room [2] - General Grievous - p. 4 - Story mode - LEGO Star Wars III: The Clone Wars - Game Guide and Walkthrough](/legostarwarsiiitheclonewars/gfx/word/-1423743921.jpg) |
Once again throw an item at Grievous [1], hit him with the Light Saber and use the lever in the opened room [2].
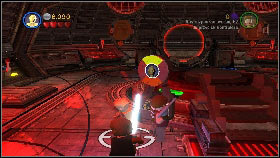
 | ![Deal with the last enemy group just like before and attack Grievous for the last time [1] - General Grievous - p. 4 - Story mode - LEGO Star Wars III: The Clone Wars - Game Guide and Walkthrough](/legostarwarsiiitheclonewars/gfx/word/-1423743890.jpg) |
Deal with the last enemy group just like before and attack Grievous for the last time [1]. Go into the room in front of you, stand on one of the buttons, wait for you companion to do the same with the other one and jump into the hole [2].
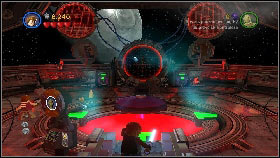
 |  |
After switching to the second team, keep heading deeper into the corridor. At its end there's a panel on which you should use C-3PO [1]. Jump into the hole once the door opens [2].
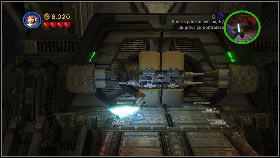
 | ![Inside the next room, deal with the enemies and use the golden robot on the panel [1] - General Grievous - p. 4 - Story mode - LEGO Star Wars III: The Clone Wars - Game Guide and Walkthrough](/legostarwarsiiitheclonewars/gfx/word/-1423743828.jpg) |
Inside the next room, deal with the enemies and use the golden robot on the panel [1]. Afterwards use the Light Saber to create two holes [2] in the containers on both sides of the round screen.
 | ![Afterwards use Padme's grappling hook on the grapple points [1] found above the two containers you were cutting just a moment ago - General Grievous - p. 4 - Story mode - LEGO Star Wars III: The Clone Wars - Game Guide and Walkthrough](/legostarwarsiiitheclonewars/gfx/word/-1423743796.jpg) |
Afterwards use Padme's grappling hook on the grapple points [1] found above the two containers you were cutting just a moment ago. Use the Force on the connectors that will fall out and plug them into the nearby sockets [2].
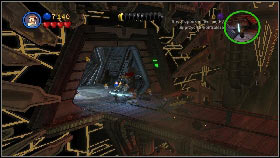
 | ![Afterwards use the Force on the middle platform [1] and start moving it firmly in all sides - General Grievous - p. 4 - Story mode - LEGO Star Wars III: The Clone Wars - Game Guide and Walkthrough](/legostarwarsiiitheclonewars/gfx/word/-1423743765.jpg) |
Afterwards use the Force on the middle platform [1] and start moving it firmly in all sides. After a bit enemies will enter the room. Destroy them and keep moving the platform until enemies from the elevator on the left will attack you. Defeat them and use the elevator [2] from which they came.

- LEGO Star Wars III: The Clone Wars Game Guide
- LEGO Star Wars 3 The Clone Wars: Game Guide
- LEGO Star Wars 3 The Clone Wars: Story mode
- LEGO Star Wars 3 The Clone Wars: Prologue Story mode
- LEGO Star Wars 3 The Clone Wars: Count Dooku p. 1 Story mode
- LEGO Star Wars 3 The Clone Wars: Count Dooku p. 2 Story mode
- LEGO Star Wars 3 The Clone Wars: Count Dooku p. 3 Story mode
- LEGO Star Wars 3 The Clone Wars: Count Dooku p. 4 Story mode
- LEGO Star Wars 3 The Clone Wars: Count Dooku p. 5 Story mode
- LEGO Star Wars 3 The Clone Wars: General Grievous p. 1 Story mode
- LEGO Star Wars 3 The Clone Wars: General Grievous p. 2 Story mode
- LEGO Star Wars 3 The Clone Wars: General Grievous p. 3 Story mode
- LEGO Star Wars 3 The Clone Wars: General Grievous p. 4 Story mode
- LEGO Star Wars 3 The Clone Wars: General Grievous p. 5 Story mode
- LEGO Star Wars 3 The Clone Wars: General Grievous p. 6 Story mode
- LEGO Star Wars 3 The Clone Wars: General Grievous p. 7 Story mode
- LEGO Star Wars 3 The Clone Wars: Asajj Ventress p. 1 Story mode
- LEGO Star Wars 3 The Clone Wars: Asajj Ventress p. 2 Story mode
- LEGO Star Wars 3 The Clone Wars: Asajj Ventress p. 3 Story mode
- LEGO Star Wars 3 The Clone Wars: Asajj Ventress p. 4 Story mode
- LEGO Star Wars 3 The Clone Wars: Asajj Ventress p. 5 Story mode
- LEGO Star Wars 3 The Clone Wars: Epilogue Story mode
- LEGO Star Wars 3 The Clone Wars: Story mode
- LEGO Star Wars 3 The Clone Wars: Game Guide
You are not permitted to copy any image, text or info from this page. This site is not associated with and/or endorsed by the developers and the publishers. All logos and images are copyrighted by their respective owners.
Copyright © 2000 - 2026 Webedia Polska SA for gamepressure.com, unofficial game guides, walkthroughs, secrets, game tips, maps & strategies for top games.