StarCraft 2 Wings of Liberty: Echoes of the Future (Achievements)

Echoes of the Future:
Reach the Nexus, Bring Zeratul to each of the 4 Overmind Tendrils, Power the 2 Obelisks, Zeratul Must Survive.
Army of One:
I think you will complete this achievement without even having it in mind. If you're in a hurry, you can head out for a hunt with the Observer. The kill counter will quickly increase and the current number can be viewed in the character panel.
Overmind Dead Body:
Another difficult raid. You have to get to all four Tendrills in as few as 20 minutes, the area is swarming with Zergs and you don't even have a base to start with. Curiously, you can complete this achievement in as much as 3-4 minutes, but luck pays a big role in that case. That's why I'll first show you the more time-consuming, but certain method. The mentioned faster solution can be found at the end.
After getting to the Nexus, start building a strong economy so that you won't be short on crystals or gas in the future (two Assimilators absolutely needed) and Pylons. Move your Colossuses right away to the nearest marker [1]. Aid them with an Observer and begin training new units in the meantime.
Once Zeratul mentions the Zerg attack, retreat the Colossuses back to the cliffs and fight off the first wave. Afterwards continue killing the natives round the first obelisk and build a Pylon which will activate the Warp Gate. They can bring in new units, which you can of course use during the mission (you can also turn your own Gateway into one of them).
![Collect all your forces and move up towards the next Gate [2] and Tendrils - Echoes of the Future (Achievements) - Campaign - Prophesy missions - StarCraft II: Wings of Liberty - Game Guide and Walkthrough](/starcraftiiwingsofliberty/gfx/word/80456468.jpg)
Collect all your forces and move up towards the next Gate [2] and Tendrils. Cause as much destruction as possible and retreat to your base to protect it from the Zerg attack. Afterwards take your whole army to destroying the nearby nests in order to get to the second obelisk [3]. This is a very important part of the mission. You have to accomplish the goal as fast as possible, while being troubled by local Brood Lords and Mutalisks. Counter them with Stalkers and don't forget that you also have your High Templars' Psi Storm (they will pass through the activated Gates).
You will probably have to retreat to the base once again, but you can also risk, place many Cannons and invest in more Colossuses. Additionally you should also train Dark Templars - they are great against the blind Zergs. You should also consider having them in the first line, as they're very effective even despite the detectors.
Once you get to the second Tendril, don't start fighting for the third [4] - there's a lot of ground units and Spine Crawlers there. Once Zeratul reaches each of it, his health will recover - use this fact. Run with the hero along the edge (without fighting), towards the new marker, avoiding bigger obstacles with Blink.
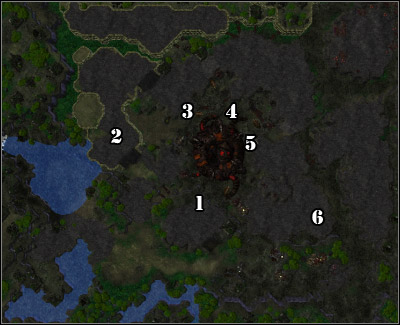
![Now you can choose if you want to continue going right to the last Tendril [5] (risky) or return to your troops and attack the final Tendril from the infected Terran base's side [6] - Echoes of the Future (Achievements) - Campaign - Prophesy missions - StarCraft II: Wings of Liberty - Game Guide and Walkthrough](/starcraftiiwingsofliberty/gfx/word/80456484.jpg)
Now you can choose if you want to continue going right to the last Tendril [5] (risky) or return to your troops and attack the final Tendril from the infected Terran base's side [6]. It's not a big challenge. In this case, once you're nearby the Tendril, you can speed things up by raiding with Zeratul and using his Blink ability.
The quicker method consists of using Zeratul's Blink ability and jumping from one Tendril to the other. Each Tendril replenishes the hero's strength, so why not try? The distances aren't too big, but you probably will have to load a few times.

- StarCraft II: Wings of Liberty Game Guide
- StarCraft 2 Wings of Liberty: Game Guide
- StarCraft 2 Wings of Liberty: Prophesy missions
- StarCraft 2 Wings of Liberty: Whispers of Doom
- StarCraft 2 Wings of Liberty: Whispers of Doom (Achievements)
- StarCraft 2 Wings of Liberty: A Sinister Turn
- StarCraft 2 Wings of Liberty: A Sinister Turn (Achievements)
- StarCraft 2 Wings of Liberty: Echoes of the Future
- StarCraft 2 Wings of Liberty: Echoes of the Future (Achievements)
- StarCraft 2 Wings of Liberty: In Utter Darkness
- StarCraft 2 Wings of Liberty: In Utter Darkness (Achievements)
- StarCraft 2 Wings of Liberty: Prophesy missions
- StarCraft 2 Wings of Liberty: Game Guide
You are not permitted to copy any image, text or info from this page. This site is not associated with and/or endorsed by the developers and the publishers. All logos and images are copyrighted by their respective owners.
Copyright © 2000 - 2026 Webedia Polska SA for gamepressure.com, unofficial game guides, walkthroughs, secrets, game tips, maps & strategies for top games.