ArmA 2 Operation Arrowhead: Mission 6A - Sandstorm - p. 1
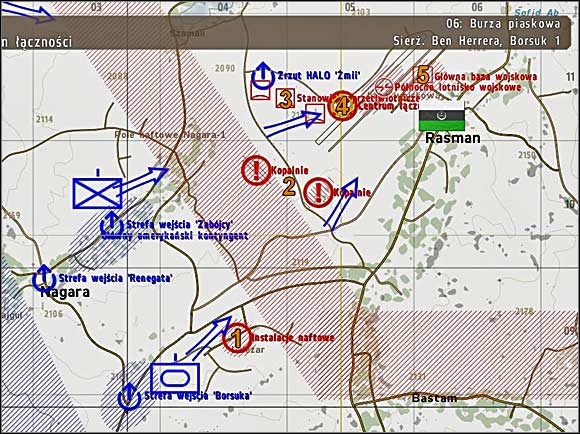
 | Date and place: Friday, June 1, 2012, 22:00, to the SW from Rasman airfield. Mission: A unit of tanks and IFVs (Infantry Fighting Vehicles) leaded by sergeant Ben Herrera (this means - you) has to seize the enemy airfield in Rasman. During the fight you have to destroy comms centre (4) and then strike the main base (5) of the enemy. |
Support: there's artillery support at your disposal and you can also call for ammo, repair and refuel trucks.
Proposed equipment: You, as a commander of this unit and one of its tanks, and your subordinates (tankists), have an access only to standard firearms. Although, you won't be using these rifles here, because you'll inflict coup de grace with your real beasts - tanks and IFVs.
Successive objectives in this scenario:
- Destroy comms centre (4)
- Strike the main base (5)
![[1] - Mission 6A - Sandstorm - p. 1 - Operation Arrowhead - ArmA II: Operation Arrowhead - Game Guide and Walkthrough](/armaiioperationarrowhead/gfx/word/-1597216156.jpg) [1]
| ![[2] - Mission 6A - Sandstorm - p. 1 - Operation Arrowhead - ArmA II: Operation Arrowhead - Game Guide and Walkthrough](/armaiioperationarrowhead/gfx/word/-1597216140.jpg) [2]
|
Before you start your game, it is worth to set the view distance (in options) to at least 3 km. You command your sections of tanks and Infantry Fighting Vehicles (IFVs) in High Command mode (#1). In order to proficiently command your units in this mode it is advisable to play also a respective chapter of the tutorial. In this scenario you have at your disposal: two sections of tanks, with one M1A1 Abrams tank in each section, one section composed of one tank of the same type and one IFV M2 Bradley, and finally one squad of mechanized infantry with one IFV. I suggest keeping this last unit back during the whole gameplay, because it is very vulnerable to enemy fire. If US Army's relationships with neutral, Takistani partisans are good (mainly because of your own efforts), then the grateful guerillas will mark on your map the mine fields located in the vicinity of the airfield. Before you start working on the first, main objective of this scenario (which is to attack the airfield in Rasman), you should secure the nearby oil installations (1), in order to not let the Takistani army to set fire on them.
To do this I'd propose directing all of your tanks to a flat slope located to the right (to E/NE) from the road which is leading towards these installations (1) (#2). For the moment leave your mechanized infantry squad on its current position.
![[3] - Mission 6A - Sandstorm - p. 1 - Operation Arrowhead - ArmA II: Operation Arrowhead - Game Guide and Walkthrough](/armaiioperationarrowhead/gfx/word/-1597216125.jpg) [3]
| ![[4] - Mission 6A - Sandstorm - p. 1 - Operation Arrowhead - ArmA II: Operation Arrowhead - Game Guide and Walkthrough](/armaiioperationarrowhead/gfx/word/-1597216109.jpg) [4]
|
From this flat slope you should have quite a nice view on the surroundings. However, try not to push your own tank too far on this flat slope, in order to avoid presenting too big target for your enemies. To the north from the oil installations (1) and also among these installations you'll see after a while the first enemy units. There are: some infantrymen and a car armed with HMG among the installations (1), and to the north from this location you'll see mainly the Takistani tanks (probably T-55s) and infantry. In skies you may also see enemy (attack) helicopter (#3).
It's best to detect all enemy units by using one of two thermovisual channels of your sight (#4). In the High Command mode there are also red NATO signs appearing over enemy units spotted by friendly forces - these signs specify unit type and size. That's why it's worth to use also the HC mode to locate the enemy - this mode makes this task a little easier.
![[5] - Mission 6A - Sandstorm - p. 1 - Operation Arrowhead - ArmA II: Operation Arrowhead - Game Guide and Walkthrough](/armaiioperationarrowhead/gfx/word/-1597216093.jpg) [5]
| ![[6] - Mission 6A - Sandstorm - p. 1 - Operation Arrowhead - ArmA II: Operation Arrowhead - Game Guide and Walkthrough](/armaiioperationarrowhead/gfx/word/-1597216078.jpg) [6]
|
In this scenario I preferred to switch to gunner's seat and fire personally from tank's cannon and machineguns without trusting the AI. Shooting from the cannon at the hostiles is very enjoyable here. After aiming at the target and reading the distance to it from the rangefinder (numbers are displayed below the cross-hair) you have to make an adjustment of firing by pressing the PageUp and PageDown keys, in order to match (more or less) your distance of shooting (visible in the upper right corner of the screen) with the value taken from the rangefinder. Afterwards you only have to fire - that's the whole philosophy. Use AP shells (sabots) against enemy tanks and coaxial machine gun against hostile infantry. Alternatively you can treat these infantrymen with HE rounds if you see them gathering together in small groups (#5). Though they may spread out again before your loader switches the type of the shell... You can open fire at the enemy off road cars from a remotely operated HMG of the commander of the tank. Generally in this scenario you should save the ammo for tank's cannon and don't waste it on small things.
In order to prevent the enemy from setting the oil installations (1) on fire you have to try to get to them as fast as possible - right after burning the majority of enemy tanks, which are visible on the horizon, or even during the fight with this armored units. I'd suggest sending one or two Abrams on these flat slopes located near the installations (1) in order to let your tanks fire from there not only at enemy tanks but also at the "arsonists" (#6).
- ArmA II: Operation Arrowhead Game Guide
- ArmA 2 Operation Arrowhead: Operation Arrowhead
- ArmA 2 Operation Arrowhead: Mission 1 - Backstab
- ArmA 2 Operation Arrowhead: Mission 2 - Good Morning Takistan - p. 1
- ArmA 2 Operation Arrowhead: Mission 2 - Good Morning Takistan - p. 2
- ArmA 2 Operation Arrowhead: Mission 3 - Pathfinder - p. 1
- ArmA 2 Operation Arrowhead: Mission 3 - Pathfinder - p. 2
- ArmA 2 Operation Arrowhead: Mission 3 - Pathfinder - p. 3
- ArmA 2 Operation Arrowhead: Mission 4 - Coltan Blues - p. 1
- ArmA 2 Operation Arrowhead: Mission 4 - Coltan Blues - p. 2
- ArmA 2 Operation Arrowhead: Mission 5 - Open Season - p. 1
- ArmA 2 Operation Arrowhead: Mission 5 - Open Season - p. 2
- ArmA 2 Operation Arrowhead: Mission 6A - Sandstorm - p. 1
- ArmA 2 Operation Arrowhead: Mission 6A - Sandstorm - p. 2
- ArmA 2 Operation Arrowhead: Mission 6B - From Hell - p. 1
- ArmA 2 Operation Arrowhead: Mission 6B - From Hell - p. 2
- ArmA 2 Operation Arrowhead: Mission 7 - Eye of the Hurricane - p. 1
- ArmA 2 Operation Arrowhead: Mission 7 - Eye of the Hurricane - p. 2
- ArmA 2 Operation Arrowhead: Mission 8A - Finishing Touch
- ArmA 2 Operation Arrowhead: Mission 8B - Operation Phoenix
- ArmA 2 Operation Arrowhead: Mission 9 - The Press Conference
- ArmA 2 Operation Arrowhead: Operation Arrowhead
You are not permitted to copy any image, text or info from this page. This site is not associated with and/or endorsed by the developers and the publishers. All logos and images are copyrighted by their respective owners.
Copyright © 2000 - 2026 Webedia Polska SA for gamepressure.com, unofficial game guides, walkthroughs, secrets, game tips, maps & strategies for top games.