Battlefleet Gothic Armada: Chapter 2 - The Eye of Night
In the course of the game, you have to fight back Chaos fleet at all costs. It is trying to gain advantage by seizing an important artifact. Help Inquisition retrieve the item and fight back the invaders.
- Turn 8: The Eye of Night - Sector Gethsemane
- Turn 9: Seizing the Eye - Sector Gethsemane
- Turn 10: Counter Attack - Sector Gethsemane
Turn 8: The Eye of Night - Sector Gethsemane
Your mission is to render help to ground forces on the planet, by means of bombarding enemy positions from space.
Mission type: Planetary Assault
Opponent: Chaos fleet
Opponent's strength: Randomly generated
Class of ships: Randomly generated
Player's ships: Cruiser + Light cruiser + Inquisition Allied Forces
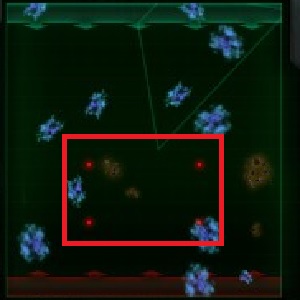
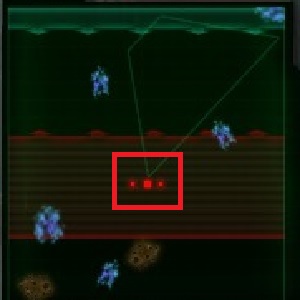
Take a close look at the above minimap. Deployment zones are at both sides of the battlefield. The objects marked in the screenshot are defense platforms that make up the defense system of the planet and they have been seized by the opponent. There is no need for you to destroy them, but try not to move among them. Damage they deal is not too high, but it may quickly damage your ship of you get among them all.
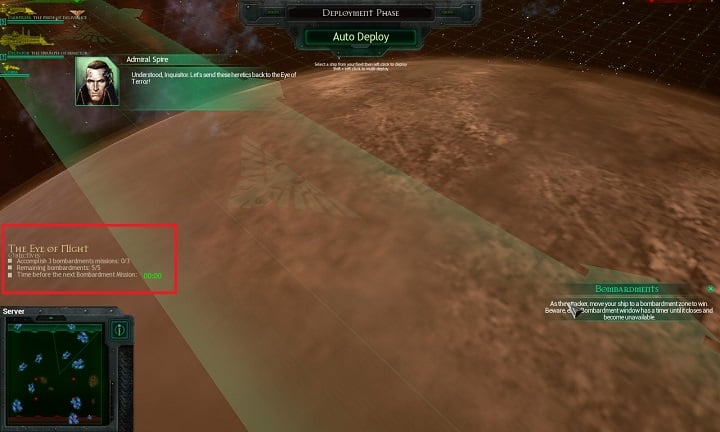
The above screenshot presents mission objectives. In this part of the screen, you can view exact information concerning number of bombing zones. In this mission, there are five such zones and you have to reach, at least, three of them for the mission to be successful. The counter measures time to open the next zone that you have to reach. Remember that the only help can come from a Light cruiser class or higher.
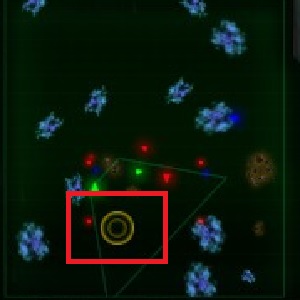
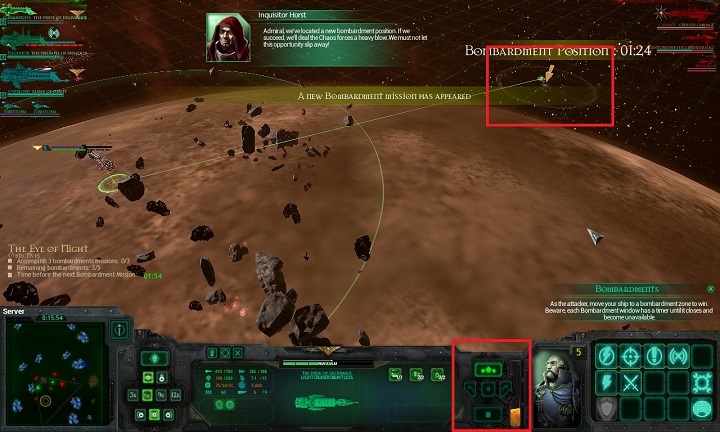
When time elapses, there appears an are on the map, which has to be reached by one of your line ships. Minimap displays it as two gold rings. There can only be one bombing zone active at a time. You only have 90 seconds to reach the zone, starting with the moment at which appears. Locations of points are random for each mission.
Inquisition ships present in the battlefield will not try to reach these zones. Their mission is to provide distraction for your ships, while you are doing your job. Remember to keep your ships in the central part of the map and scatter them. There is no point in commanding them all into one point. Remember that the three-minute time limit is measured even if one of the zones is active. Keep an eye on the counter on the left side of the screen and make sure that you do not use any of your units.
Set the ship in the center of the map to automatic engagement, thanks to which it conducts fire and keeps enemy units occupied. Remember to use combustion and Reload order, thanks to which you can replenish combustion faster. Reach three of the required zones to complete the mission.
Key skills:
Icon | Name and description |
| Disruption Bomb A long range weapon. At the moment of the blast, it removes shields of all targets within range. |
| Plasma Bomb A long range weapon. At the moment of explosion, it deals 100 points of damage, to unit within range, while ignoring enemy shields. The explosion destroys enemy bombs within range. |
| Stasis Bomb A long range weapon. At the moment of explosion, all units within range will be slowed down. |


Turn 9: Seizing the Eye - Sector Gethsemane
Destroy defense systems seized by Chaos.
Mission type: Space Station Assault
Opponent: Chaos fleet
Opponent's strength: Randomly generated throughout the entire mission
Class of ships: Randomly generated
Player's ships: Battle cruiser + Cruiser + 2 x Light cruiser + Inquisition Allied Forces
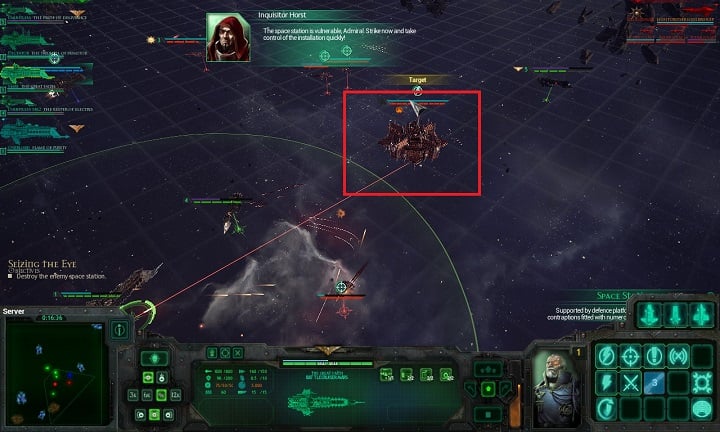
The above screenshot presents locations of objects important for the mission. The space station is supported by two defense platforms. First of all, you have to destroy the small platforms, which enables you then to focus on your main objective. Note the enemy's deployment. Enemy ships dispatched by the platform will keep appearing in this area. They will mainly be support ships, by they will be coming in overwhelming numbers.

As soon as possible, decrease the distance between you and the fortifications. Attack them with all that you have (standard fire, boarding actions, special forces, bombs, Nova Cannons). You should also remember that buildings of this type can perform repairs and block damage for some time. Still, with overwhelming fire you should be able to destroy them. You will be help to a major extent by Inquisition's Warship, but it is you that the success of the mission relies on. Switch into tactical mode often, issue orders, deploy bombs and keep within medium distance of the station.
After you destroy all of the defense platforms, summon all of your units at one point and direct all of your firepower against the building. Use Lock On order to deal critical damage, and deploy bombs. Set engagement to the nearest range, thanks to which you improve accuracy of your units. Also, perform boarding actions on the station. Remember that the station deals really high damage, so you should control integrity of your ships at all times, load shields and perform repairs. After a longer fire exchange, you should be able to destroy the station and complete the mission.
Key skills:
Icon | Name and description |
| Disruption Bomb A long range weapon. At the moment of the blast, it removes shields of all targets within range. |
| Plasma Bomb A long range weapon. At the moment of explosion, it deals 100 points of damage, to unit within range, while ignoring enemy shields. The explosion destroys enemy bombs within range. |
| Stasis Bomb A long range weapon. At the moment of explosion, all units within range will be slowed down. |
| Lock On! Increases effectiveness of attack by 20% and increases chances of critical hit by 100%. Duration: 45 seconds Cooldown: 120 seconds Affiliation: Deck |
| Boarding Assault It can be used only within the range of 90° on each side of the ship. The squad can deal critical damage aboard the ship which depends on the value of the ship. Number of boarding actions during each mission depends on ship's tonnage. Range: 2,500 units Cooldown: 90 seconds Number of actions: depends on ship's tonnage Affiliation: Hull |


Turn 10: Counter Attack - Sector Gethsemane
Defend Horst's ship on its way out of Gethsemane sector.
Mission type: Convoy
Opponent: Chaos fleet
Opponent's strength: Randomly generated
Class of ships: Randomly generated
Player's ships: Battle cruiser + Light cruiser
For this mission, pick two heaviest ships available in your fleet. It is important that you do not have to control multiple units. Two heavy ones will do. The majority of the battlefield is swarming with asteroid clusters, so small ships would be destroyed immediately.
Also, it should be noted that for the first time you are also dealing with a natural phenomenon: Solar Eruptions. As a result, any ship with no shield resources takes 1 point of damage to the hull, per one second of the mission. This holds for your ships, the Inquisitor's ship and the enemy.
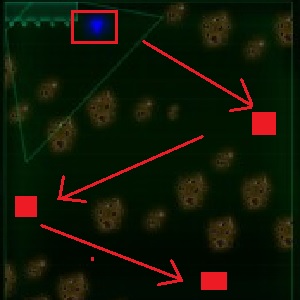
Look at the above map. The zone in which units are deployed is very small and it ends right next to the Inquisition ship. The blue blip on the map is Horst's warship. Arrows have been used to mark the route that the ship will take to get to the other side of the battlefield. Enemy forces will be generated in each of the areas marked with red rectangles.
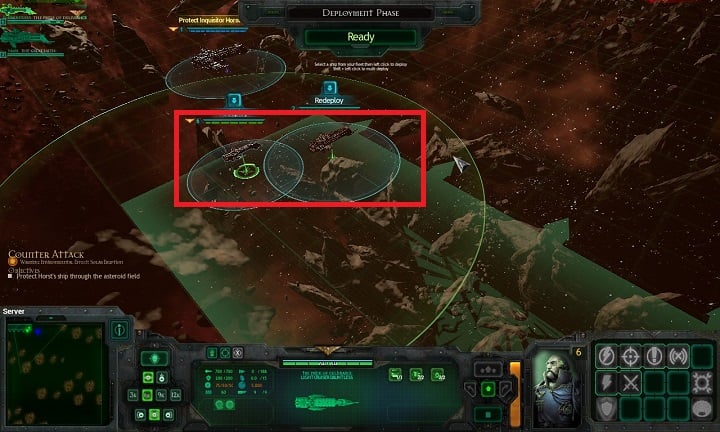
Deploy your forces as close to Horst's ship as possible and try to keep within shot distance. Keep monitoring the direction of your flight and make sure that asteroid clusters do not deplete shields of the ship. Pat attention to the enemy units that appear on the map. The ship you are escorting will fight the enemy, but you have to provide reinforcement.
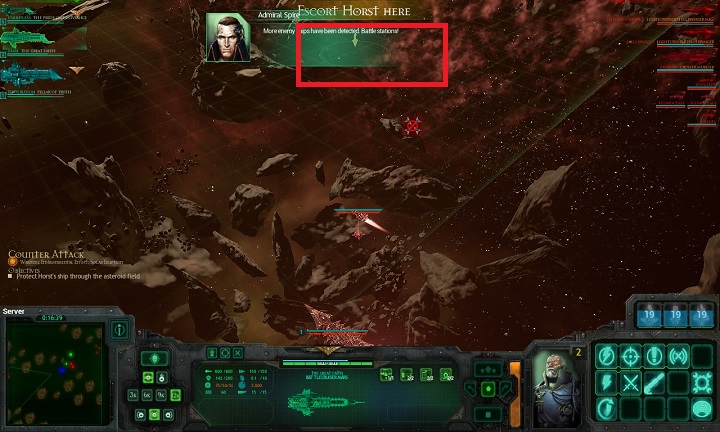
Zones that the ship has to reach will be encircled on the map and they will be provided with descriptions. Each next point generates a larger number of enemy units. Remember to use the entire artillery and to distract the enemy. The slower the Inquisitor is moving, the more units there will be in the battlefield.

After you reach the last point, the Inquisition ship will stop and will start to load warp jump. Provide defense for some time more and enjoy your success.
Key skills:
Icon | Name and description |
| Disruption Bomb A long range weapon. At the moment of the blast, it removes shields of all targets within range. |
| Plasma Bomb A long range weapon. At the moment of explosion, it deals 100 points of damage, to unit within range, while ignoring enemy shields. The explosion destroys enemy bombs within range. |
| Stasis Bomb A long range weapon. At the moment of explosion, all units within range will be slowed down. |


- Battlefleet Gothic: Armada Game Guide
- Battlefleet Gothic Armada: Game Guide
- Battlefleet Gothic Armada: Campaign
- Battlefleet Gothic Armada: Basics
- Battlefleet Gothic Armada: Prologue - Omens of Darkness
- Battlefleet Gothic Armada: Chapter 1 - The Hand of Darkness
- Battlefleet Gothic Armada: Chapter 2 - The Eye of Night
- Battlefleet Gothic Armada: Chapter 3 - Surprise Attack
- Battlefleet Gothic Armada: Chapter 4 - 12th Black Crusade
- Battlefleet Gothic Armada: Chapter 5 - The Empire Resurgent
- Battlefleet Gothic Armada: Special missions
- Battlefleet Gothic Armada: Side missions
- Battlefleet Gothic Armada: Campaign
- Battlefleet Gothic Armada: Game Guide
You are not permitted to copy any image, text or info from this page. This site is not associated with and/or endorsed by the developers and the publishers. All logos and images are copyrighted by their respective owners.
Copyright © 2000 - 2026 Webedia Polska SA for gamepressure.com, unofficial game guides, walkthroughs, secrets, game tips, maps & strategies for top games.