Gears of War 4: Act 3 - 5 - Elevator to Hell
Number of collectibles: 1

Right at the very beginning you will have the opportunity to discover a collectible. After you jump from the ramp head right, and you will see a building with "Controls" written on the wall. Turn left after you enter, and go up the stairs. Find the toilet on the upper floor, where you will acquire another item for your collection.
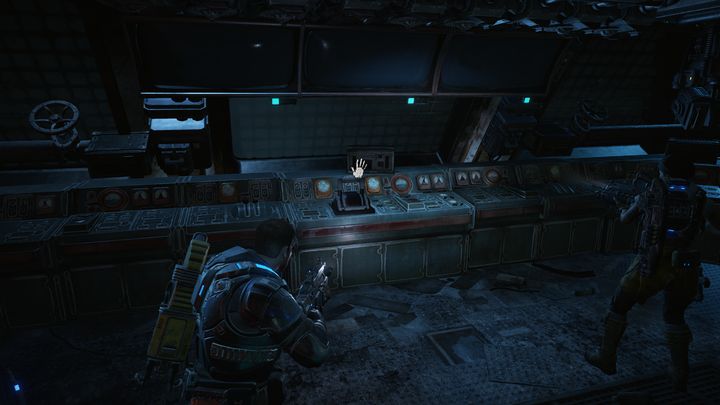
Afterwards, you should head forwards to the control panel, where you must pull the lever. You will have to descend to the lower level, and switch the engines to the reserve fuel supply. You will be attacked right after you approach the console. After you pull the lever the elevator will start descending, so you should head back to the bridge.
Now, you have to fortify your position by using the Fabricator. The first wave will come from the left side, so it is best to place e.g. an automated turret there. Juvies will be the first enemy you encounter, so it is not worth it to use the heavy level 2 turret on them, if you have placed one. It is better to fight them off using traditional methods.
The second wave will be made up of Drones. Here, placing a level 2 turret in the front, and a decoy and two level 1 turrets in the back, is a sound strategy. This way, the enemies will be running straight into the fire of your guns.
The next wave will be much bigger then the two you have defeated earlier. It is worth it to place two additional turrets, a bit further outside, so that they can cover one another, and you should have no issues with repelling this attack.
After the siege is over, you will have to find the machine-room. It is best to simply follow Del. When you enter the machine-room, grab a valve and start turning it. After a while the elevator will start descending again.
There is one more skirmish ahead of you, this time against Pouncers. It is best to fall back and run to the previous platform with the turrets. When this fight is over you will watch a cutscene, and then run to the emergency break.
When you manage to achieve that, another cutscene will pop up, and afterwards, you and your team will be at the bottom of the shaft, where the chapter will end.

- Gears of War 4 Game Guide
- Gears of War 4: Game Guide
- Gears of War 4: Walkthrough
- Gears of War 4: Act 1 - 0 - Prologue
- Gears of War 4: Act 1 - 1 - The Raid
- Gears of War 4: Act 1 - 2 - In and Out
- Gears of War 4: Act 1 - 3 - New Friends
- Gears of War 4: Act 1 - 4 - A Few Snags
- Gears of War 4: Act 2 - 0 - The Prodigal Son
- Gears of War 4: Act 2 - 2 - Geared Up
- Gears of War 4: Act 2 - 3-4 - Plan B, The Great Escape
- Gears of War 4: Act 3 - 1-2 - Almost Midnight, Night Terrors
- Gears of War 4: Act 3 - 3 - At the Doorstep
- Gears of War 4: Act 3 - 4 - Do Not Go Gentle
- Gears of War 4: Act 3 - 5 - Elevator to Hell
- Gears of War 4: Act 3 - 6 - Origins
- Gears of War 4: Act 4 - 1 - The Great Escape
- Gears of War 4: Act 4 - 2 - No Detours
- Gears of War 4: Act 4 - 3 - Knock Knock
- Gears of War 4: Act 4 - 4 - Powerless
- Gears of War 4: Act 4 - 5 - Storm Warning
- Gears of War 4: Act 5 - 1 - Convergence
- Gears of War 4: Act 5 - 2 - Killing Time
- Gears of War 4: Act 5 - 3 - Gate Crashers
- Gears of War 4: Act 5 - 4 - Release
- Gears of War 4: Walkthrough
- Gears of War 4: Game Guide
You are not permitted to copy any image, text or info from this page. This site is not associated with and/or endorsed by the developers and the publishers. All logos and images are copyrighted by their respective owners.
Copyright © 2000 - 2026 Webedia Polska SA for gamepressure.com, unofficial game guides, walkthroughs, secrets, game tips, maps & strategies for top games.