Kingdoms of Amalur Reckoning: The Keening Maps
Table of Contents
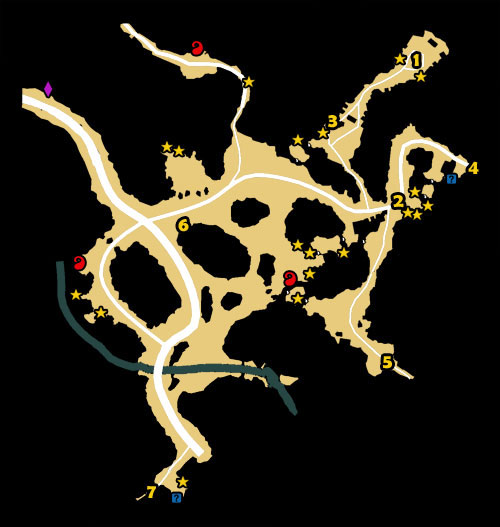
1 - Prismere Chantries
2 - Audra Firan
3 - Jottun Runelord
4 - Ghennig
5 - Fallen Hall
6 - Liordran
7 - Rahnil
- Kingdoms of Amalur: Reckoning Game Guide & Walkthrough
- Kingdoms of Amalur Reckoning: Game Guide
- Kingdoms of Amalur Reckoning: Detyre, Klurikon and Alabastra
- Kingdoms of Amalur Reckoning: Maps Detyre, Klurikon and Alabastra
- Kingdoms of Amalur Reckoning: World maps Detyre, Klurikon and Alabastra
- Kingdoms of Amalur Reckoning: The Red Marches Maps
- Kingdoms of Amalur Reckoning: Alserund Maps
- Kingdoms of Amalur Reckoning: The Hollowlands Maps
- Kingdoms of Amalur Reckoning: Menetyre Maps
- Kingdoms of Amalur Reckoning: Apotyre Maps
- Kingdoms of Amalur Reckoning: Adessa Maps
- Kingdoms of Amalur Reckoning: Cursewood Maps
- Kingdoms of Amalur Reckoning: The Midden Maps
- Kingdoms of Amalur Reckoning: The Keening Maps
- Kingdoms of Amalur Reckoning: Drowned Forest Maps
- Kingdoms of Amalur Reckoning: Caeled Coast Maps
- Kingdoms of Amalur Reckoning: High Fulgen Maps
- Kingdoms of Amalur Reckoning: Shadow Pass Maps
- Kingdoms of Amalur Reckoning: Twilight Pass Maps
- Kingdoms of Amalur Reckoning: Amaura Maps
- Kingdoms of Amalur Reckoning: Maps Detyre, Klurikon and Alabastra
- Kingdoms of Amalur Reckoning: Detyre, Klurikon and Alabastra
- Kingdoms of Amalur Reckoning: Game Guide
You are not permitted to copy any image, text or info from this page. This site is not associated with and/or endorsed by the developers and the publishers. All logos and images are copyrighted by their respective owners.
Copyright © 2000 - 2026 Webedia Polska SA for gamepressure.com, unofficial game guides, walkthroughs, secrets, game tips, maps & strategies for top games.