Resistance 3: Chapter 6 - p. 3
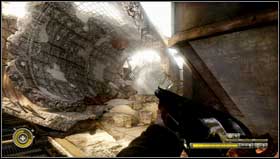
![When you pass the footbridge take the stairs to get to the attic [1] - Chapter 6 - p. 3 - Walkthrough - Resistance 3 - Game Guide and Walkthrough](/resistance3/gfx/word/1851776125.jpg)
When you pass the footbridge take the stairs to get to the attic [1].
 |  |
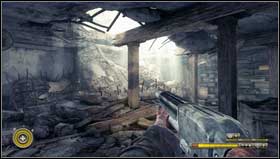
Your goal is to kill all the enemies and get to the other side of the building. Start with the elimination of the Grims which will attack you as soon as you enter the attic. Take a look around, pick up the ammo and get to the other wall. There's the hatchery so take a range weapon (mines, grenades, shotgun, Atomizer) [1]. When you clear the room you'll notice the exit from the building [2].
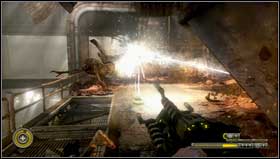
 | ![Before you use it, pay attention to the enemies throwing the burning fragments at you [1] - Chapter 6 - p. 3 - Walkthrough - Resistance 3 - Game Guide and Walkthrough](/resistance3/gfx/word/1851776187.jpg) |
Before you use it, pay attention to the enemies throwing the burning fragments at you [1]. When you eliminate them find the broken platform [2] leading to your opponents.

The hole in the platform is small enough to jump over it, but it is safer to take the metal beam near the bridge. On the other side you'll find the ammo and the Safety Violation [1] note.
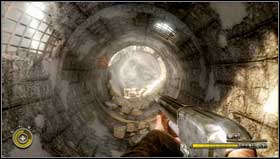 | ![Leave the factory using the concrete tunnel [1] which ends with a crack leading to the small room - Chapter 6 - p. 3 - Walkthrough - Resistance 3 - Game Guide and Walkthrough](/resistance3/gfx/word/1851776234.jpg) |
Leave the factory using the concrete tunnel [1] which ends with a crack leading to the small room. Use the hidden exit door [2].
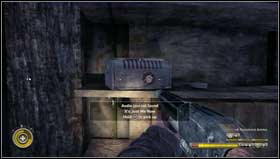 |  |
Now you're in the corridor in the ruined building. At its end go left to get the tape recorder with the It's Just Me Now [1] recording or go right to the room with the hole in the ceiling [2].
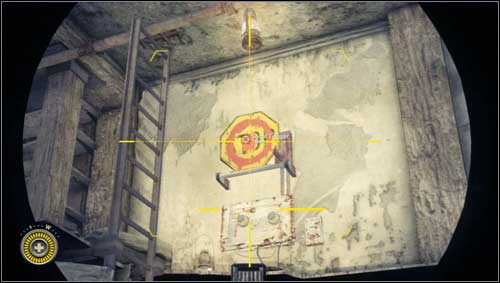
On the right there's a ladder. In a small room there's a hole in the ceiling through which you can see the target [1]. Shoot at it to lower the ladder.

- Resistance 3 Game Guide & Walkthrough
- Resistance 3: Walkthrough
- Resistance 3: Chapter 1
- Resistance 3: Chapter 2
- Resistance 3: Chapter 3
- Resistance 3: Chapter 4
- Resistance 3: Chapter 5 - p. 1
- Resistance 3: Chapter 5 - p. 2
- Resistance 3: Chapter 6 - p. 1
- Resistance 3: Chapter 6 - p. 2
- Resistance 3: Chapter 6 - p. 3
- Resistance 3: Chapter 6 - p. 4
- Resistance 3: Chapter 7 - p. 1
- Resistance 3: Chapter 7 - p. 2
- Resistance 3: Chapter 8
- Resistance 3: Chapter 9 - p. 1
- Resistance 3: Chapter 9 - p. 2
- Resistance 3: Chapter 10 - p. 1
- Resistance 3: Chapter 10 - p. 2
- Resistance 3: Chapter 11 - p. 1
- Resistance 3: Chapter 11 - p. 2
- Resistance 3: Chapter 11 - p. 3
- Resistance 3: Chapter 12 - p. 1
- Resistance 3: Chapter 12 - p. 2
- Resistance 3: Chapter 12 - p. 3
- Resistance 3: Chapter 13
- Resistance 3: Chapter 14
- Resistance 3: Chapter 15 - p. 1
- Resistance 3: Chapter 15 - p. 2
- Resistance 3: Chapter 15 - p. 3
- Resistance 3: Chapter 16 - p. 1
- Resistance 3: Chapter 16 - p. 2
- Resistance 3: Chapter 17 - p. 1
- Resistance 3: Chapter 17 - p. 2
- Resistance 3: Chapter 18 - p. 1
- Resistance 3: Chapter 18 - p. 2
- Resistance 3: Chapter 19 - p. 1
- Resistance 3: Chapter 19 - p. 2
- Resistance 3: Chapter 20
- Resistance 3: Walkthrough
You are not permitted to copy any image, text or info from this page. This site is not associated with and/or endorsed by the developers and the publishers. All logos and images are copyrighted by their respective owners.
Copyright © 2000 - 2026 Webedia Polska SA for gamepressure.com, unofficial game guides, walkthroughs, secrets, game tips, maps & strategies for top games.