WoW Warlords of Draenor: Bloodmaul Slag Mines
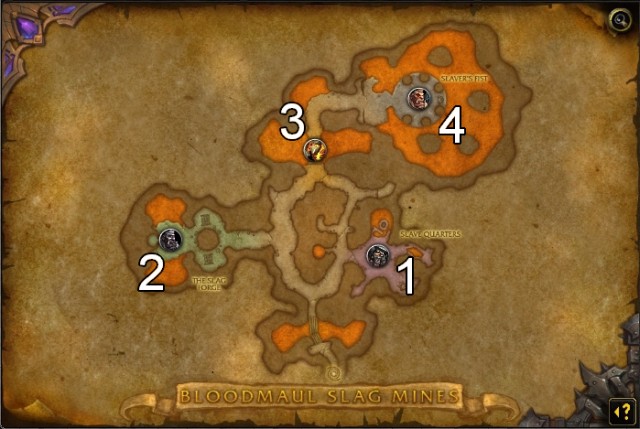
Bloodmaul Slag Mines is the first dungeon available in the Warlords of Draenor. The recommended character level is 90-92, but you can also complete it at level 94. It is best that you did it as quickly as possible, because the dungeon becomes unavailable to you, after you progress to level 95, and you will be able to complete it only after you progress to level 100. During your journey, you will have to defeat 4 bosses. The items that the opponents may drop are at level 530, at the normal difficulty level, and 630, if you complete the dungeon at the Heroic level.
To the north of the Frostfire Ridge, ogres of the Bloodmaul clan opened a mine in the center of the volcanic caves complex. Slaves from all the Draenor are brought to the mine, where they are exploited to the brink of their abilities. The mine provides lots of various ores and precious stones but, the main purpose of the mine is, allegedly, unearthing a powerful artifact inside the volcano.
1. Slave Watcher Crushto
Your first opponent is the Slave Watcher Crushto. He is not too demanding and an opponent, for a good party but, you need to watch out for several things, during the battle. First of all, your tanks should keep the opponent away from the rest of the party. The majority of Crushto's attacks are focused on single targets. During the battle, you should watch out for [Earth Crush], in the random spot of the battlefield, there appears a huge stone spire which, apart from dealing massive AoE damage, immobilizes you for 2 seconds. Fortunately, this attack is signaled beforehand and you simply need to get off the line of attack. Another ability is [Wild Slam]. A shockwave pushes everyone away and deals, around 10k damage. This is often followed by [Crushing Leap], which is aimed at a random part member, who gets crushed and immobilized for 8 seconds.
The greatest responsibility, during this battle, rests on the shoulders of the tank and the healer, the DPS characters should focus on dealing massive damage to Crushto and on casting an AoE spell, occasionally, to kill the summoned miners. The healer should focus on healing the individual party members, especially the tank, and the character that suffered from [Crushing Leap]. If there is something that appears on the ground - steer clear of it as quickly as possible.
2. Forgemaster Gog'duh - Magmolatus

Before you get to your main opponent - Magmolatus, you need to fight your way through dozens of opponents and Gog'duh. Before you enter the forge itself, you will have to eliminate several groups of fire elementals. They are not too demanding opponents, provided that you deal with them in small groups. Players with weak armors should make sure that they do not get too close to the opponents, because they may die quickly.
As soon as you approach the forge itself, it turns out that your main opponent is being held captive by one of the ogres - Forgemaster Gog'duh. You will have to deal with him in the first place. While fighting, he mainly uses AoE spells and summons lots of fire and earth elementals. The attackers should be, predominantly, using AoE spells, the tanks should focus the attention of all the enemies and healer should be using healing spells, over the entire party. After the fight, you should have no problems defeating Gog'duh.
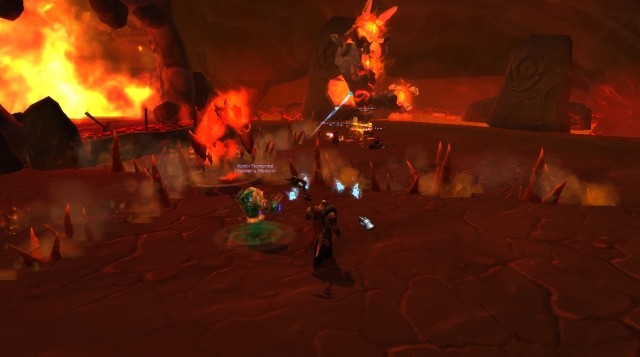
At this point, your main opponent - Magmolatus breaks free. He summons smaller numbers of elementals, but you should kill them as quickly as possible, to prevent getting distracted by them, while avoiding the opponent's attacks. This battle is definitely more eventful. Magmolatus co occasionally throws [Magma Barrage], which is a huge magma projectile. On the ground, you will notice the circle that marks the area, where the projectile drops. Get away from there, as quickly as possible. His other AoE attack is [Shatter Earth], which takes on the form of a cross of spikes from the ground. Each time, it surfaces elsewhere so, you need to be careful. It does to deal too high damage, provided that you get away from there quickly.
3. Roltall
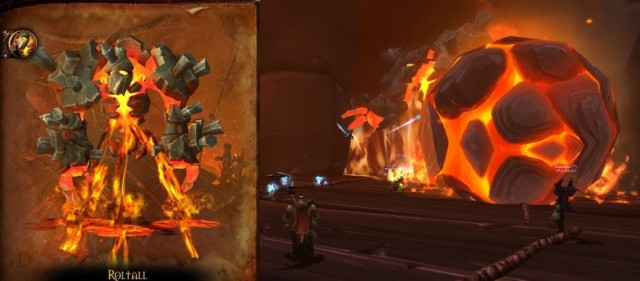
After you defeat Magmolatus a bridge guarded by Roltall will open. He will be accompanied by several groups of ogres, who should be no challenge to you.
Roltall himself is very similar to the previous opponent and you can expect similar attacks. The only difference is the [Fiery Boulder]. It summons three large balls of magma that roll your way. If you are not careful enough, you can easily lose as much as 80k of health. If, however, you learn the attack, you can easily avoid the balls. First of all, always there only are three. As soon as you dodge all of them, you can approach Roltall. The trajectory of the balls is predetermined. One of them is always rolling on the left side of the bridge, one in the middle and one on the right. The only random thing is the order in which they appear so, the combination middle-left-right is a possibility. The best solution is to stand as far away from the opponent as possible, in the middle of the bridge's width, thanks to which you will have enough time to avoid the attack. The remaining part of the battle should not be a problem. One more hint: do not fall off the bridge or you will die.
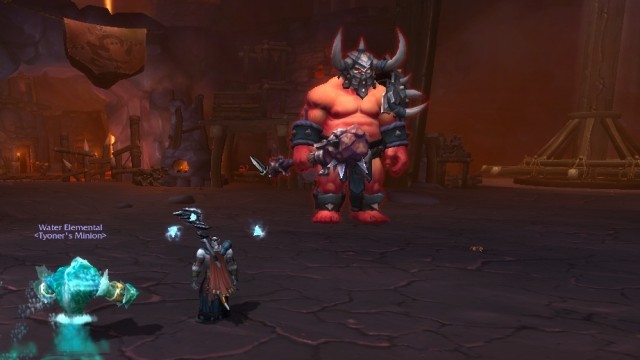
4. Gug'Rokk
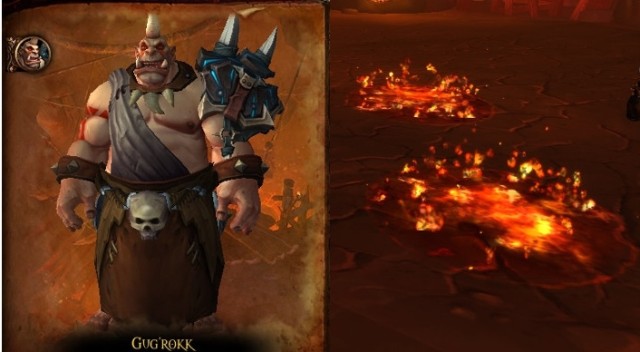
After you cross the bridge and deal with several packs of ogres, you face the boss of the mine - Gug'Rokk. Before fighting him, you should deal with his guards, who form a protective ring. While fighting them, the boss should take no part in the fights, but just in case, it is best to stay away, as far as possible.
Fighting Gug'rokk is similar as in the case of the previous bosses, in many respects, but his attacks are stronger. First of all, you should watch your step, because a large portion of the battlefield is covered with magma and fire. The boss's only attack is [Magma Eruption], which forms a field of magma under each party member and they hold for 2 minutes. You need to step out of the pool, as quickly as possible, because each second costs you 10k health. The Healer should watch out for the [Molten Barrage], which deals around 12k damage to the party members. The final thing that you need to watch out for is the elementals that the boss summons occasionally - Unstable Slags, who head towards the furnace. You need to kill them before they get there, or the party starts taking around 8k damage every three seconds. To sum up, the key to victory is avoiding the pools of magma and fire, and elimination of the elementals before they reach the furnace.

- World of Warcraft: Warlords of Draenor Game Guide
- WoW Warlords of Draenor: Detailed guide
- WoW Warlords of Draenor: Detailed guide to WOW Warlords of Draenor
- WoW Warlords of Draenor: Markings in this guide
- WoW Warlords of Draenor: The garrison
- WoW Warlords of Draenor: The purpose and functions of the garrison
- WoW Warlords of Draenor: Garrison management
- WoW Warlords of Draenor: The suggested order to expand your garrison
- WoW Warlords of Draenor: How to obtain new resources
- WoW Warlords of Draenor: Buildings (big)
- WoW Warlords of Draenor: Buildings (medium)
- WoW Warlords of Draenor: Buildings (small)
- WoW Warlords of Draenor: Miscellaneous buildings
- WoW Warlords of Draenor: Outposts
- WoW Warlords of Draenor: The system of followers
- WoW Warlords of Draenor: Picking and dispatching followers on missions
- WoW Warlords of Draenor: Recruiting new allies
- WoW Warlords of Draenor: Dungeons
- WoW Warlords of Draenor: Bloodmaul Slag Mines
- WoW Warlords of Draenor: Iron Docks
- WoW Warlords of Draenor: Auchindoun
- WoW Warlords of Draenor: Skyreach
- WoW Warlords of Draenor: Grimrail Depot
- WoW Warlords of Draenor: Shadowmoon Burial Grounds
- WoW Warlords of Draenor: The Everbloom
- WoW Warlords of Draenor: Upper Blackrock Spire
- WoW Warlords of Draenor: Mounts
- WoW Warlords of Draenor: Achievement-related mounts
- WoW Warlords of Draenor: Garrison-related mounts
- WoW Warlords of Draenor: Profession-related mounts
- WoW Warlords of Draenor: Reputation-related mounts
- WoW Warlords of Draenor: Mounts that you obtain after you defeat an opponent
- WoW Warlords of Draenor: Mounts that you obtain from PvP duels
- WoW Warlords of Draenor: Remaining mounts
- WoW Warlords of Draenor: Fieldcane Add-ons
- WoW Warlords of Draenor: Curse
- WoW Warlords of Draenor: Garrison Mission Manager + Master Plan
- WoW Warlords of Draenor: HandyNotes
- WoW Warlords of Draenor: Bagnon
- WoW Warlords of Draenor: System requirements
- WoW Warlords of Draenor: Detailed guide
You are not permitted to copy any image, text or info from this page. This site is not associated with and/or endorsed by the developers and the publishers. All logos and images are copyrighted by their respective owners.
Copyright © 2000 - 2026 Webedia Polska SA for gamepressure.com, unofficial game guides, walkthroughs, secrets, game tips, maps & strategies for top games.