Inside: Mirror gauntlet - take it, because you will need it in another secret.
Press the switch on the wall and step back so that the missile wouldn't hit you and the gate (6.2) will open. Don't go thorugh it yet - press the switch again. The gate will start to close slowly and you should make it on time so that they close behind you. It is important to do so, as it will open the passage to a secret (6.3).
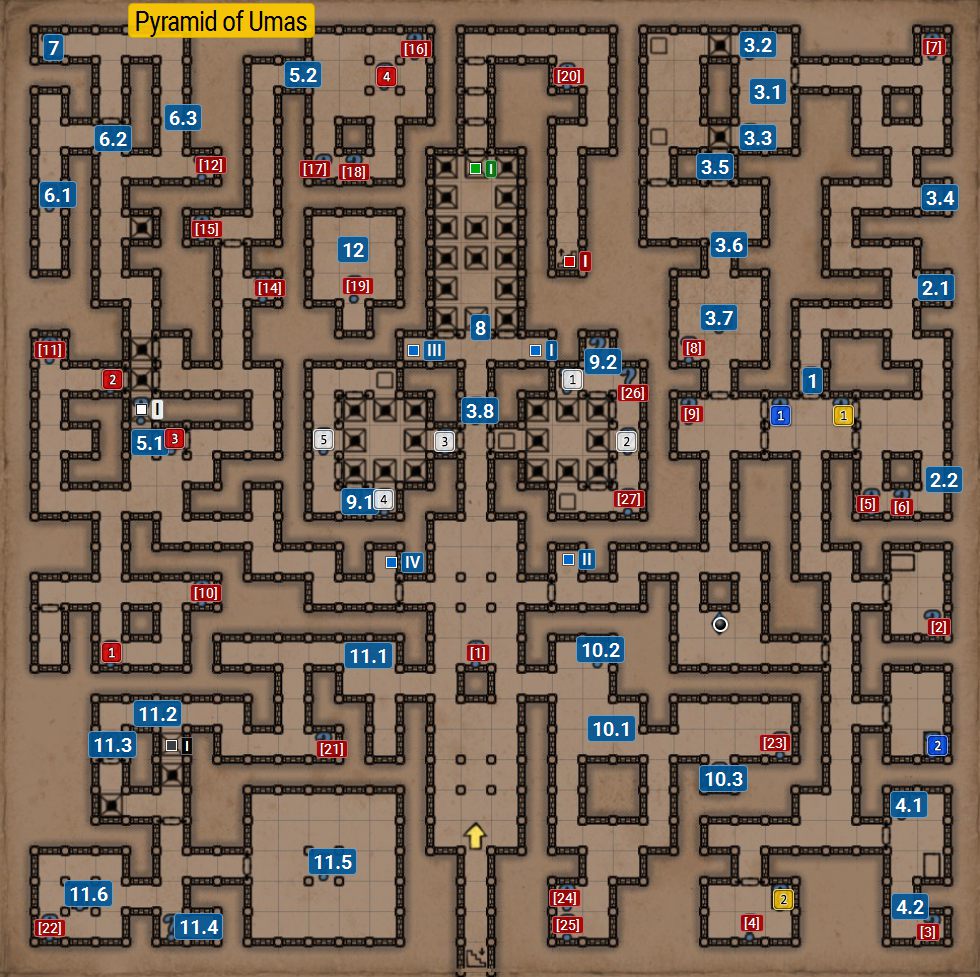
You have to press all the switches on the wall to open the gate. To do that, you have to place items on the appropriate plates in the two othe rooms. The correct plates are marked with grey squares 1-5 on the map.
When you put something on the plates, you will be able to access all the switches.
Legend of Grimrock 2: Pyramid of Umas
Pyramid of Umas lies to the north of the Sleet Islands. In order to get inside you will need to traverse the swamps located on south. After that, go into the Herder's Den - the undergrounds and find the Serpent Staff, which is a reward for solving a riddle with the magic runes and pressure plates. Having the item, approach the door and use one of the staff's ability. The door will open and you will be able to pass through them. On the first floor you will encounter a big snake with an ability to poison your party. These snakes leave the tails after defeating them, you can feed yourself with them. This level is based on finding two keys (3.7) (7) which open adjoining chambers. To unlock the higher floor you will have to solve a riddle (8). A part of the room is locked (10.1) (11.1) but you will be able to enter it later, whilst being in the Tomb of Rites, via hole. In one of the secrets (6) you will find the Mirror Gauntlets. Take them to unlock the secrets on a higher level.
- Legend of Grimrock II Game Guide
- Legend of Grimrock 2: Game Guide
- Legend of Grimrock 2: Walkthrough
- Legend of Grimrock 2: Shipwreck Beach
- Legend of Grimrock 2: Hall of Dead
- Legend of Grimrock 2: Twigroot Forest
- Legend of Grimrock 2: Twigroot Tunnel I
- Legend of Grimrock 2: Twigroot Tunnel II
- Legend of Grimrock 2: Forgotten River
- Legend of Grimrock 2: River Tunnels (The Cache, The Hub, Shrine of Balance)
- Legend of Grimrock 2: Keelbreach Bog
- Legend of Grimrock 2: Herder's Den
- Legend of Grimrock 2: Sleet Island
- Legend of Grimrock 2: Flooded Dungeon
- Legend of Grimrock 2: Cemetery
- Legend of Grimrock 2: Wormbound Dungeon
- Legend of Grimrock 2: Orul's Crypt
- Legend of Grimrock 2: Ruins of Desaure
- Legend of Grimrock 2: Archives
- Legend of Grimrock 2: Lexiconary
- Legend of Grimrock 2: Hamlet of Stormbreach
- Legend of Grimrock 2: Sewers
- Legend of Grimrock 2: Crystal Mine Entrance
- Legend of Grimrock 2: Crystal Mine Core
- Legend of Grimrock 2: Crystal Mine Abyss
- Legend of Grimrock 2: Pyramid of Umas
- Legend of Grimrock 2: Tomb Underground
- Legend of Grimrock 2: Tomb of Rites
- Legend of Grimrock 2: Ceremonial Chamber
- Legend of Grimrock 2: Barren Desert
- Legend of Grimrock 2: Castle Nex
- Legend of Grimrock 2: Library
- Legend of Grimrock 2: Twisted Passage
- Legend of Grimrock 2: Test Chamber
- Legend of Grimrock 2: Void
- Legend of Grimrock 2: Castle Roof
- Legend of Grimrock 2: Trickster's Lair
- Legend of Grimrock 2: Walkthrough
- Legend of Grimrock 2: Game Guide
You are not permitted to copy any image, text or info from this page. This site is not associated with and/or endorsed by the developers and the publishers. All logos and images are copyrighted by their respective owners.
Copyright © 2000 - 2026 Webedia Polska SA for gamepressure.com, unofficial game guides, walkthroughs, secrets, game tips, maps & strategies for top games.
