Uncharted 1: The Bunker - Chapter 18 walkthrough
Last update:
On this page of our guide to Uncharted Drake's Fortune we have prepared a detailed walkthrough of Chapter 18 - The Bunker. The action of this chapter takes place in the title bunker with a moored boat. During the exploration of the bunker, in addition to standard climbing, you must also be ready to fight even more waves of monsters.
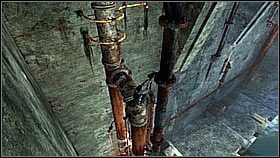 |  |
Drake continued his journey alone. He jumped out the window on the pipe and from it he jumped right to the next one, after climbing a bit higher. He repeated this action with the next pipe on the right. He climbed to the top of it and jumped left to the next element.[1] From there he had to move right and down (after another vertical pipe). At the bottom, he turned the right, and grabbed various objects on the wall.
 | 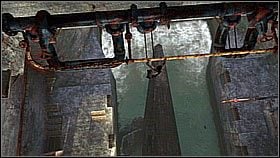 |
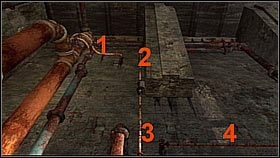
At the end of the next horizontal pipe, he jumped on a chain and then to the right (after swinging on it). He jumped onto a vertical pipe (from the chain) and climbed up to the top. From there he moved to the right(1-4) and jumped onto the platform.[1] From there he jumped onto another pipeline and slowly walked on it to the opposite side of the chasm. Once he got there, he jumped onto the other platform.[2]
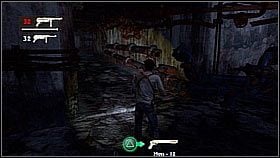 | 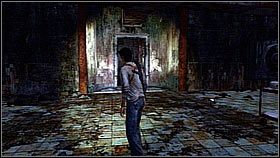 |
He ran into the room and jumped over the chasm. He entered a complex of bunkers and dark corridors. In the first room, he turned right into the path that led down. He reached a larger room and collected the MP40.[1] Now he turned left and at the first crossroads he went right towards the open door. He got into a big room full of weapons. He ran through the room to the another door.[2] As soon as he ran out of the door, two monsters attacked him - he quickly got rid of them.
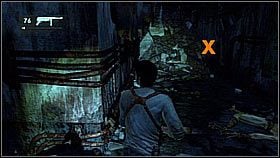 |  |
Once he bypassed the corpses of mysterious beasts, he ran to the end of the corridor - another corpse jumped out from behind the left corner. Drake killed the enemy and turned right. At the end, he confronted more opponents and, more importantly, discovered a treasure. It was lying on the left among the rubble (Gold Monkey Figurine).[1] After collecting the treasure Nathan returned to the main path and ran straight ahead (another creature appeared in the distance). But Nate didn't run to the end, he turned left into another path.[2]

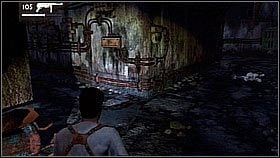
A bit further he turned right (he also slaughtered some monsters). At the end, he entered a larger room with a generator. The machine was standing against the opposite wall. Nate ran up to it and found a lever (roughly in the middle of the machine). He used it.[1]

- Uncharted Drakes Fortune Guide
- Uncharted 1: Game Guide
- Uncharted 1: Walkthrough
- Uncharted 1: Ambushed - Chapter 1 walkthrough
- Uncharted 1: The Search for El Dorado part 1 - Chapter 2 walkthrough
- Uncharted 1: The Search for El Dorado part 2 - Chapter 2 walkthrough
- Uncharted 1: A Surprising Find - Chapter 3 walkthrough
- Uncharted 1: Plane-wrecked part 1 - Chapter 4 walkthrough
- Uncharted 1: Plane-wrecked part 2 - Chapter 4 walkthrough
- Uncharted 1: The Fortress - Chapter 5 walkthrough
- Uncharted 1: Unlocking the Past - Chapter 6 walkthrough
- Uncharted 1: Out of the Frying Pan - Chapter 7 walkthrough
- Uncharted 1: The Drowned City - Chapter 8 walkthrough
- Uncharted 1: To the Tower - Chapter 9 walkthrough
- Uncharted 1: The Customs House - Chapter 10 walkthrough
- Uncharted 1: Trapped - Chapter 11 walkthrough
- Uncharted 1: Heading Upriver - Chapter 12 walkthrough
- Uncharted 1: Sanctuary - Chapter 13 walkthrough
- Uncharted 1: Going Underground - Chapter 14 walkthrough
- Uncharted 1: On the Trail of the Treasure - Chapter 15 walkthrough
- Uncharted 1: The Treasure Vault - Chapter 16 walkthrough
- Uncharted 1: The Heart of the Vault - Chapter 17 walkthrough
- Uncharted 1: The Bunker - Chapter 18 walkthrough
- Uncharted 1: Unwelcome Guests - Chapter 19 walkthrough
- Uncharted 1: Race to the Rescue - Chapter 20 walkthrough
- Uncharted 1: Gold and Bones - Chapter 21 walkthrough
- Uncharted 1: Showdown - Chapter 22 walkthrough, Navarro boss fight
- Uncharted 1: Walkthrough
- Uncharted 1: Game Guide
You are not permitted to copy any image, text or info from this page. This site is not associated with and/or endorsed by the developers and the publishers. All logos and images are copyrighted by their respective owners.
Copyright © 2000 - 2026 Webedia Polska SA for gamepressure.com, unofficial game guides, walkthroughs, secrets, game tips, maps & strategies for top games.