Kane & Lynch Dead Men: Chapter 14 - part 3
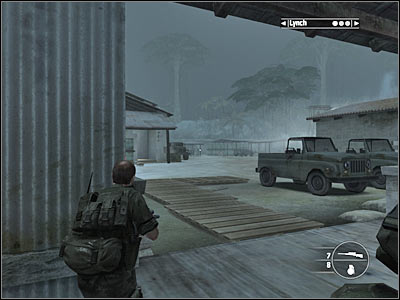
Proceed to the upper level. If you've already secured this area from the top of the hill, you shouldn't encounter enemy units right away. Go ahead by making a few steps forward. I would recommend hiding somewhere to your right (screen), because you will be able to take out additional enemy forces from there.
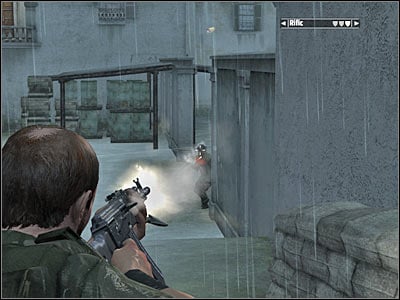
The first group of enemy soldiers is stationed inside the left building, however killing them isn't going to be a problem. Watch out for a second group, though. Enemy soldiers will arrive from the right. Thankfully, if you're using a good cover, you should be able to get rid of them without sustaining major injuries. Conserve the ammunition to your sniper rifle, because you'll have to use this weapon at least one more time.
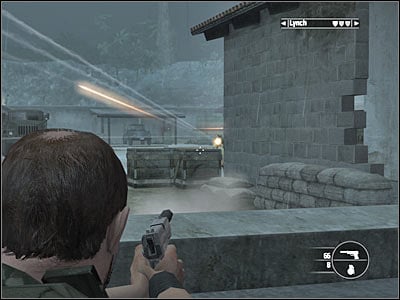
You will probably have to secure the sniper tower, because one of the enemy soldiers may be standing there. The guard tower can be found near the main gate leading to the rear section of the compound (screen). You should also secure the area to your left, however don't move too close to the gate.
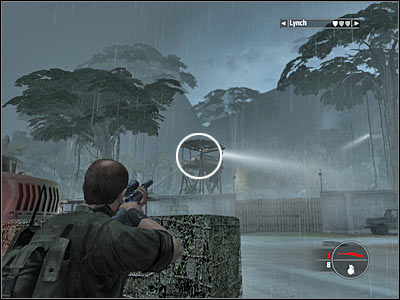
Your current target area is located to your right, however don't go there right away. Start off by ordering your men to stay behind. The route leading to the inner section of the compound is being guarded by an enemy sniper. You will have to use your sniper rifle to kill him (screen). If you don't have any bullets for this weapon, you would have to move closer to him, however this would be quite challenging to accomplish.
Make sure that the sniper has been eliminated. Order your teammates to get here and place them somewhere to your left, near parked vehicles. Don't move them too close to the inner section of the compound. Try making a few steps forward. A small group of soldiers will probably advance towards your position. Kill them without hesitation.
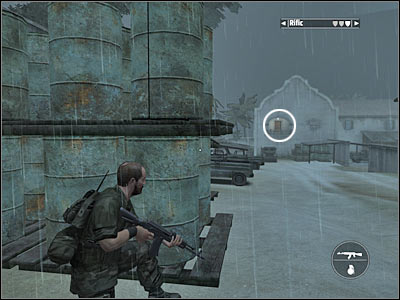
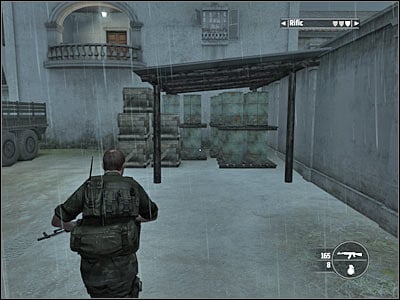
The inner section is probably guarded by at least two active vehicles with machine gun nests mounted on them. I guess you may have some problems neutralizing these threats. I would recommend that you start off by running forward, towards the crates (screen). You could try climbing on top of this structure, however you would be fully exposed to enemy fire. The only exception would be to use all of the remaining bullets to the sniper rifle. You should be carrying an assault rifle at the moment. You'll find a lot of these weapons near fallen enemies.

- Kane & Lynch: Dead Men Game Guide & Walkthrough
- Kane & Lynch Dead Men: Walkthrough
- Kane & Lynch Dead Men: Walkthrough - Chapter 1 - Impact
- Kane & Lynch Dead Men: Chapter 1 - part 1
- Kane & Lynch Dead Men: Chapter 1 - part 2
- Kane & Lynch Dead Men: Chapter 1 - part 3
- Kane & Lynch Dead Men: Chapter 1 - part 4
- Kane & Lynch Dead Men: Chapter 2 - Trial
- Kane & Lynch Dead Men: Chapter 2 - part 1
- Kane & Lynch Dead Men: Chapter 2 - part 2
- Kane & Lynch Dead Men: Chapter 3 - Withdrawal
- Kane & Lynch Dead Men: Chapter 3 - part 1
- Kane & Lynch Dead Men: Chapter 3 - part 2
- Kane & Lynch Dead Men: Chapter 3 - part 3
- Kane & Lynch Dead Men: Chapter 3 - part 4
- Kane & Lynch Dead Men: Chapter 4 - Cracking Up
- Kane & Lynch Dead Men: Chapter 4 - part 1
- Kane & Lynch Dead Men: Chapter 4 - part 2
- Kane & Lynch Dead Men: Chapter 4 - part 3
- Kane & Lynch Dead Men: Chapter 4 - part 4
- Kane & Lynch Dead Men: Chapter 5 - The Mizuki
- Kane & Lynch Dead Men: Chapter 5 - part 1
- Kane & Lynch Dead Men: Chapter 5 - part 2
- Kane & Lynch Dead Men: Chapter 5 - part 3
- Kane & Lynch Dead Men: Chapter 5 - part 4
- Kane & Lynch Dead Men: Chapter 5 - part 5
- Kane & Lynch Dead Men: Chapter 6 - Exchange
- Kane & Lynch Dead Men: Chapter 6 - part 1
- Kane & Lynch Dead Men: Chapter 6 - part 2
- Kane & Lynch Dead Men: Chapter 7 - Reunion
- Kane & Lynch Dead Men: Chapter 7 - part 1
- Kane & Lynch Dead Men: Chapter 7 - part 2
- Kane & Lynch Dead Men: Chapter 8 - Breakout
- Kane & Lynch Dead Men: Chapter 8 - part 1
- Kane & Lynch Dead Men: Chapter 8 - part 2
- Kane & Lynch Dead Men: Chapter 8 - part 3
- Kane & Lynch Dead Men: Chapter 8 - part 4
- Kane & Lynch Dead Men: Chapter 8 - part 5
- Kane & Lynch Dead Men: Chapter 9 - Retomoto Tower
- Kane & Lynch Dead Men: Chapter 9 - part 1
- Kane & Lynch Dead Men: Chapter 9 - part 2
- Kane & Lynch Dead Men: Chapter 10 - Tokyo Streets
- Kane & Lynch Dead Men: Chapter 10 - part 1
- Kane & Lynch Dead Men: Chapter 10 - part 2
- Kane & Lynch Dead Men: Chapter 10 - part 3
- Kane & Lynch Dead Men: Chapter 11 - Freedom Fighters
- Kane & Lynch Dead Men: Chapter 11 - part 1
- Kane & Lynch Dead Men: Chapter 11 - part 2
- Kane & Lynch Dead Men: Chapter 11 - part 3
- Kane & Lynch Dead Men: Chapter 11 - part 4
- Kane & Lynch Dead Men: Chapter 11 - part 5
- Kane & Lynch Dead Men: Chapter 12 - El Capitol
- Kane & Lynch Dead Men: Chapter 12 - part 1
- Kane & Lynch Dead Men: Chapter 12 - part 2
- Kane & Lynch Dead Men: Chapter 12 - part 3
- Kane & Lynch Dead Men: Chapter 12 - part 4
- Kane & Lynch Dead Men: Chapter 13 - Bird's Eye View
- Kane & Lynch Dead Men: Chapter 13 - part 1
- Kane & Lynch Dead Men: Chapter 13 - part 2
- Kane & Lynch Dead Men: Chapter 13 - part 3
- Kane & Lynch Dead Men: Chapter 13 - part 4
- Kane & Lynch Dead Men: Chapter 13 - part 5
- Kane & Lynch Dead Men: Chapter 14 - Within The Walls
- Kane & Lynch Dead Men: Chapter 14 - part 1
- Kane & Lynch Dead Men: Chapter 14 - part 2
- Kane & Lynch Dead Men: Chapter 14 - part 3
- Kane & Lynch Dead Men: Chapter 14 - part 4
- Kane & Lynch Dead Men: Chapter 14 - part 5
- Kane & Lynch Dead Men: Chapter 14 - part 6
- Kane & Lynch Dead Men: Chapter 15 - Choice
- Kane & Lynch Dead Men: Chapter 15 - part 1
- Kane & Lynch Dead Men: Chapter 15 - part 2
- Kane & Lynch Dead Men: Chapter 16 - Consequence
- Kane & Lynch Dead Men: Chapter 16 - part 1
- Kane & Lynch Dead Men: Chapter 16 - part 2
- Kane & Lynch Dead Men: Chapter 16 - part 3
- Kane & Lynch Dead Men: Walkthrough
You are not permitted to copy any image, text or info from this page. This site is not associated with and/or endorsed by the developers and the publishers. All logos and images are copyrighted by their respective owners.
Copyright © 2000 - 2026 Webedia Polska SA for gamepressure.com, unofficial game guides, walkthroughs, secrets, game tips, maps & strategies for top games.