STALKER Shadow of Chernobyl: Agroprom Research Institute Detailed map
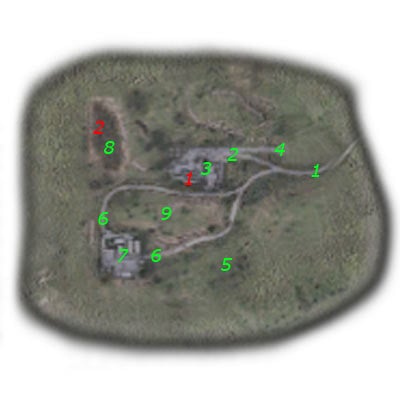
DETAILED MAP OF THIS ZONE - NPC's & IMPORTANT PLACES:
Important NPC characters (red color):
1 - Mole - To be completely honest, this is the only important NPC character of this entire map. You will also encounter other friendly Stalker's, however they won't have anything useful to say to you. Mole will be hiding in one of the largest buildings of the main compound. You will have to kill all bandits in order to be able to talk to him. Once this happens, he will stand up and allow you to ask questions.
2 - Babich - This Stalker will probably tell you the locations of sewer entrances, however you will receive the exact same intel from Mole. As a result, you won't have to pay him a visit, however it is possible. Babich is hiding in the central part of a large polluted lake.
Important places (green color):
1 - You will encounter a single Stalker here. This happens only the first time you enter this zone. The soldier will tell you that someone's attacking the main compound. Enemy soldiers are trying to hunt down Mole. You will have to help them to defend Mole's life. I would recommend that you start following this soldier, so you'll be able to reach one of the entrances.
 |  |
2 - This is the main entrance which leads to the factory. Once again, important things will occur only the first time you visit this spot. You will have an opportunity to watch a short cut-scene. I wouldn't recommend entering the factory from here. It's going to be easier to choose one of the northern or western entrances. You will also find A LOT of interesting artifacts in this area. I think it's fairly obvious that you should pick them up, especially since there aren't many anomalies in this area.
 |  |
3 - This is the largest compound of this map. Mole and his men are stationed here. You can't kill them, but that should be quite obvious. The factory will be attacked from time to time, however you won't have to take part in these battles. I would recommend exploring all rooms.
 |  |
4 - This is the large entrance which leads to a short tunnel. I guess you won't be surprised if I tell you that there are a lot of dangerous and well hidden anomalies inside. You will be dealing mostly with vortex traps. I wouldn't recommend going past this location, because you will find some very precious artifacts here. Pick them up, even if you plan on selling them to the trader.
 |  |
5 - This is where one of the stashes has been hidden. It's very easy to locate this spot, however you must have a good armor at your disposal, because this is a radioactive area.

6 - These roads lead straight to an army base. As a result, you will have to be extremely careful here. Some of the soldiers are patrolling these roads. Additionally, there are snipers in the towers. Thankfully, you will be able to reach the facility by using the sewers. It's all been described in the quest section of this map.
 |  |
7 - Army base. I guess I don't have to remind you to be VERY careful here. Sadly, it's going to be difficult to remain hidden, so you will probably have to secure this area by killing all enemy units. You will also have to remember about reinforcements.
 |  |
8 - This is a very large and highly radioactive lake. Thankfully, you won't have to go explore these regions of this map, however it is possible. You will have to avoid some of the mutants. Radioactive zones are a bigger problems. You should be able to find some artifacts here. Additionally, one of the Stalkers is hiding inside a small building. You might consider talking to him, so you'll receive sewer entrances locations.
 |  |
9 - There's not much to do here, however you will have an opportunity to take a look at the army base. Remember that you won't be hidden here, so you will probably raise the alarm in the base.


You are not permitted to copy any image, text or info from this page. This site is not associated with and/or endorsed by the developers and the publishers. All logos and images are copyrighted by their respective owners.
Copyright © 2000 - 2026 Webedia Polska SA for gamepressure.com, unofficial game guides, walkthroughs, secrets, game tips, maps & strategies for top games.
