
Discharger blueprint - It's in an opened drawer in Bilal's gas station.
Countryside Bane blueprint - Complete the Venom side quest (short conversation with Bilal).
This blueprint is an eastern egg, because the sword you can manufacture looks exactly like the ones from The Legend of Zelda series.
Dying Light The Following: Blueprints
In The Following expansion to the Dying Light, there are tens of completely new blueprints that you can add to your existing collection. The above map has been marked for whereabouts of blueprints, where you need to make sure that you read the description of each one, because you obtain some of them as a reward after a quest. The more difficult ones have been described further in the text. Additionally, at the end of this chapter, you can find a list of blueprints that are not connected with the exploration of the map, e.g. ones that you receive for unlocking new skills or for obtaining Trust points.
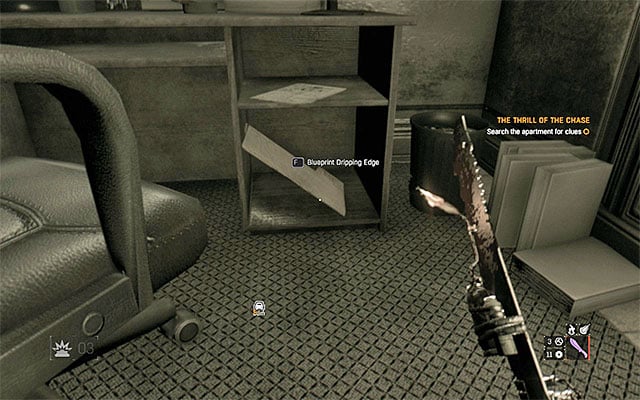
Dripping Edge - You need to gain access to Adam's House in the town (you visit this location during the side quest The Thrill of the Chase connected with finding the Saber). You can make it into Adam's house through the basement of the neighbouring building and after you cross several underground corridors. You find the blueprint in one of the rooms at the upper floor - it is on the bottom shelf of the desk.
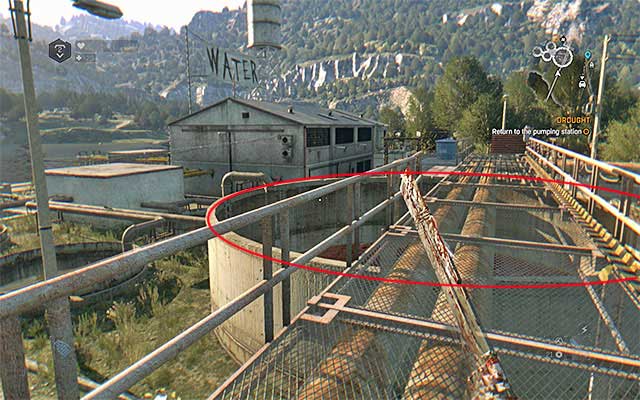
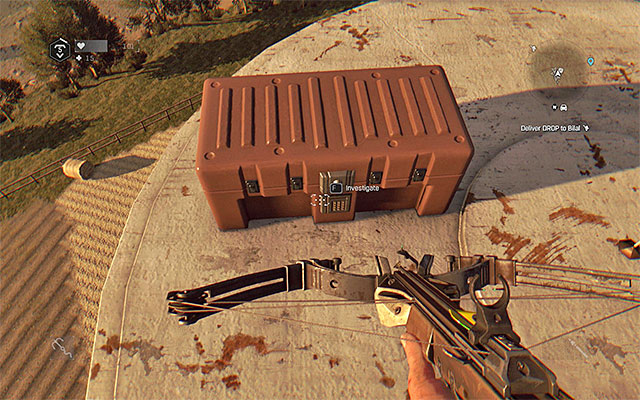
Super Molotov - You can find this blueprint in the pumping station that is a quest location (you visit it during a main and a side quest). Note the huge blood-filled tank marked in the above screenshot (it is in the spot where you have met the bandit leader at the beginning of the game). Dive into the tank. At the bottom, you find a box that you have to open to collect the blueprint.
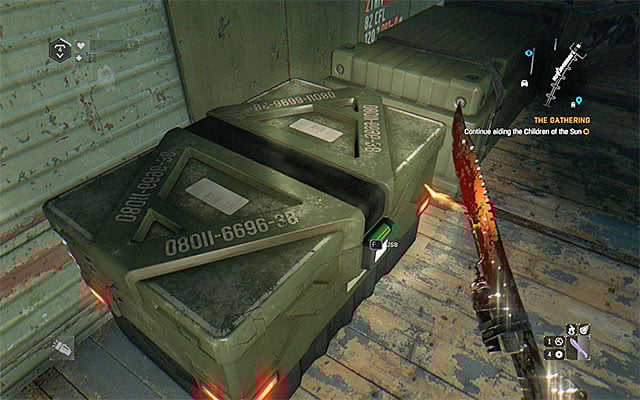
Experimental Military Part - blueprints from this group are found always in the same circumstances, as they are acquired from boxes similar to the ones shown on the above screenshot. Most of those boxes are located inside military outposts, and can lie under the open sky, or be hidden inside train cars. You will need the Military Keycard to open all of them - the card is given to Crane at the end of The Gathering story quest. Each blueprint from this group unlocks access to a new, high-quality part for the buggy (the perfect nitro, or suspension, to name few). If you want to complete challenges and take part in races, you should acquire as many of those blueprints as possible.
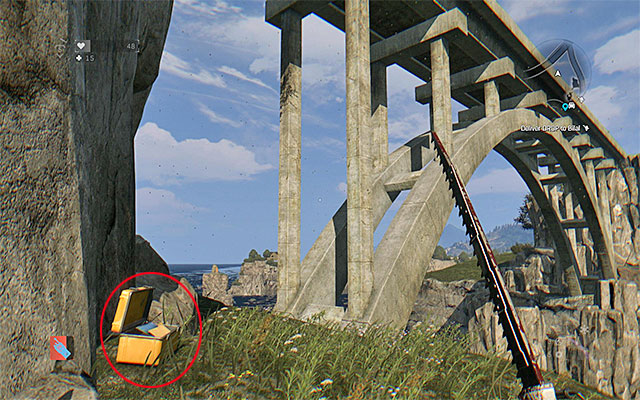
Scorching Summer - This Blueprint can be found inside a yellow box, on a rock shelf shown in the screenshot above. The easiest way to get there is by jumping onto the shelf from the bridge above it (you can use the Grappling Hook).
Origami 101 - You can obtain this Blueprint after climbing the top of a high white tower. When you've done it, open the Mysterious Box shown in the screenshot. To open it, you will need the Hacking Tool from the Rocket Waggoon side quest.
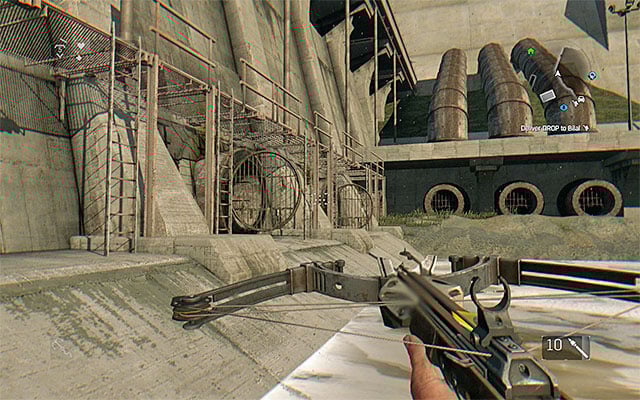
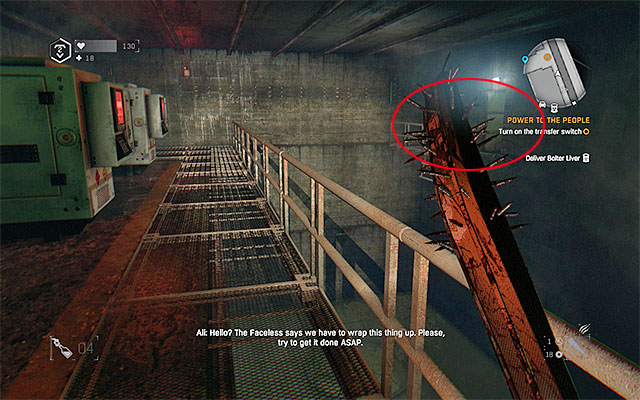
Helluva Homerun - This blueprint has been very well hidden and it is unlikely that you find it during free exploration of the game world. It is in one of the rooms in the sewers under the dam. You explore the sewers, for the first time, during side quest Power to the People (where you have to restore power to safe zones), but you can return here later into the game. In such a situation, find entrances into sewer tunnels by the water, shown in screenshot 1. Take one of them and start your exploration of the sewers. You have to follow corridors and swim underwater a bit. Your destination is the generator room at the upper level, where you have been using the switch in quest Power to the People - it has been shown in screenshot 2. You have to reach the door to the right in this room (take a long jump or use the hook). In the neighboring location, find a white crate with the blueprint in it.
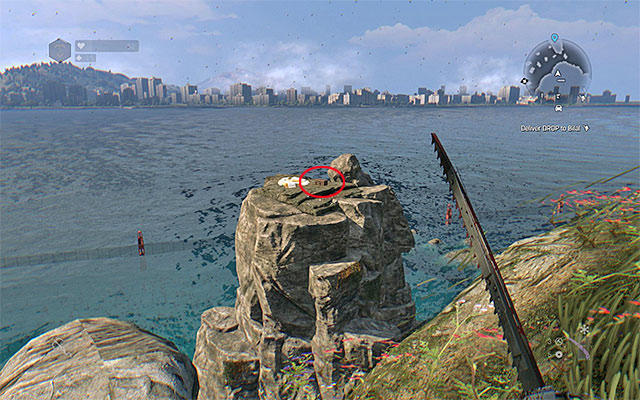
Tolga's Folly - This blueprint is located on a rock island near the cemetery, in the eastern part of the map. The place is shown in the screenshot above. You can reach the shelf by climbing or using the Grappling Hook. After reaching your destination, you will find a Mysterious Box. The only way to open it is to use the Hacking Tool
Note - Tolga's Folly Blueprint allows you to craft The Button - an easter egg that will teleport Crane to random location in the game world. You will find more information about that on the page entitled How to obtain The Button.
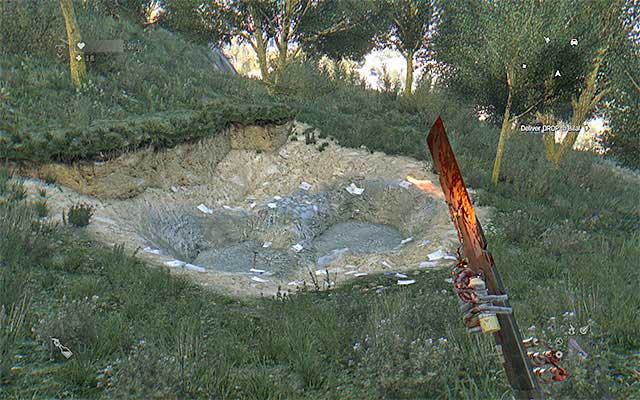
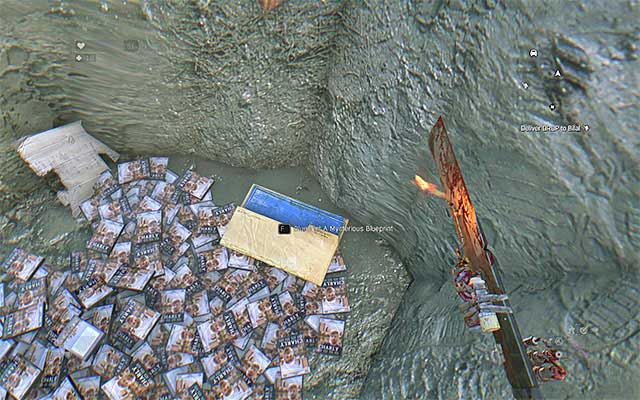
A Mysterious Blueprint - This blueprint is an easter egg and therefore finding it is quite problematic. To find it, you have to find the two holes in the ground, shown in screenshot 1, where DVD movies have been dumped. Jump down into one of them and... start pressing the kick key/button. To get to the bottom, you have to kick around 20 times. If you do not find the blueprint (screenshot 2) in the first hole, jump down into the other one and repeat the action.
The remaining blueprints
Engine Part Lvl. 1 | You need to buy the skill Mechanic Lvl. 1 from Driver tree. |
Turbo Part Lvl. 1 | You need to buy the skill Mechanic Lvl. 1 from Driver tree. |
Suspension Part Lvl. 1 | You need to buy the skill Mechanic Lvl. 1 from Driver tree. |
Traction Part Lvl. 1 | You need to buy the skill Mechanic Lvl. 1 from Driver tree |
Brakes Part Lvl. 1 | You need to buy the skill Mechanic Lvl. 1 from Driver tree |
Engine Part Lvl. 2 | You need to buy the skill Mechanic Lvl. 2 from Driver tree |
Turbo Part Lvl. 2 | You need to buy the skill Mechanic Lvl. 2 from Driver tree |
Suspension Part Lvl. 2 | You need to buy the skill Mechanic Lvl. 2 from Driver tree |
Traction Part Lvl. 2 | You need to buy the skill Mechanic Lvl. 2 from Driver tree |
Brakes Part Lvl. 2 | You need to buy the skill Mechanic Lvl. 2 from Driver tree |
Engine Part Lvl. 3 | You need to buy the skill Mechanic Lvl. 3 from Driver tree |
Turbo Part Lvl. 3 | You need to buy the skill Mechanic Lvl. 3 from Driver tree |
Suspension Part Lvl. 3 | You need to buy the skill Mechanic Lvl. 3 from Driver tree |
Traction Part Lvl. 3 | You need to buy the skill Mechanic Lvl. 3 from Driver tree |
Brakes Part Lvl. 3 | You need to buy the skill Mechanic Lvl. 3 from Driver tree |
Engine Part Lvl. 4 | You need to buy the skill Mechanic Lvl. 4 from Driver tree |
Turbo Part Lvl. 4 | You need to buy the skill Mechanic Lvl. 4 from Driver tree |
Suspension Part Lvl. 4 | You need to buy the skill Mechanic Lvl. 4 from Driver tree |
Traction Part Lvl. 4 | You need to buy the skill Mechanic Lvl. 4 from Driver tree |
Brakes Part Lvl. 4 | You need to buy the skill Mechanic Lvl. 4 from Driver tree |
Engine Part Lvl. 5 | You need to buy the skill Mechanic Lvl. 5 from Driver tree |
Turbo Part Lvl. 5 | You need to buy the skill Mechanic Lvl. 5 from Driver tree |
Suspension Part Lvl. 5 | You need to buy the skill Mechanic Lvl. 5 from Driver tree |
Traction Part Lvl. 5 | You need to buy the skill Mechanic Lvl. 5 from Driver tree |
Brakes Part Lvl. 5 | You need to buy the skill Mechanic Lvl. 5 from Driver tree |
Compound Crossbow | You need to obtain the required number of Trust points to reach the third rank - Newcomer and receive the crossbow from the Acolyte (Faceless). |
Regular Bolt | You need to obtain the required number of Trust points to reach the third rank - Newcomer and receive the crossbow from the Acolyte (Faceless). |
Stun Bolt | You need to obtain the required number of Trust points in order to reach the fourth rank - Ally. |
Toxic Bolt | You need to obtain the required number of Trust points in order to reach the fourth rank - Ally. |
Impact Bolt | You need to obtain the required number of Trust points in order to reach the fourth rank - Ally. |
Land Mine | You need to buy the skill Mine Dispenser in the Driver category, which lets you throw mines while driving |
Upgraded Crossbow | You need to obtain the required number of Trust points (Trust) to reach rank five - Believer. |
North Pole | You need to find Volkan's Backpack during side quest Crash Boom Bang. |

- Dying Light: The Following Game Guide
- Dying Light The Following: Game Guide
- Dying Light The Following: Secrets and Achievements
- Dying Light The Following: Racing Trophies
- Dying Light The Following: Masks
- Dying Light The Following: Notes
- Dying Light The Following: Blueprints
- Dying Light The Following: Paint Jobs and Accessories
- Dying Light The Following: Flags
- Dying Light The Following: How to obtain The Button (easter egg)?
- Dying Light The Following: Achievements / Trophies
- Dying Light The Following: Secrets and Achievements
- Dying Light The Following: Game Guide
You are not permitted to copy any image, text or info from this page. This site is not associated with and/or endorsed by the developers and the publishers. All logos and images are copyrighted by their respective owners.
Copyright © 2000 - 2026 Webedia Polska SA for gamepressure.com, unofficial game guides, walkthroughs, secrets, game tips, maps & strategies for top games.