Batman: Arkham Knight: Infiltrate the tunnel network under Miagani Island
On this page of our game guide to Batman: Arkham Knight we explain how to infiltrate the tunnel network under Miagani Island. The main part of this task is a walk-through combined with the use of various Batman gadgets.
Your next destination is the entrance to the tunnels. It is located in the central part of Miagani Island. Glide towards the entrance and summon the Batmobile when you're near. Now, a rather difficult battle awaits you. You will be facing several dozen enemy tanks. When fighting, avoid staying in one place for too long. To reduce the number of targets that you need to face at one time, you can go to the narrow alleys nearby. This will make it more difficult for the vehicles to reach you.
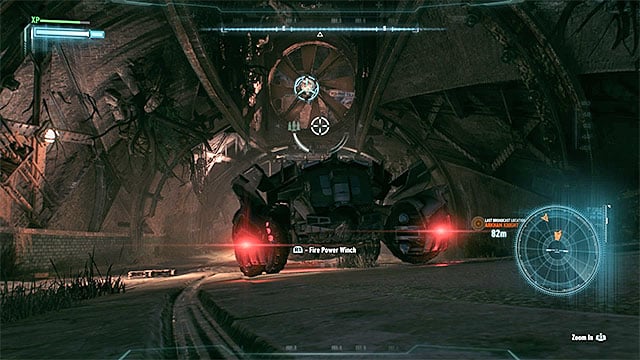
When the battle is over, go back to the place marked by the game, park the Batmobile and go inside the tunnel, when the passage is open. Stop near the first barricade, look up and use the Winch on the large ventilator. Pull it out and use the grapnel to reach the hole.

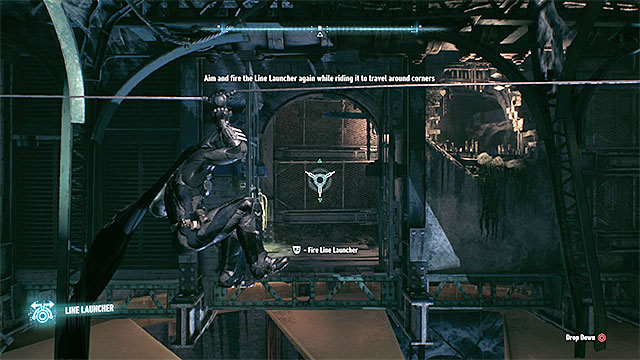
Listen to a conversation with Robin and spread Explosive Gel on the planks nearby unlock the passage. Do the same near the next wall and go inside the ventilation shaft. After reaching a large working ventilator, select Line Launcher in the inventory. Aim at the wall on the other side. Slide on the rope to the shelf that you can see far away
Now it's the first time that you have to use another one of Batman's gadget, the Remote Control Batarang. Use detective mode to locate an interactive switch (behind the fence). The Batarang has to fly through the hole in the wall, located to the right of the switch (control the Batarang as it flies and hold the key/button responsible for decreasing speed if needed).
When you hit the switch with the Batarang, a passage will open. You need to get to it right away using the Line Launcher. Climb onto the shelf and approach the edge. Choose Remote Control Batarang again. This time, you need to send it to a hole in the left wall (it is well visible). Behind the hole, direct the Batarang towards another switch.
Select Line Launcher and aim at the shelf nearby. When the rope reaches the target, immediately press the key/button responsible for slowing down when sliding. Turn the camera to the left and use the Line Launcher again on the wall shown in the picture above. It will change your course 90 degrees.
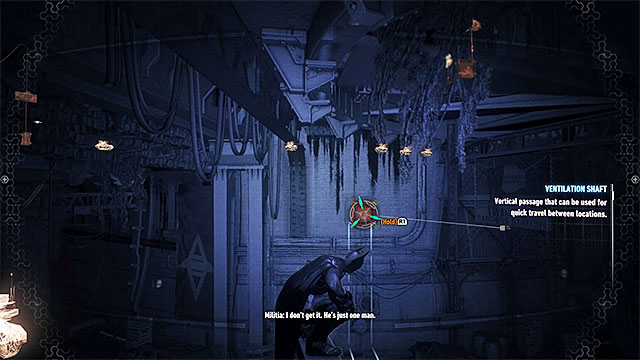
You will reach a large tunnel with a very big group of enemies inside. Don't try to attack them, because they are enemy tanks parked nearby and they would kill you immediately. Instead, start jumping from one vantage point to another and look for a ventilation shaft located very high. Reach it using the grapnel. Start going through the shaft and ignore the enemies. You need to get to the room marked by the game. When trying to leave the shaft, you will be attacked by Arkham Knight (you cannot escape it). Watch the cut-scene.

- Batman: Arkham Knight Game Guide & Walkthrough
- Batman Arkham Knight: Walkthrough
- Batman Arkham Knight: Main story
- Batman: Arkham Knight: Prologue
- Batman: Arkham Knight: Rescue the missing police officer
- Batman: Arkham Knight: Interrogate the driver of the military vehicle
- Batman: Arkham Knight: Investigate Scarecrow's safehouse
- Batman: Arkham Knight: Destroy enemy tanks
- Batman: Arkham Knight: Run Battle Mode weapon energy system diagnostics
- Batman: Arkham Knight: Destroy the squadron of drone tanks
- Batman: Arkham Knight: Take Ivy to the GCPD lockup
- Batman: Arkham Knight: Meet Oracle at the Clock Tower
- Batman: Arkham Knight: Use Panessa Studio antenna
- Batman: Arkham Knight: Use the antenna at the Falcone Shipping Yard
- Batman: Arkham Knight: Rendezvous with Gordon at the ACE Chemicals Plant
- Batman: Arkham Knight: Rescue the missing ACE Chemicals workers
- Batman: Arkham Knight: Open the main ACE Chemicals gate
- Batman: Arkham Knight: Rescue the missing ACE Chemicals workers (continued)
- Batman: Arkham Knight: Destroy Arkham Knight's flying machine
- Batman: Arkham Knight: Stop Scarecrow from blowing up ACE Chemicals
- Batman: Arkham Knight: Flashback - Jim Gordon
- Batman: Arkham Knight: Escape ACE Chemicals
- Batman: Arkham Knight: Meet Gordon outside GCPD Lockup
- Batman: Arkham Knight: Escort Gordon to the Oracle's Watch Tower
- Batman: Arkham Knight: Take out the militia forces guarding the Clock Tower
- Batman: Arkham Knight: Investigate the Clock Tower for clues to help locate Oracle
- Batman: Arkham Knight: Track the Arkham Knight's vehicle using the Forensics Scanner
- Batman: Arkham Knight: Regain control of Mercy Bridge
- Batman: Arkham Knight: Head to Riddler's orphanage to rescue Catwoman
- Batman: Arkham Knight: Track the Arkham Knight's vehicle using the Forensics Scanner (continued)
- Batman: Arkham Knight: Investigate the crash site
- Batman: Arkham Knight: Analyze the Arkham Knight's encryption protocols
- Batman: Arkham Knight: Infiltrate the tunnel network under Miagani Island
- Batman: Arkham Knight: Neutralize the Brutes
- Batman: Arkham Knight: Stop the enemy APC and interrogate the driver
- Batman: Arkham Knight: Rendezvous with Nightwing to get intel on Penguin's whereabouts
- Batman: Arkham Knight: Follow the weapons truck to locate Penguin's hideout
- Batman: Arkham Knight: Access the weapons cache and interrogate Penguin
- Batman: Arkham Knight: Destroy Penguin's weapon cache
- Batman: Arkham Knight: Escape Penguin's ambush
- Batman: Arkham Knight: Find a way to infiltrate the Stagg Enterprises airships
- Batman: Arkham Knight: Infiltrate the first airship
- Batman: Arkham Knight: Destroy the weapon turrets on the second airship
- Batman: Arkham Knight: Infiltrate the second airship
- Batman: Arkham Knight: Find Scarecrow onboard the second airship
- Batman: Arkham Knight: Rescue Oracle from Scarecrow's hideout
- Batman: Arkham Knight: Meet with Ivy at the GCPD Lockup
- Batman: Arkham Knight: Scan the Cobra tank to discover its weakness
- Batman: Arkham Knight: Destroy the Cobra tank
- Batman: Arkham Knight: Take Ivy to the Botanical Gardens
- Batman: Arkham Knight: Use the Batmobile's sonar to locate Ivy's second plant
- Batman: Arkham Knight: Protect Poison Ivy's plant from enemy military forces
- Batman: Arkham Knight: Analyze the Arkham Knight's forces in Panessa Studios
- Batman: Arkham Knight: Glide onto the relay drone and examine it
- Batman: Arkham Knight: Destroy the Arkham Knight's radar network
- Batman: Arkham Knight: Take out the long range missile launcher
- Batman: Arkham Knight: Disable the missile launcher's protective shields
- Batman: Arkham Knight: Return to the Clock Tower to review the Batwing scans
- Batman: Arkham Knight: Stop Harley Quinn from taking the Joker infected
- Batman: Arkham Knight: Apprehend Christina Bell in sound stage B
- Batman: Arkham Knight: Apprehend Albert King in sound stage A
- Batman: Arkham Knight: Apprehend Johnny Charisma in sound stage C
- Batman: Arkham Knight: Stop Harley Quinn from taking the Joker infected (continued)
- Batman: Arkham Knight: Investigate the unusual seismic activity on Miagani Island
- Batman: Arkham Knight: Stop the enemies attacking the Botanical Gardens
- Batman: Arkham Knight: Interrogate Simon Stagg to find a way to defeat the Cloudburst Tank
- Batman: Arkham Knight: Use the Nimbus Power Cell to repair the Batmobile
- Batman: Arkham Knight: Locate and release Ivy's plant on the Founders' Island
- Batman: Arkham Knight: Gain access to the subway network
- Batman: Arkham Knight: Locate and release Ivy's plant on the Founders' Island (continued)
- Batman: Arkham Knight: Protect Poison Ivy and her plants
- Batman: Arkham Knight: Destroy the Cloudburst tank controlled by Arkham Knight
- Batman: Arkham Knight: Investigate the reason for losing contact with Poison Ivy
- Batman: Arkham Knight: Meet with communications specialist in the GCPD
- Batman: Arkham Knight: Find commissioner Gordon in the shopping mall
- Batman: Arkham Knight: Damage the drilling machine controlled by Arkham Knight
- Batman: Arkham Knight: Find commissioner Gordon in the shopping mall (continued)
- Batman: Arkham Knight: Defeat Arkham Knight
- Batman: Arkham Knight: Capture the Scarecrow
- Batman: Arkham Knight: Protect the Oracle
- Batman: Arkham Knight: Stop Scarecrow's men from destroying Oracle's servers
- Batman: Arkham Knight: Defend the Gotham City Police Department
- Batman: Arkham Knight: Check Scarecrow's activity in Panessa Studios
- Batman: Arkham Knight: Surrender to Scarecrow
- Batman: Arkham Knight: Epilogue - Joker
- Batman: Arkham Knight: Additional endings - Knightfall Protocol
- Batman Arkham Knight: Main story
- Batman Arkham Knight: Walkthrough
You are not permitted to copy any image, text or info from this page. This site is not associated with and/or endorsed by the developers and the publishers. All logos and images are copyrighted by their respective owners.
Copyright © 2000 - 2026 Webedia Polska SA for gamepressure.com, unofficial game guides, walkthroughs, secrets, game tips, maps & strategies for top games.