Divinity Original Sin 2: Powerful Awakening
Stage 1: Meistr Siva
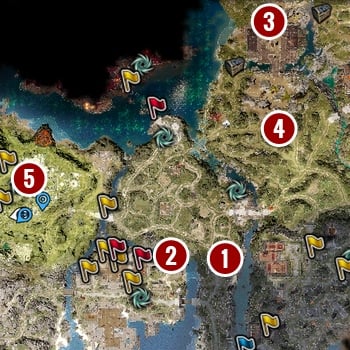
1. Reaper's Coast - Meistr Siva
2. Driftwood -Meistr Siva's house
3. Sawmill - Saheila
4. Reaper's Coast - Elves camp
5. Cloisterwood - Hannag
When you leave Hall Of Echoes, you are asked by Malady to find Meistr Siva.
You can find her hanged near the bridge that leads to Driftwood [1]. When you decide to cut her rope, you will be immediately attacked by magisters guarding her. After the fight, you must speak with Siva. This time, you can find her in her house in Driftwood [2].
During the conversation, she orders you to open a shelter. She will also give you a code to a hatch. In order to see the hatch, you need to remove the picture from the wall and press the button that was behind it.

This reveals the hatch that requires a code given to you by Siva. When you enter the shelter, Siva will inform you that a ritual must be done twice. These rituals will send you back to Hall Of Echoes.
All required ingredients can be found in a wardrobe that is the closest to Source Fountain. In order to get to Hall Of Echoes you need a Source Point and perform the ritual as follows:
- Use Obsidian Lancet and it will turn into Bloody Obsidian Lancet
- Combine Ritual Bowl, Blackroot and Bloody Obsidian Lancet
- This mix must be placed on a grate and then you must turn Incinerator Control Valve
Interact with the newly created hallucinatory cloud. Thanks to that, you are able to go to Hall Of Echoes. There, you must speak with yourself. After the conversation, you will receive Spirit Vision ability. Use this newly acquired ability. It turns out that you are speaking with your god. When the conversation is over you must interact with the hallucinatory cloud and leave Hall Of Echoes.
However, the second ritual requires another portion of Blackroot. This plant can be found near Cloisterwood. Location of one of those plants is presented in the picture below.

The second problem is to have a required amount of Source Points. You need two if you want to enter Hall Of Echoes again. You have to find someone that can teach you how to gather additional Source Points. There are a few characters that can do that.
Choice 1: Saheila
This choice is possible if you didn't kill Saheila in Fort Joy. If you also managed to win over elves then this choice will also allow you to complete The Elven Seer quest.
Saheila is kept by Roost on a floor of the main building in Sawmill [3]. This area is guarded by Roost's people. You can fight them or pay for moving on their lands.
When you reach the floor, you will have to face Roost and his guards which includes two wolves and crossbowmen. After the fight, you must free Saheila and agree to escort her back to elves camp [4]. If you managed to defeat Roost's people before you reached the floor then this is just a formality because there won't be anyone that can stand on your path.
Speak with Saheila when you reach the camp. She will teach you how to gather an additional Source Point.
Choice 2: Hannag
In ruins in Cloisterwood you can meet a group of magisters that want to capture Hannag [5]. If you decide to help her, you will unlock On The Ropes quest (more information about this quest can be found in a separate chapter).
After completing it Hannag decides to teach you to how to gather an additional Source Point. However, if a person that is talking with her has Pet Pal trait then that character will lose it.
Choice 3: Ryker
In Stonegarden, you can find a mansion in which Ryker [6] lives. If you agree to his request and bring him a certain item, you will unlock A Generous Offer quest (more details can be found in the dedicated chapter).
Complete this quest and Ryker will teach you how to gather additional Source Point.
Choice 4: Jahan
A demonologist, called Jahan [7], lives near a downed tree, the one which allows you to avoid going through the troll's bridge. He wants you to kill a demon that lives on Bloodmoon Island. If you agree with him then you will unlock a quest called A Hunter Of Wicked Thing (more details can be found in the dedicated chapter).
When you go back to Jahan and inform him that the demon is dead, he will teach you how to gather additional Source Point.
Choice 5: The Advocate
When you reach Bloodmoon Island, you can meet a demon called The Advocate [8]. He orders you to retake Ancestor Tree which is connected to The Advocate quest (more details can be found in the dedicated chapter). If you agree to help him then he will teach you how to gather an additional Source Point.
After that you must go back to Siva. Be sure that you have enough Source Points and perform a ritual in the same way as you did for the first time. This allows you to go to Hall Of Echoes. There, speak with the god again and this time, you will unlock Source Vampirism ability. You must use it on your god. Use the hallucinatory cloud to leave Hall Of Echoes.
Note: If you get the third Source Point, you need to do ritual once more. Then you will be attack in Hall of Echoes and Meistr Siva will die.
Stage 2: Bloodmoon Island
After performing the necessary rituals, you learn that your mission on Reaper's Coast is now complete. Go on Bloodmoon Island. Speak with The Advocate. Since you reclaimed Ancestor Tree for him, he can now tell you location of your next objective - Nameless Isle. Go back on Lady Vengeance and speak with Malady. She gives you her report on the ship and informs you who didn't return from the island.
If you really want to go to your next objective then you can leave your friends. However, the best option is to go back on the shore and collect everyone. You will have to complete a few additional quests. They include All In The Family from Tarquin and Burying The Past from Gareth. Their descriptions can be found in the dedicated chapters.
- Divinity Original Sin 2 Guide
- Divinity Original Sin 2: Walkthrough
- Divinity Original Sin 2: Chapter 4 - Reaper's Coast
- Divinity Original Sin 2: Quests in Reaper's Coast - Map of quests and quest givers in Reaper's Coast
- Divinity Original Sin 2: Powerful Awakening
- Divinity Original Sin 2: They Shall Not Pass
- Divinity Original Sin 2: Lost And Found
- Divinity Original Sin 2: Hide And Seek
- Divinity Original Sin 2: Red Ink In The Ledger
- Divinity Original Sin 2: Aggressive Takeover
- Divinity Original Sin 2: Business Rivals
- Divinity Original Sin 2: A Trial For All Seasons
- Divinity Original Sin 2: The Elven Seer
- Divinity Original Sin 2: The Wrecked Caravan
- Divinity Original Sin 2: The Missing Magisters
- Divinity Original Sin 2: On The Ropes
- Divinity Original Sin 2: Eithne The Trader
- Divinity Original Sin 2: A Generous Offer
- Divinity Original Sin 2: The Midnight Oil
- Divinity Original Sin 2: The Reluctant Servants
- Divinity Original Sin 2: Shadow Over Driftwood
- Divinity Original Sin 2: A Taste Of Freedom
- Divinity Original Sin 2: Love Has A Price
- Divinity Original Sin 2: Heroes Of The Rest
- Divinity Original Sin 2: Burying The Past
- Divinity Original Sin 2: Counting Your Chicken
- Divinity Original Sin 2: The Three Altars
- Divinity Original Sin 2: The Law Of The Order
- Divinity Original Sin 2: All In The Family
- Divinity Original Sin 2: A Hunter Of Wicked Things
- Divinity Original Sin 2: The Bark's Bite
- Divinity Original Sin 2: The Ugly Little Bird
- Divinity Original Sin 2: The Forgotten And The Damned
- Divinity Original Sin 2: The Silent One
- Divinity Original Sin 2: Bound By Pain
- Divinity Original Sin 2: Delusions of Grandeur
- Divinity Original Sin 2: Strange Cargo
- Divinity Original Sin 2: A Web of Desire
- Divinity Original Sin 2: Opposites Attack
- Divinity Original Sin 2: An Existential Crisis
- Divinity Original Sin 2: A Men And His Dog
- Divinity Original Sin 2: The Dirftwood Arena
- Divinity Original Sin 2: Finder's Fee
- Divinity Original Sin 2: Treated Like Cattle
- Divinity Original Sin 2: Window Of Oportunity
- Divinity Original Sin 2: No Way Out
- Divinity Original Sin 2: A Rare Prey
- Divinity Original Sin 2: Doctor's Orders
- Divinity Original Sin 2: Remaining quests
- Divinity Original Sin 2: Chapter 4 - Reaper's Coast
- Divinity Original Sin 2: Walkthrough
You are not permitted to copy any image, text or info from this page. This site is not associated with and/or endorsed by the developers and the publishers. All logos and images are copyrighted by their respective owners.
Copyright © 2000 - 2026 Webedia Polska SA for gamepressure.com, unofficial game guides, walkthroughs, secrets, game tips, maps & strategies for top games.