Divinity Original Sin 2: The Elven Seer
This quest is only available if you didn't kill Saheila in Fort Joy.
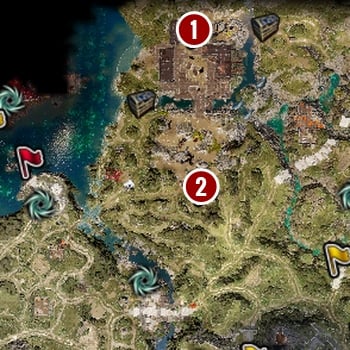
1. Sawmill - Saheila
2. Reaper's Coast - Elves camp
If you managed to convince elves to let you to enter the ritual site then, when they complete it, you will be able to speak with them. You learn that Saheila is kidnapped by Roost and is held captive in Sawmill. If your Persuasion is high enough, you can convince the elves to leave it to you.
Your next goal is to go to Sawmill. Saheila is held captive on a floor of one of the buildings. Most of this area is heavily guarded by Roost's people. Because of that, you will have to break through by using force. The only exception is the moment, when you have Ifan ben-Mezd in your team. In such case, you will be able to freely move around the camp.
Another fight awaits at the floor. This time, you must face Roost and his personal guard which includes two wolves and crossbowmen. Staying inside of a smaller room can make this fight easier. Then, you must free Saheila. She asks you to escort her back to the Elven camp.
Speak with Saheila when you reach the camp. She will teach you how to gather an additional Source Point.
Reward: 4 guaranteed rewards + 1 from 3 that you can choose from depending on character's class
- Divinity Original Sin 2 Guide
- Divinity Original Sin 2: Walkthrough
- Divinity Original Sin 2: Chapter 4 - Reaper's Coast
- Divinity Original Sin 2: Quests in Reaper's Coast - Map of quests and quest givers in Reaper's Coast
- Divinity Original Sin 2: Powerful Awakening
- Divinity Original Sin 2: They Shall Not Pass
- Divinity Original Sin 2: Lost And Found
- Divinity Original Sin 2: Hide And Seek
- Divinity Original Sin 2: Red Ink In The Ledger
- Divinity Original Sin 2: Aggressive Takeover
- Divinity Original Sin 2: Business Rivals
- Divinity Original Sin 2: A Trial For All Seasons
- Divinity Original Sin 2: The Elven Seer
- Divinity Original Sin 2: The Wrecked Caravan
- Divinity Original Sin 2: The Missing Magisters
- Divinity Original Sin 2: On The Ropes
- Divinity Original Sin 2: Eithne The Trader
- Divinity Original Sin 2: A Generous Offer
- Divinity Original Sin 2: The Midnight Oil
- Divinity Original Sin 2: The Reluctant Servants
- Divinity Original Sin 2: Shadow Over Driftwood
- Divinity Original Sin 2: A Taste Of Freedom
- Divinity Original Sin 2: Love Has A Price
- Divinity Original Sin 2: Heroes Of The Rest
- Divinity Original Sin 2: Burying The Past
- Divinity Original Sin 2: Counting Your Chicken
- Divinity Original Sin 2: The Three Altars
- Divinity Original Sin 2: The Law Of The Order
- Divinity Original Sin 2: All In The Family
- Divinity Original Sin 2: A Hunter Of Wicked Things
- Divinity Original Sin 2: The Bark's Bite
- Divinity Original Sin 2: The Ugly Little Bird
- Divinity Original Sin 2: The Forgotten And The Damned
- Divinity Original Sin 2: The Silent One
- Divinity Original Sin 2: Bound By Pain
- Divinity Original Sin 2: Delusions of Grandeur
- Divinity Original Sin 2: Strange Cargo
- Divinity Original Sin 2: A Web of Desire
- Divinity Original Sin 2: Opposites Attack
- Divinity Original Sin 2: An Existential Crisis
- Divinity Original Sin 2: A Men And His Dog
- Divinity Original Sin 2: The Dirftwood Arena
- Divinity Original Sin 2: Finder's Fee
- Divinity Original Sin 2: Treated Like Cattle
- Divinity Original Sin 2: Window Of Oportunity
- Divinity Original Sin 2: No Way Out
- Divinity Original Sin 2: A Rare Prey
- Divinity Original Sin 2: Doctor's Orders
- Divinity Original Sin 2: Remaining quests
- Divinity Original Sin 2: Chapter 4 - Reaper's Coast
- Divinity Original Sin 2: Walkthrough
You are not permitted to copy any image, text or info from this page. This site is not associated with and/or endorsed by the developers and the publishers. All logos and images are copyrighted by their respective owners.
Copyright © 2000 - 2026 Webedia Polska SA for gamepressure.com, unofficial game guides, walkthroughs, secrets, game tips, maps & strategies for top games.