
Pillars Of Eternity 2: Arkemyr's Manor - Map
The map above shows the Arkemyr's Manor. It is one of the largest locations to be explored during your stay in Neketaka in the game Pillars of Eternity 2 Deadfire. Initially, the manor is only associated with a side quest to steal a tablet from its vault, but you can also return to this location later in the game to meet its owner the Archmage Arkemyr. Due to the possibility of encountering high-level enemies, it is best to postpone your visit here for a good time.
- How do I enter the manor?
- Points of interest in Arkemyr's Manor
- Quests unlocked in Arkemyr's Manor
- Quests continued in Arkemyr's Manor
- Important NPCs in Arkemyr's Manor
- Types of opponents and monsters in Arkemyr's Manor
- Other information related to Arkemyr's Manor
How do I enter the manor?
Arkhemyr's manor can be entered from three different points in the Periki's Overlook district. We've presented them below.
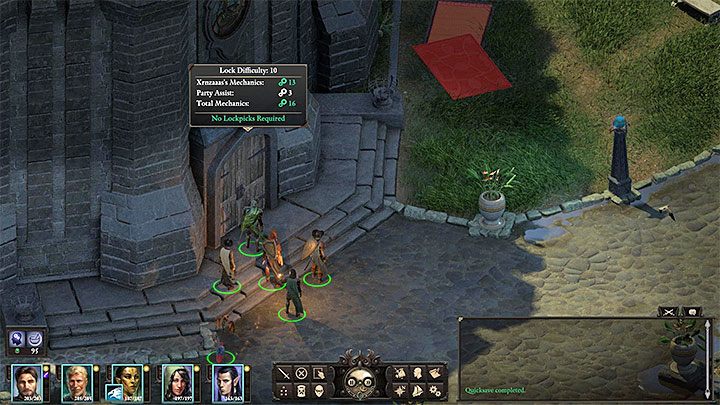
The first method is also the most obvious one, requiring you to simply open the main door of the manor (M15,3). It's a good option if you're in a hurry.
You can open the main door in two ways. The first is to use Mechanics 10 (or slightly lower Mechanics in combination with some lockpicks) to break in. The second way is to complete the side task Velvet Glove, Brass Fist at Fassina's request (M15,4) - the description of this quest can be found on the page Remaining side quests in Neketaka in our guide. In this case, it is essential to raise the issue of the archmage's manor during the first conversation with Fassina and to ask for the key to it in return for doing her a favor. You will then receive it at the completion of the quest. If you don't ask for the key, Fassina will give you some other prize.
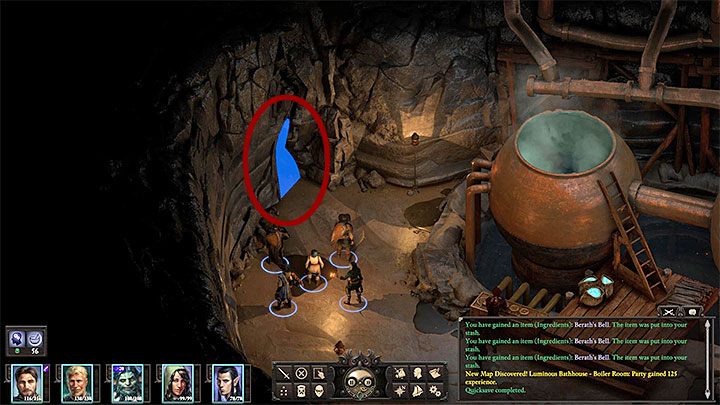
The second method is to use the secret passage in Luminous Bathouse (M15.8). Though, admittedly, it's not a very interesting option. Although you will be able to immediately move to the laboratories in the basement of the manor, there is a risk that an alarm will be triggered if you handle the stone wall improperly (M32,14).
After entering the Luminous Bathouse, use the stairs leading to the boiler room (M24,5). The secret passage is in the place shown on the above picture. You'll have to complete a simple paragraph scene as well.
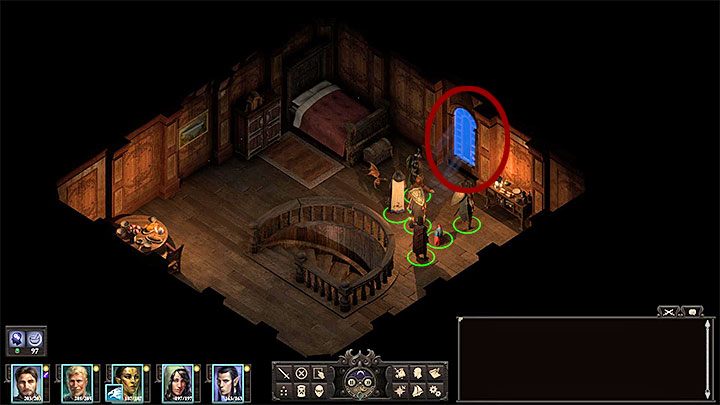
The final, third method is also the best hidden one and concerns attaching a rope on the upper floor of the Dark Cupboard (M15,4). This is the recommended option if you want to rob the manor without getting involved in any fighting.
After entering the Dark Cupboard, you have to use the spiral stairs leading to the first floor. Here, examine the window shutter marked in the picture. A paragraph scene will be triggered, in which you have to use a grappling hook to attach a rope and then pass an Athletics check (fortunately it's rather easy). After a successful action, the party will be placed on the roof of the Arkemyr's Manor (M15.9). You can either enter the building immediately or (which is a better idea) first visit the bedroom (M32,8) and grab Arkemyr's Old Clothes, which will allow you to avoid being detected by imps and constructs (and don't forget to take Arkemyr's Notes from the bedroom and read it in your inventory!).
Points of interest in Arkemyr's Manor
1. The main corridor. You will start exploring the manor here if you've entered the building through the main door (after opening the lock or using Fassina's key in M15.3). At the end of the corridor you'll encounter powerful ironclad constructs (plus some imps). You can either avoid detection or fight them.
4. Arkemyr's Cabinet. Initially, you will only encounter an imp here - you can kill it or ignore it if you're wearing Akremyr's Old Clothes (M32,9).
Arkemyr himself does not appear until after the completion of The Archmage's Vault task. You can then meet him at his request during the Cordial Invitation side quest and receive from him the next task - Bekarna Folly.
In the containers you'll find, among other things, potions, scrolls and books. The most important finding is a note with a combination to the vault (M32,11).
8. The upper floor. There are some small treasures here - some food, water and supplies.
You can talk to the imp called Yellow-Eye Three in the northern room (don't forget to wear Arkemyr's Old Clothes (M32,9)) or you can kill him - in both cases you will get a Translucent Crystal to help you open the vault (M32,11).
There is an exit to the roof of the manor (watch out for the ironclad construct). You can walk across the roof to the north-east and reach Arkemyr's bedroom (M32.9).

9. Arkemyr's Bedroom. It is accessible from the roof - start on the first floor of the manor (M32,8) and go to the roof. Then walk across the roof to the north-east to reach the entrance to the bedroom.
Inside, you'll find a rigged chest with a level 9 lock - it hides, among other things, an excellent scepter and a black pearl. You'll find Arkemyr's Old Clothes (among other things) in the cupboard - you can use them to trick imps and avoid fighting. Open the inventory, select the main character, and place the robes in place of the armor you've been using so far (see example in the picture above). From now on you will not be attacked by imps and constructs as soon as you find yourself in their field of vision. Extra note - you don't need to remove any other pieces of your armor (e.g. headgear). The imps and constructs will also "ignore" the rest of the party while travelling around the manor.
The desk contains Ring of Supervision and Arkemyr's Notes. Be sure to read the notes as they contain the passphrase that will help you talk to the imps - Cider and cheese (you can select it from the list during the conversation).
A secret box with scrolls. A cabinet with a level 8 lock - you will find there, among other things, Boots of Speed.
11. The lock of the vault. You must place the Translucent Crystal you've received from Yellow-Eye Three (M32,8) in the mechanism or pass a Mechanics check (blocking the free slot in an alternative way).
To open the vault you can use the ready combination from the note you've found in Arkemyr's office (M32,4) or you can enter it yourself - diamond, ruby, ruby, sapphire, emerald.
14. A stone wall. You'll start exploring the manor near the stone wall if you have chosen to enter from the boiler room in the Luminous Bathouse (M24,5).
An alarm is mounted here and you can disarm it with the help of Mechanics - if you skip this step or fail the skill check, alarms will be activated in the whole manor.
You can demolish the wall by relying on Might or dismantle it with a chisel and a hammer. This will allow you to enter the main lab area and quickly reach the vault via the northern corridor.

20. The Vault. There are plenty of traps in the treasury - disarm or avoid them. The arrangement of all traps is shown in the picture above.
In the southern container there is the Harapo Epic stone tablet (quest object).
The chest with a level 10 lock - Ninagauth's Teachings and the Cloak of Greater Protection. Chest with level 8 lock - potion and supplies. Chest with level 7 lock - Stone of Power amulet. Unlocked chest - potions and Ivory Wurm Figurine.
A chest with a trap and level 11 lock - jewels and a unique light armor Cabalist's Gambeson.
Quests unlocked in Arkemyr's Manor
[Missions] Bekarna's Folly - You must meet with Arkemyr in his office (M32.4) after completing The Archmage's Vault side quest.
Quests continued in Arkemyr's Manor
[Missions] The Archmage's Vault (M15) - Break into the treasury (M32,20) and steal a Harapo Epic stone tablet.
Important NPCs in Arkemyr's Manor
Arkemyr (M32,4) - You can only meet him after you break into his vault during The Archmage's Vault quest. He'll give you a new quest - Bekarna's Folly.
Yellow-Eye Three (M32,8) - You can talk to this imp only if you haven't fought in the manor. The Arkemyr's Old Robes and Arkemyr's bedroom note (M32,9) are helpful here. The imp can give the hero an Tranclucent Crystal without having to fight for it.
Types of opponents and monsters in Arkemyr's Manor
Imp -They appear in several varieties. They are not very strong, but they come in groups and often in the company of constructs. These creatures are resistant to mind attacks and grounding attacks.
Ironclad Construct -These machines are very durable and inflict large hand-to-hand damage (additionally they have a kind of flame thrower thanks to the Furnace ability - it is worth to increase resistance to this element). First, take care of the accompanying imps and blights and only then attack them one after the other. Constructs are immune to diseases and poisons.
Steelclad Prototype -This is a stronger version of an ironclad construct. In addition to its greater strength and stamina, it can also pull in its victims.
Failed Experiment - It's a unique stronger creature you'll encounter in the garden. It is immune to afflictions of resolve and intellect. It is accompanied by other monsters that are worth taking care of first.
Blight - You'll encounter several types of Blights, including Storm Blight and Fire Blight.
Other information related to Arkemyr's Manor
Before visiting the manor, it is worth waiting for all party members to advance to about 11-12th level of experience. This will guarantee you the ability to keep your heroes alive even in the event of a battle. Interestingly, skirmishes with imps and constructs are not obligatory. You can avoid them by sneaking, choosing the right entrance to the manor and, above all, by putting on Arkemyr's Old Robe found in his bedroom.
In the main vault, apart from the quest-related table, there are also many other treasures that are worth seeing. But there are also plenty of traps, so first slowly examine the place using character(s) that can detect and disarm them.

- Pillars Of Eternity 2 Deadfire Game Guide
- Pillars Of Eternity 2: Walkthrough
- Pillars Of Eternity 2: Neketaka Island
- Pillars Of Eternity 2: Maps Neketaka Island
- Pillars Of Eternity 2: Queen's Berth - Map
- Pillars Of Eternity 2: The Gullet - Map
- Pillars Of Eternity 2: The Brass Citadel - Map
- Pillars Of Eternity 2: The Sacred Stair - Map
- Pillars Of Eternity 2: Periki's Overlook - Map
- Pillars Of Eternity 2: Serpent's Crown - Map
- Pillars Of Eternity 2: Bardatto Estate - Map
- Pillars Of Eternity 2: Vailian Trading Company Headquarters - Map
- Pillars Of Eternity 2: The Wild Mare - Map
- Pillars Of Eternity 2: Delver's Row and Undercroft - Map
- Pillars Of Eternity 2: Old City - Map
- Pillars Of Eternity 2: The Hole - Map
- Pillars Of Eternity 2: Imperial Command - Map
- Pillars Of Eternity 2: Luminous Bathhouse - Map
- Pillars Of Eternity 2: Kahanga Palace - Map
- Pillars Of Eternity 2: The Hanging Sepulchers - Map
- Pillars Of Eternity 2: Arkemyr's Manor - Map
- Pillars Of Eternity 2: Watershapers Guild - Map
- Pillars Of Eternity 2: Maps Neketaka Island
- Pillars Of Eternity 2: Neketaka Island
- Pillars Of Eternity 2: Walkthrough
You are not permitted to copy any image, text or info from this page. This site is not associated with and/or endorsed by the developers and the publishers. All logos and images are copyrighted by their respective owners.
Copyright © 2000 - 2026 Webedia Polska SA for gamepressure.com, unofficial game guides, walkthroughs, secrets, game tips, maps & strategies for top games.