The Witcher 3 Blood and Wine: Scavenger Hunt Grandmaster Feline Gear - diagrams and item statistics
On this page you will find descriptions of all six Grandmaster Feline Gear diagrams - two swords, armor, boots, trousers and gauntlets. You will also find here their requirements and statistics.
During this quest you will find all six diagrams of Grandmaster Feline Gear. You can learn about this quest by encountering grandmaster Zdravko in Beauclair during the Master Master Master Master! side quest (or it can be added to your journal after you find one of the diagrams on your own). The diagrams can be found in any order you want, but it is better to follow the successive steps of this quest. Thanks to that Geralt will not only find new diagrams, but hints about the locations of next parts as well.
- Map of the Feline Witcher Gear diagrams (northern part of Toussaint)
- Armor diagram
- Trousers and boots diagrams
- Steel sword, silver sword and gauntlets diagrams
- Feline school gear statistics
Important - For equipping more parts of this gear simultaneously you can receive bonus:
- Equipping three parts of Feline Witcher Gear - A strong attack increases the damage of further quick attacks for five seconds. The bonus equals 10% per each equipment part.
- Equipping all six parts of Feline Witcher Gear - Back attack deals 50% more damage and it additionally stuns the opponent for the price of adrenaline point/points.
Important - Crafting Grandmaster Feline Witcher Gear will be possible only if Geralt has master objects of this Witcher school. Otherwise you will have to spend additional ingredients on crafting them.
Map of the Feline Witcher Gear diagrams (northern part of Toussaint)
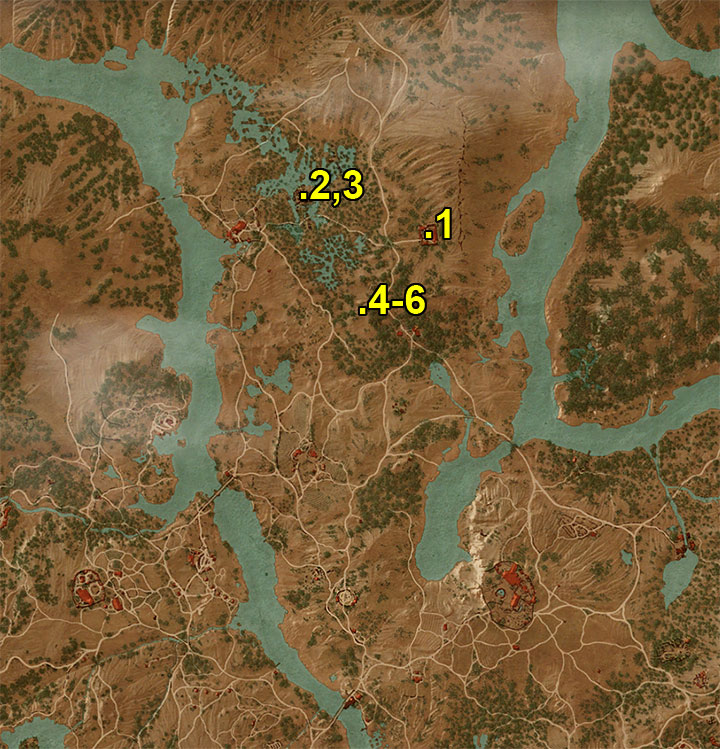
Map markings:
1 - Bartolome de Launay's house - Feline Armor diagram
2, 3 - Ruins of Arthach palace - Feline Trousers and Feline Boots diagrams
4-6 - Pits of Brume - Feline Steel Sword, Feline Silver Sword and Feline Gauntlets
Armor diagram
Go to Bartoleme de Launay's house
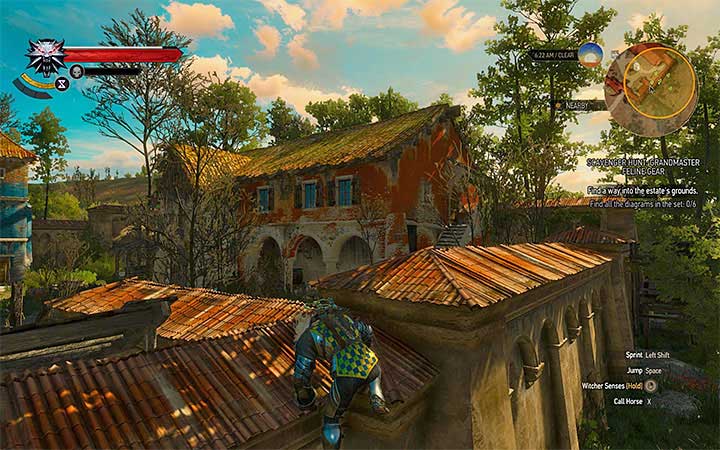
Bartoleme's house is in the northern part of Toussaint duchy, near the Trading Post. Once you reach the destination you will learn that the main gate is closed and that you must find an alternative way in. Go to the right and climb on the wall in the place shown on the above picture.
Search the estate
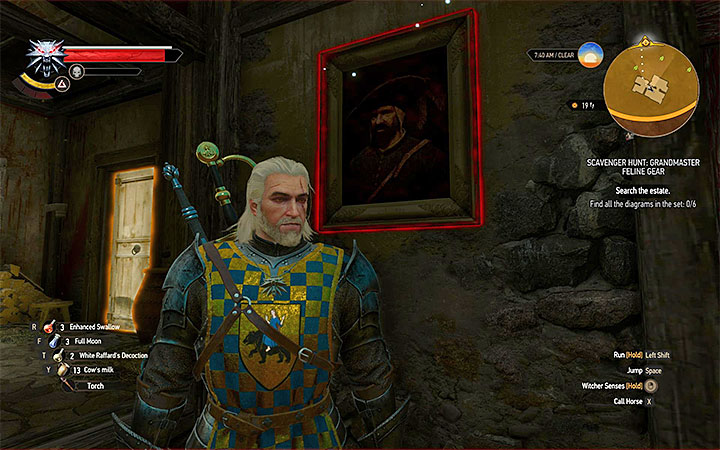
There is a large group of level 40 bandits on the courtyard, you must take them down. Avoid being forced into a corner due to the small size of the area. Once the battle is won, you can speak with the automatically saved Clerk and ask him about the Witcher Gear diagrams. Go towards the smaller building on the left and use Witcher Senses to find an interactive painting. The Diagram: Grandmaster Feline armor and Letter to Bartolome de Launay was hidden there. Read the letter. You can leave the house by finding a sack with the Key to Villa Vedette on the courtyard and using the item on the gate or by climbing on the wall again.
Trousers and boots diagrams
Explore the ruins of Arthach Palace
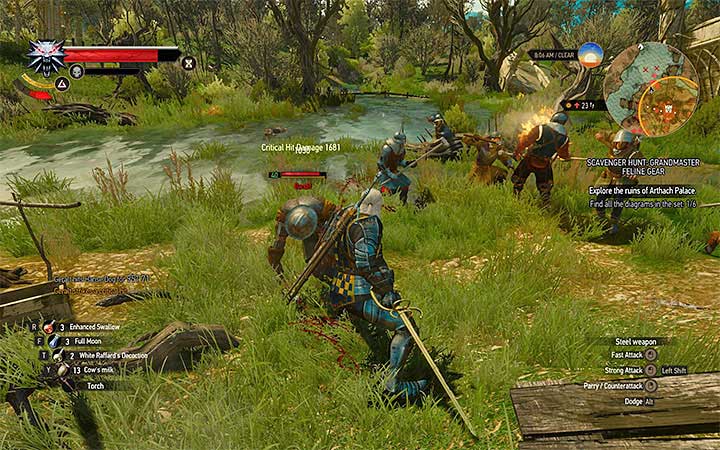
The next location to visit is Arthach Palace Ruins located not far to the northwest from the mansion. The ruins are gang's hideout (one of the points of interest on the map). This means that there is a large group of enemies there. What's more, if you don't want the bandits to call reinforcements from nearby camps, then you must make it impossible for them to reach the bonfires in the northern part of ruins with torches. During the battles you must watch out for the dogs that accompany the bandits. Use Igni or Aard sign to weaken larger groups of enemies.
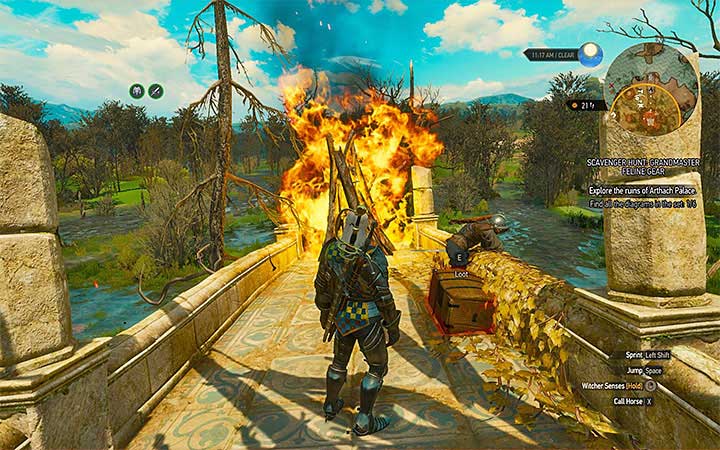
You don't need to secure the whole hideout (kill all bandits and defeat their leader) in order to find the diagrams. The most important thing is to reach to the wall shown on the above picture. The wall is located next to the bonfire used by bandits for alarming their allies. In the chest you will find Diagram: Grandmaster Feline trousers, Diagram: Grandmaster Feline boots and Hanse's leader's notes. Read the notes in order to learn where to search for next diagrams.
Steel sword, silver sword and gauntlets diagrams
Find the entrance to the Pits of Brume
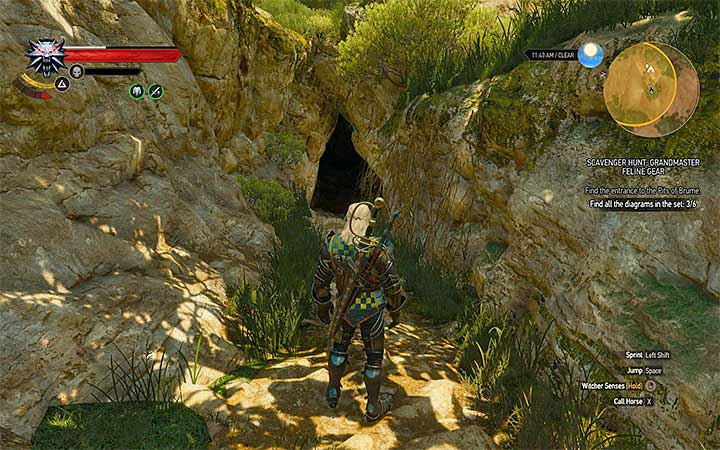
Pits of Brume is a monster nest located not far south from Arthach Palace Ruin. Once you arrive at the destination you must find the entrance to the cave and start exploring it.
Find the hidden diagrams
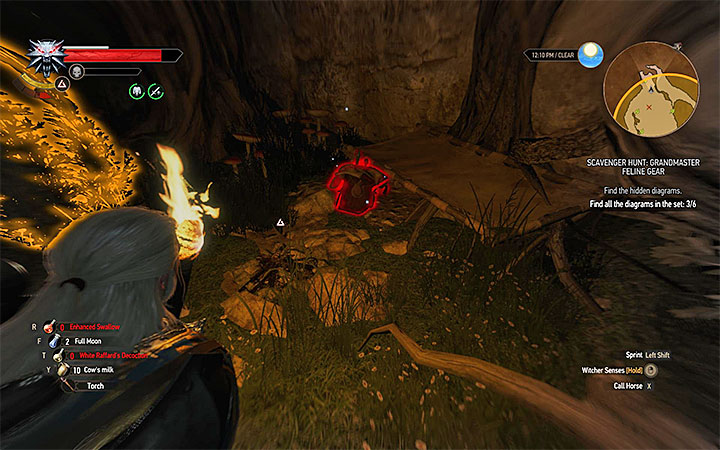
Cave exploration is rather linear. Geralt must reach the largest chamber in which he will be attacked by a few archespores. Cursed oil and Igni sign can be effective in killing these monsters. In addition to that, you should drink the Cat potion which will make it easier to travel through the dark cave. Avoid the poison spit by archespores and attack them only after they take a flower form. Jump away after a few attacks in order to avoid explosion and keep away from "closed" flowers - they will explode if you get too close. After killing all the archespores you can find the bag shown on the picture. Inside it you will find Diagram: Grandmaster Feline steel sword, Diagram: Grandmaster Feline silver sword, Diagram: Grandmaster Feline gauntlets and Lexandre's journal.
Feline school gear statistics
Grandmaster Feline Armor
- Required level: 40
- Required craftsman: Smith, grandmaster
- Required crafting materials: mastercrafted feline armor x1, enhanced draconid leather x2, hardened dimetrium plate x2, monster liver x2, monster heart x2
- Number of slots: 3
- Armor: 240 (light weight armor)
- +22% attack power
- +12% piercing resist
- +17% slashing resist
- +17% resistance to damage dealt by monsters
- +46% elemental resist
Grandmaster Feline Trousers
- Required level: 40
- Required craftsman: Smith, grandmaster
- Required crafting materials: mastercrafted feline trousers x1, enhanced draconid leather x1, hardened dimetrium plate x1, monster tongue x2, monster blood x2
- Number of slots: 2
- Armor: 91 (light weight armor)
- +11% attack power
- +5% piercing resist
- +7% slashing resist
- +7% resistance to damage dealt by monsters
- +16% elemental resist
Grandmaster Feline Boots
- Required level: 40
- Required craftsman: Smith, grandmaster
- Required crafting materials: mastercrafted feline boots x1, enhanced draconid leather x1, hardened dimetrium plate x1, monster bone x2, monster claw x4
- Number of slots: 2
- Armor: 91 (light weight armor)
- +11% attack power
- +5% piercing resist
- +6% slashing resist
- +6% resistance to damage dealt by monsters
- +6% elemental resist
Grandmaster Feline Steel Sword
- Required level: 40
- Required craftsman: Smith, grandmaster
- Required crafting materials: mastercrafted feline steel sword x1, leather scraps x2, hardened dimetrium ingot x2, sapphire x1, monster blood x1
- Number of slots: 3
- Damage: 335-409
- +15% Aard sign intensity
- +10% critical hit chance
- +15% chance to cause bleeding
- +10% chance to dismember
- +5% additional experience for performing a finisher (humans)
Grandmaster Feline Silver Sword
- Required level: 40
- Required craftsman: Smith, grandmaster
- Required crafting materials: mastercrafted feline silver sword x1, leather scraps x2, hardened dimetrium ingot x2, sapphire x1, monster tooth x1
- Number of slots: 3
- Damage: 472-576
- +15% Aard sign intensity
- +10% critical hit chance
- +15% chance to cause bleeding
- +10% chance to dismember
- +20% additional experience for performing a finisher (monsters)
Grandmaster Feline Gauntlets
- Required level: 40
- Required craftsman: Smith, grandmaster
- Required crafting materials: mastercrafted feline gauntlets x1, enhanced draconid leather x1, hardened dimetrium ingot x1, monster bone x2, powdered monster tissue x1
- Number of slots: 2
- Armor: 87 (light weight armor)
- +11% attack power
- +5% piercing resist
- +5% slashing resist
- +5% resistance to damage dealt by monsters
- +6% elemental resist

- The Witcher 3: Blood and Wine Game Guide
- The Witcher 3 Blood and Wine: Game Guide
- The Witcher 3 Blood and Wine: Grandmaster Witcher Gear - quests, diagrams and item statistics
- The Witcher 3 Blood and Wine: New Grandmaster Witcher Gear - basic information
- The Witcher 3 Blood and Wine: Scavenger Hunt Grandmaster Manticore Gear - diagrams and item statistics
- The Witcher 3 Blood and Wine: Scavenger Hunt Grandmaster Wolven Gear - diagrams and item statistics
- The Witcher 3 Blood and Wine: Scavenger Hunt Grandmaster Feline Gear - diagrams and item statistics
- The Witcher 3 Blood and Wine: Scavenger Hunt Grandmaster Griffin Gear - diagrams and item statistics
- The Witcher 3 Blood and Wine: Scavenger Hunt Grandmaster Ursine Gear - diagrams and item statistics
- The Witcher 3 Blood and Wine: Grandmaster Witcher Gear - quests, diagrams and item statistics
- The Witcher 3 Blood and Wine: Game Guide
You are not permitted to copy any image, text or info from this page. This site is not associated with and/or endorsed by the developers and the publishers. All logos and images are copyrighted by their respective owners.
Copyright © 2000 - 2026 Webedia Polska SA for gamepressure.com, unofficial game guides, walkthroughs, secrets, game tips, maps & strategies for top games.