The Witcher 3 Blood and Wine: Side quests and Witcher contracts opponents
This chapter contains walkthroughs for boss battles from side quests and Witcher contracts. Among these enemies there are grottore, monster of tufo, silver basilisk and Witch of Lynx Crag.
Below you will find advices related to most important battles with strong enemies and monsters encountered during the side quests and Witcher contracts. The descriptions contain suggested tactics and will inform you about the weaknesses of the enemies.
- Gregoire de Gorgon
- Grottore
- Griffin
- Maestro
- Monster of Tufo - shaelmaar
- Slyzards
- Living Statues
- Hermit
- Silver basilisk Iocaste
- Daphne wraith
- Witch of Lynx Crag
Gregoire de Gorgon
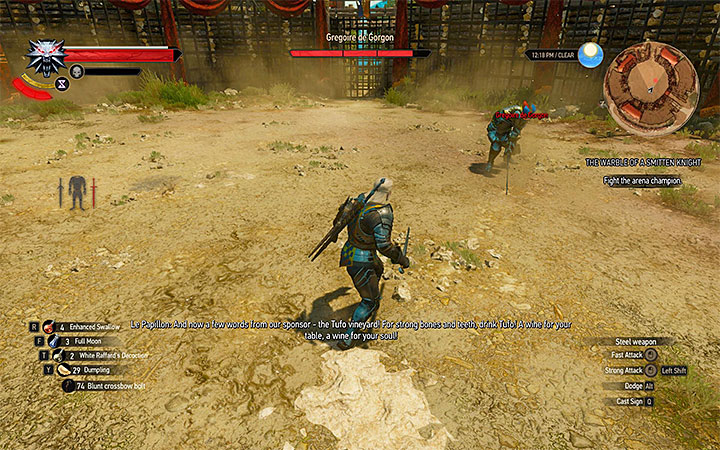
Gregoire de Gorgon is one of best knights in Toussaint and you can be forced to defeat him during the side quest The Warble of a Smitten Knight. The battle with Gregoire takes place in the finale of the tourney. To get there you must manage well in previous competitions and you cannot retreat from the tourney too early.
The most important information related to this duel is that Geralt cannot use Witcher signs or bombs. You must depend only on sword attacks. Gregoire is using a powerful, two-handed sword and all of his attacks are rather slow. It is best to wait for his attacks to miss and then run towards him and perform attacks of your own. If you watch yourself then Geralt can win the duel without losing health. If not, then using healing items is allowed during the duel. Defeating Gregoire will equal winning the whole tourney.
Grottore
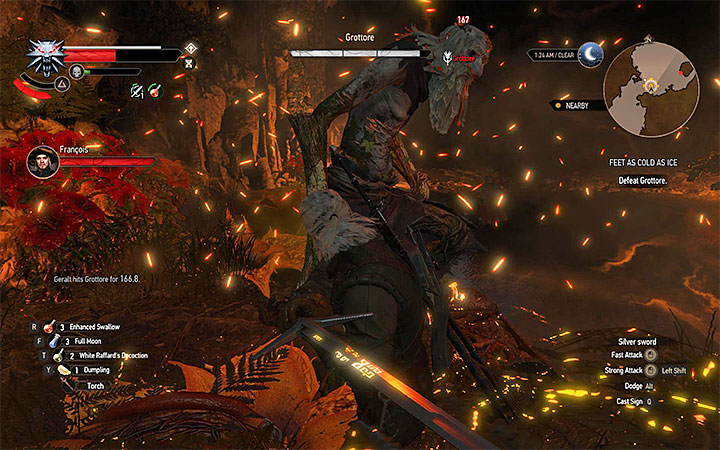
Defeating Grottore is the most important part of Feet as Cold As Ice Witcher Contract.
Before you start the battle with Grottore, try using relic oil on your silver sword. Additionally, check if Geralt has some dimeritium bombs and set Igni as the active Witcher Sign. Grottore is able to perform attacks with his long limbs (on medium and long distance) and he can quickly move from place to place. Attack him between his actions and whenever it is possible use the mentioned bomb and Igni.
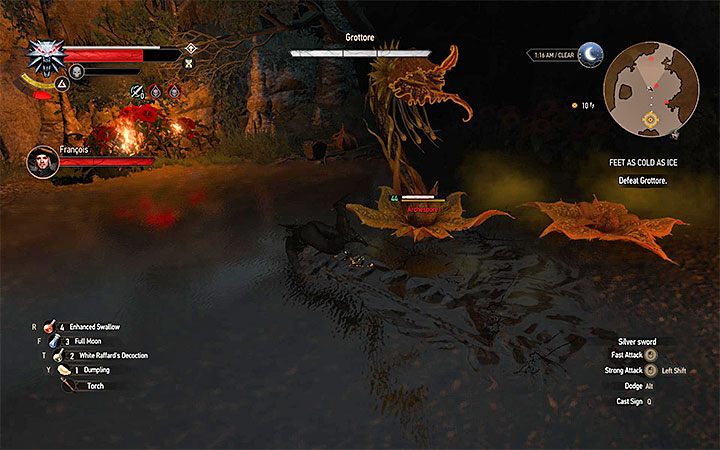
After some time archespores will join the fight. You must think how to behave when that happens. If you play on one of the lower difficulties, you can ignore them since the battle will end automatically once you kill the Grottore. On higher difficulties the duel takes longer and you should take care of archespores. As a reminder: attack the archespores only when they are looking like open flower and help yourself with Igni sign. When their flower is closed, keep away so that you won't receive damage when the flower explodes.
Griffin
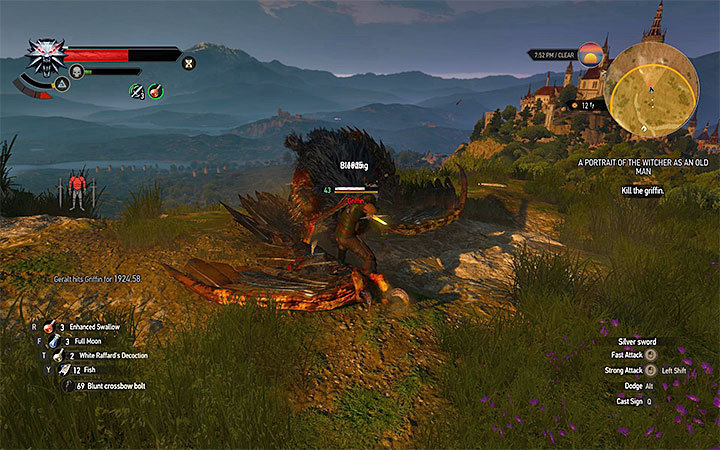
The battle with Griffin takes place in the final part of A Picture of the Witcher as an Old Man side quests in which Geralt has a painting of him created. The griffin will interrupt the process of creating the painting and Geralt will have to deal with the monster.
Before starting the duel with the flying beast, put hybrid oil on Geralt's sword. Once the fights start, act similarly as when fighting griffin at the beginning of the basic game. Use crossbow or Aard sign to take the griffin to the ground. Once the beast falls down, attack it a few times before it regains strength. Don't worry about the painter - the beast won't be interested in him.
Maestro
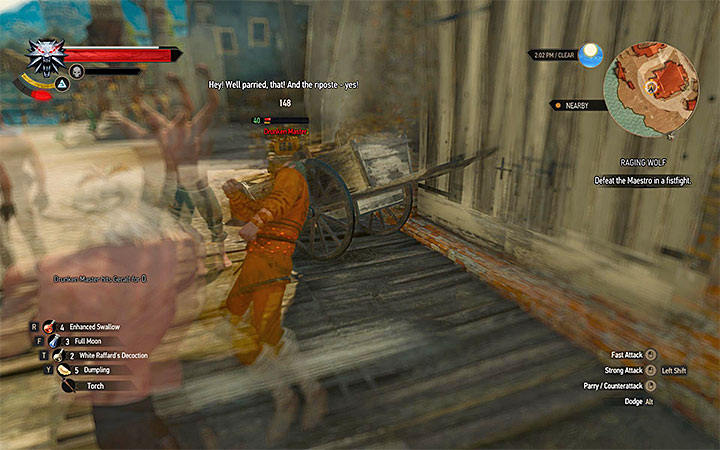
The duel with Maestro takes place after you unlock the side quest Raging Fist. As the title of the quest suggests, it is a fist fight which takes place in port in Beauclair.
Don't try participating in the duel if you haven't reached at least 40 experience level. After the battle with the drunken master starts you will have to deal some screen distortions (Geralt will drink alcohol before the fight). Focus on perfectly parrying attacks of master (pressing the block button when he attacks). This will get his off balance and will allow you to perform a few attacks. Don't let the enemy attacks to succeed because Geralt can lose all health very quickly even if he started the battle with a very high experience level. Repeat the steps described above until you defeat the master.
Monster of Tufo - shaelmaar
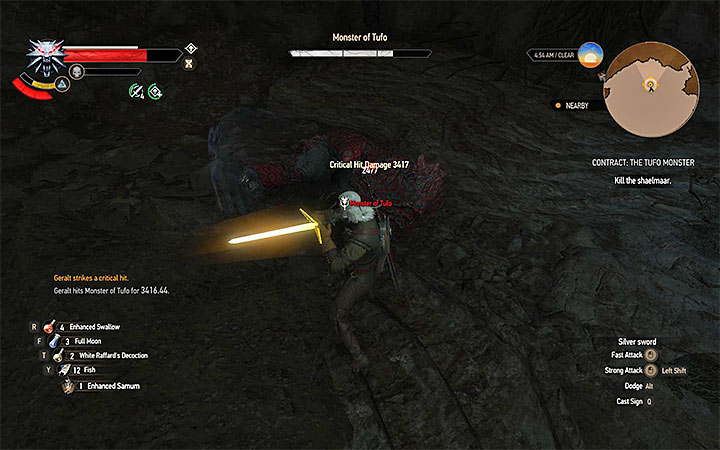
The Monster of Tufo is a Shaelmaar and defeating the monster is the most important part of Contract: The Tufo Monster.
The duel with shaelmaar will be similar to the encounter with that monster during The Beast of Toussaint main quest. Before starting the battle, use relict oil on silver sword and check if you have samum bombs equipped. Set Quen as active Witcher Sign - it will protect Geralt from serious damage when one of his actions won't be performed successfully.
Don't try attacking the shaelmaar traditionally - his thick skin will stop almost every attack. Instead of that, wait for the monster to start rolling through the cave. Wait until he is very close and jump away from his path. After hitting the wall of the cave or any other large obstacle shaelmaar should land on his back. When that happens, run quickly towards him and perform the strongest sword attacks.
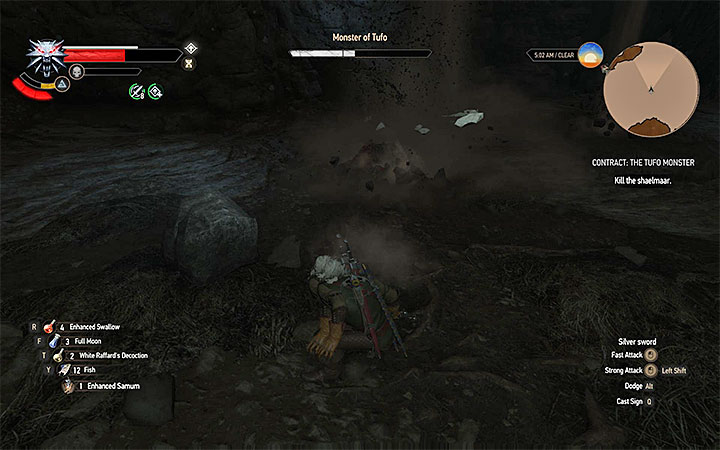
After the monster losses around 2/3 of his health bar, he will sometimes dig himself in the ground and throw small rocks. Wait through such attacks at safe distance. Keep fighting until the monster loses all health.
Slyzards
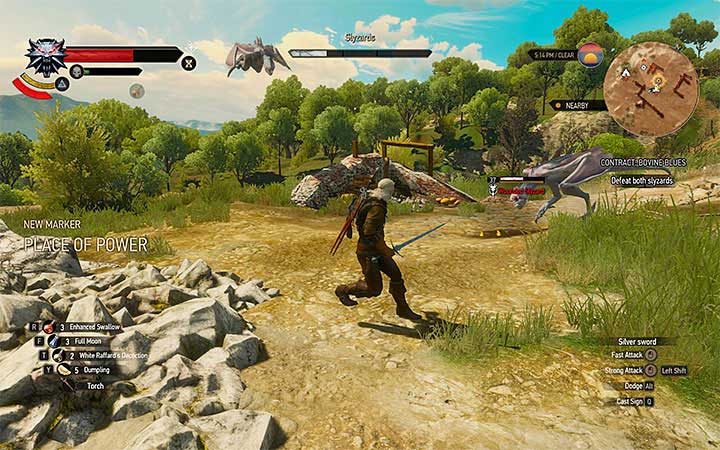
Defeating two Slyzards is the most important part of the Witcher contract titled Contract: Bovine Blues.
Before you begin the battle, you should prepare a little. Try to put the oil against draconids. Aard should be the active sign. You need to defeat two enemies: Wounded Slyzard and Female Slyzard. The sequence of attacking is of no importance, but if you don't want to avoid attacks from both creatures, start with the younger Slyzard, especially that he hasn't got a full health bar.
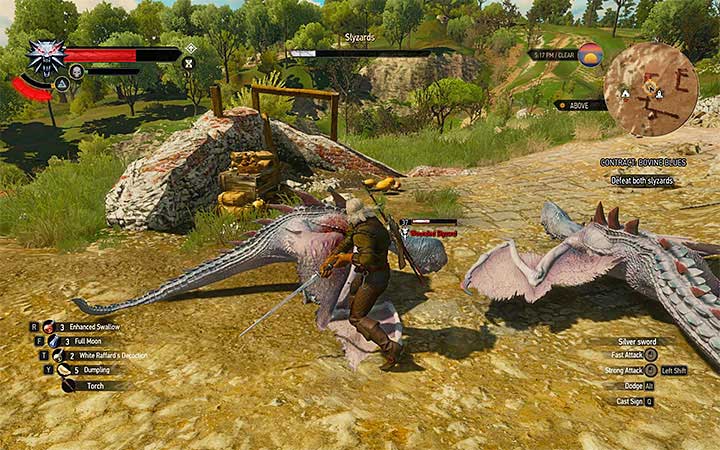
During the described battle, use the Aard sign, recommended earlier, in order to "bring to the ground" or temporarily stun the Slyzard. If a monster is far away from Geralt, wait until it closes in and at the same time, avoid his ranged attacks. To achieve that, use dodges or hiding in the nearby ruins. Once an opportunity to attack presents itself, engage the monster with few blows and dodge, so the monster won't hit you with his claws.
Once you deal with the young slyzard, you can take care of its mother. The beast has the same range of attacks, and behaves the same, only difference is, that the mother has a full health bar at the beginning.
Living Statues
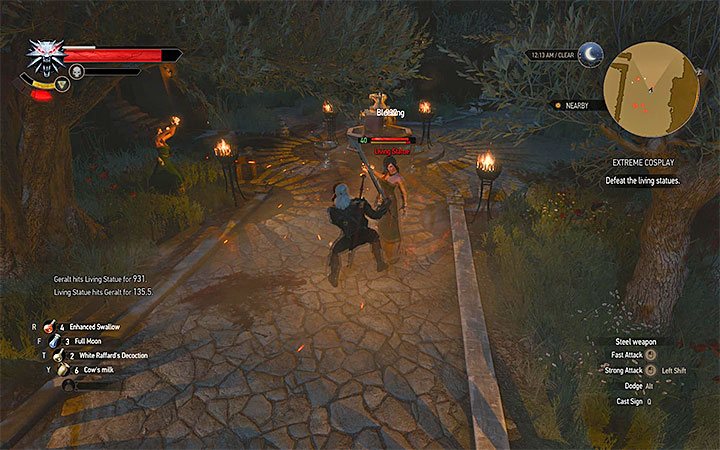
Geralt must face a group of Living Statues in the final phase of Extreme Cosplay quest in which you must investigate a mysterious mansion. The fight is requiring enough to have a separate section in the guide.
The battle will start after Geralt perfectly recreates the scene by using the elven artifacts. At the beginning of the fight set the Quen sign as your active one - this will protect Geralt from the elven attacks. Additionally, the protagonist can use the shield to block attacks. Focus your attention on the living statues of elven women, as both of use magic and can make the whole encounter a lot more difficult. When they are dead get rid of the remaining statues of men - you can now use your favorite quick or slow attacks of Geralt.
Hermit
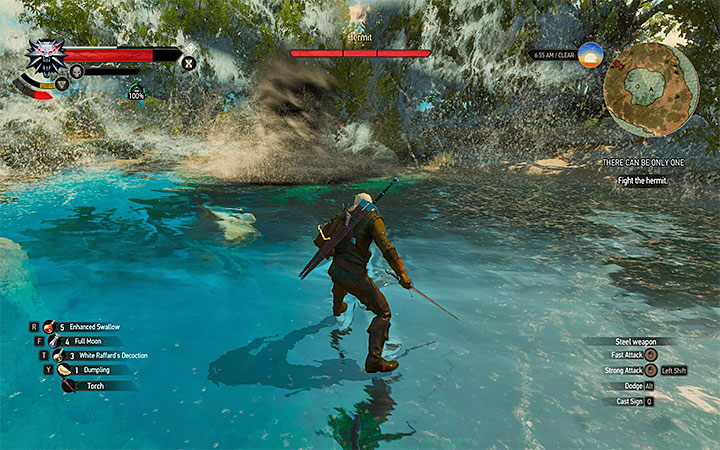
The battle with the Hermit takes place in the final phase of There Can Be Only One side quest. In this quest you must complete five Trials. What's important, it is an honorable duel, which means that it will start only after Geralt will confirm that he is ready.
The hermit will be attacking you with water attacks. His basic ones are horizontal and vertical water spouts that you can dodge. The most damaging one is the large tornado that can suck you in, if only you let it sufficiently close. Since this would drain your health considerably, focus on steering clear of the tornado and keeping your distance, up until the moment it disappears.
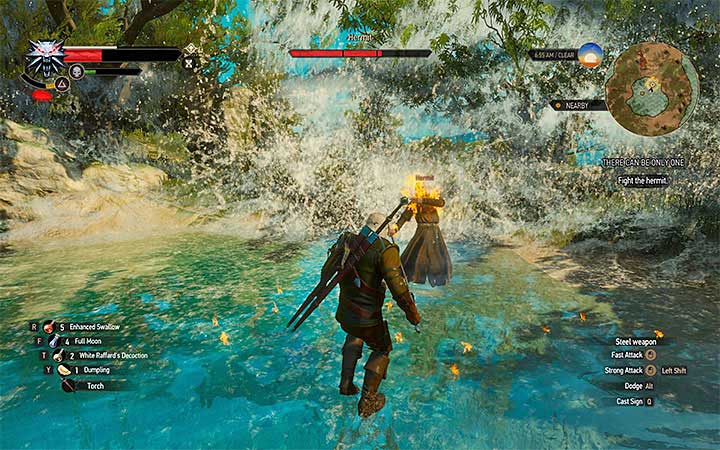
You can deal considerable damage to the hermit with your sword. Apart from that, it is a good idea to use here the element opposing to the one that is being used by the hermit, i.e. fire that is represented by the witcher sign of Igni. In itself, the sign is very effective at draining the opponent's health and exposing him to attacks.
Silver basilisk Iocaste
You can fight the Silver basilisk Iocaste during the Witcher contract Mutual of Beauclair's Wild Kingdom. It will happen only if after encountering a group of Reavers you confirm that you want to murder the monster (against what count Salvaress wants).
After you confirm that you want to kill the basilisk, you must decide how the Reavers will help Geralt in realization of the plan. It isn't an extremely important choice, but you should think about it anyway. If you decide that Reavers should use crossbows, then after the battle starts you won't need to focus on taking the monster to the ground since it will be their task. The disadvantage of this option is that you will have to weaken the basilisk without their support. If you choose that Reavers should accompany Geralt in dealing direct damage, then it will be easier to take basilisk' health away after he lands. The disadvantage of this option is that you will have to take the monster to the ground on your own (for example with Aard sign).
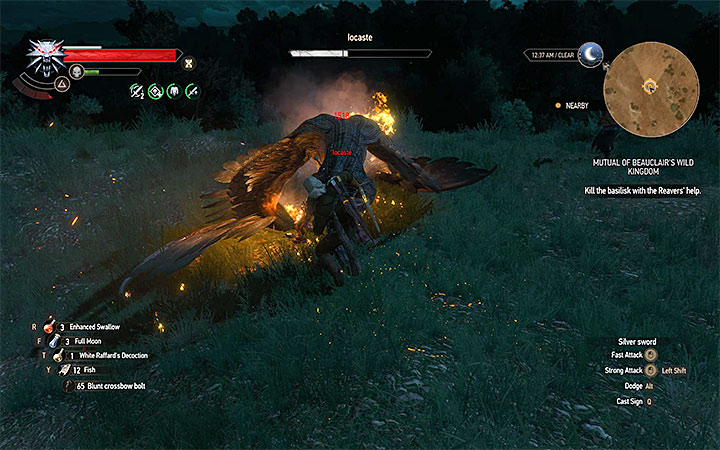
After the silver basilisk Iocaste appears, use draconid oil on Geralt's sword. Additionally, you should increase Witcher's resistance to poison and obtain some strong healing items. If the Reavers are using the crossbows, then focus on using Igni. If they are using swords, then set Aard as default sign in order to stop the flight of the monster. Try performing a few hits in a series and then jump away in order to avoid taking heavy damage and being poisoned.
Daphne wraith
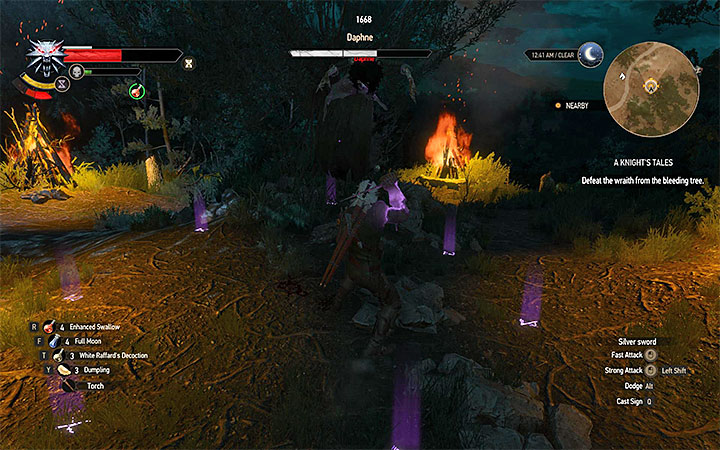
The duel with Daphne wraith can happen during A Knight's Tales side quest. You will face the monster only if you try removing the curse from the girl incorrectly. This will cause Daphne to turn into a wraith and attack you.
Before the fight, consider using the oil against wraiths. Once the battle begins, use Yrden. Attack Daphne only when she is inside the magic circle, so she will receive bigger damage. Don't attack too much, so you don't give her time to respond, especially that her attacks deal heavy damage. Shortly after the battle begins, skeletons will arrive to the glade. Try to ignore them and focus on attacking the main wraith.
Witch of Lynx Crag
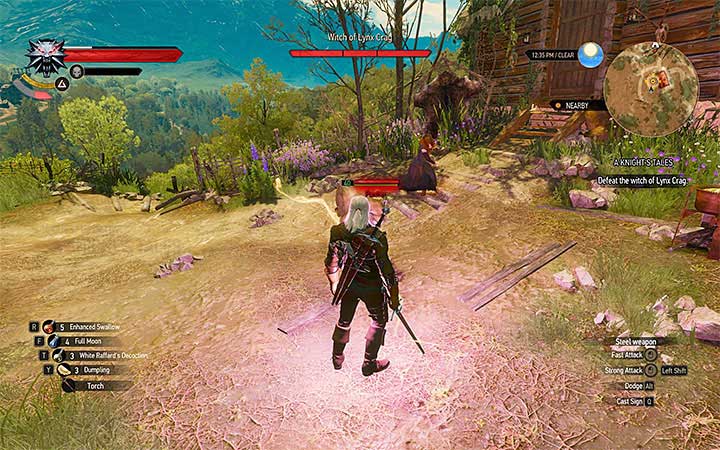
The battle with Witch of Lynx Crag can be triggered during the side quest A Knight's Tales. It will happen only if Geralt will try forcing the witch to lift the curse and thus he will anger her.
The battle with the witch will begin once you receive control over Geralt. During this fight, try to stay mobile, to avoid the witch's magic attacks and her 40 level panther. Do not lose time to weaken the panther, but search for an occasion to weaken the witch, because she is the priority here. Geralt has a freedom in choosing the active witcher sign. For example, you can use Quen to lower the risk of damage following the attacks of the witch or the panther, or use Aard in order to stun the enemies. You have to fight until the witch loses almost all her health, because only then she will surrender and promises to help in lifting of the curse.

You are not permitted to copy any image, text or info from this page. This site is not associated with and/or endorsed by the developers and the publishers. All logos and images are copyrighted by their respective owners.
Copyright © 2000 - 2026 Webedia Polska SA for gamepressure.com, unofficial game guides, walkthroughs, secrets, game tips, maps & strategies for top games.