Sekiro Shadows Die Twice: Lone Shadow Masanaga Boss Fight
Lone Shadow Masanaga the Spear-Bearer is an optional boss in Sekiro: Shadows Die Twice. In this section of the guide, we will tell you where to find the boss, and how to defeat it easily.
Where to find Lone Shadow Masanaga?
Location: Ashina Castle [nearest Sculptor's Idol: Old Grave]
Awards: Prayer Bead, Yellow Gunpowder
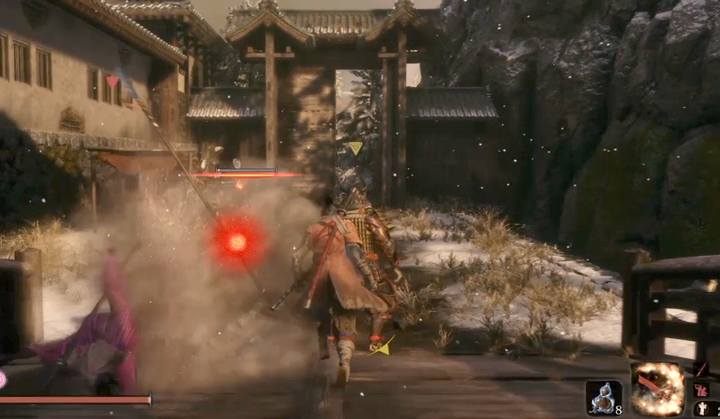
The boss Lone Shadow Masanaga is an optional opponent. You will find him near the descent to the Sunken Valley behind the Ashina Castle. It only appears when you defeat the Corrupted Monk boss later in the story, and complete the stage in the Ashina Depths. Be careful as the Ashina Castle is full of new enemies; in front of the house where the boss is, you will find 3 wolves.
How to defeat Lone Shadow Masanaga?
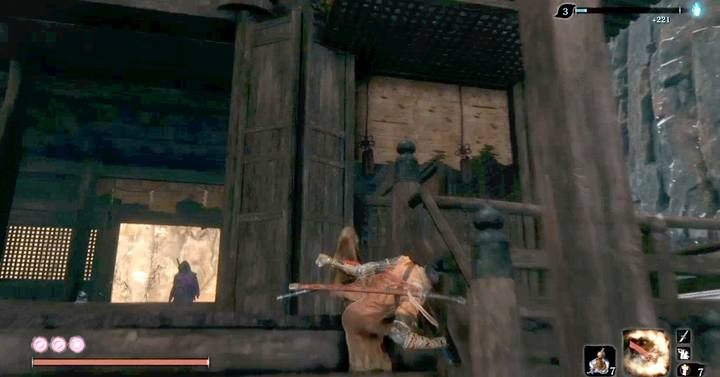
Since the enemy is standing in the building in front of the entrance, you can easily sneak behind his back to deliver a critical hit reducing one health bar.
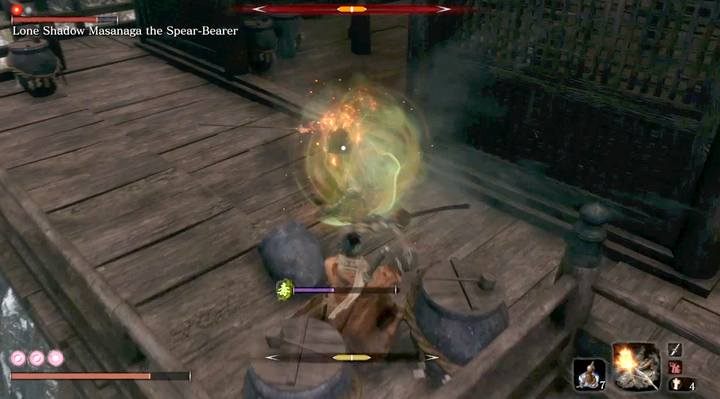
The most dangerous attack performed by the boss is hence poisoning. He has a sword similar to Sabimaru, which he uses from time to time. Every contact with the weapon (blocking included) causes partial filling of the green bar of poisoning. If it is full, you will receive critical damage from severe poisoning. This can lead to imminent death.
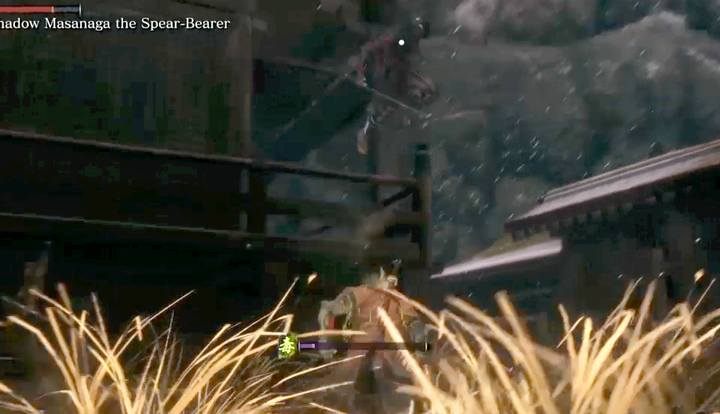
There are many ways to fight the enemy, because apart from a few melee attacks and the above-mentioned special attack, the opponent has no extraordinary feats. He's also quite vulnerable to fire. Below are some tips regarding the fight:
- try to avoid melee attacks, instead of parrying them - the combo always ends with a special attack, and melee strikes deplete your Posture much quicker;
- a good idea is to use the Shinobi Firecracker and try to backstab enemies, especially with loaded attacks - so you will quickly reduce the health level.
- use the two squares on the sides of the gazebo; the opponent does not give you respite in battle, and if you need to rest or use healing items, jumping to the ground will give you time.
If you absolutely cannot cope in battle, and you want to defeat this boss, you can use an exploit, where you jump on the gazebo and down again - the boss will follow you, but so slowly that you will be able to get into the position in which the boss will be after jumping down (always the same place) and try to backstab him. This strategy may be a bit tedious, but it is quite effective.
- Sekiro Guide and Walkthrough
- Sekiro Shadows Die Twice: Game guide
- Sekiro Shadows Die Twice: Bosses
- Sekiro Shadows Die Twice: General Naomori Kawarada Boss Fight
- Sekiro Shadows Die Twice: Chained Ogre Boss Fight
- Sekiro Shadows Die Twice: General Tenzen Yamauchi Boss Fight
- Sekiro Shadows Die Twice: Great Serpent Boss Fight
- Sekiro Shadows Die Twice: Great Serpent - the second and third encounter
- Sekiro Shadows Die Twice: Juzou the Drunkard Boss Fight
- Sekiro Shadows Die Twice: Lady Butterfly Boss Fight
- Sekiro Shadows Die Twice: Unnamed masked purple enemy Boss Fight
- Sekiro Shadows Die Twice: Gyoubu Oniwa Boss Fight
- Sekiro Shadows Die Twice: The Blazing Bull Boss Fight
- Sekiro Shadows Die Twice: Shinobi Hunter Enshin of Misen Boss Fight
- Sekiro Shadows Die Twice: Lone Shadow Longswordsman Boss Fight
- Sekiro Shadows Die Twice: Seven Ashina Spears Boss Fight
- Sekiro Shadows Die Twice: Armored Warrior Boss Fight
- Sekiro Shadows Die Twice: Genichiro Ashina Boss Fight
- Sekiro Shadows Die Twice: Guardian Ape in Sunken Valley Boss Fight
- Sekiro Shadows Die Twice: Headless Guardian Ape in Ashina Depths Boss Fight
- Sekiro Shadows Die Twice: Tokujiro the Glutton Boss Fight
- Sekiro Shadows Die Twice: Mist Noble Boss Fight
- Sekiro Shadows Die Twice: O'Rin of the Water Boss Fight
- Sekiro Shadows Die Twice: Chained Ogre from Ashina Castle Boss Fight
- Sekiro Shadows Die Twice: Lonely Shadow Vilehand Boss Fight
- Sekiro Shadows Die Twice: Long-arm Centipede Sen'un Boss Fight
- Sekiro Shadows Die Twice: Snake Eyes Shirafuji Boss Fight
- Sekiro Shadows Die Twice: Long-arm Centipede Giraffe Boss Fight
- Sekiro Shadows Die Twice: Shinobi Eyes Shirahagi Boss Fight
- Sekiro Shadows Die Twice: Corrupted Monk Boss Fight
- Sekiro Shadows Die Twice: General Kuranosuke Matsumoto Boss Fight
- Sekiro Shadows Die Twice: Shichimen Warrior Boss Fight
- Sekiro Shadows Die Twice: Ashina Elite - Jinsuke Saze Boss Fight
- Sekiro Shadows Die Twice: Headless (underwater) #1 Boss Fight
- Sekiro Shadows Die Twice: Lone Shadow Masanaga Boss Fight
- Sekiro Shadows Die Twice: Emma, the Gentle Blade Boss Fight
- Sekiro Shadows Die Twice: Isshin Ashina Boss Fight
- Sekiro Shadows Die Twice: Great Shinobi Owl Boss Fight
- Sekiro Shadows Die Twice: True Corrupted Monk Boss Fight
- Sekiro Shadows Die Twice: Sakura Bull of the Palace Boss Fight
- Sekiro Shadows Die Twice: Demon of Hatred Boss Fight
- Sekiro Shadows Die Twice: Ashina Elite - Ujinari Mizuo Boss Fight
- Sekiro Shadows Die Twice: Shigekichi of the Red Guard Boss Fight
- Sekiro Shadows Die Twice: Seven Ashina Spears - Shume Masaji Oniwa Boss Fight
- Sekiro Shadows Die Twice: Genichiro & Isshin, the Sword Saint Boss Fight
- Sekiro Shadows Die Twice: Okami Leader Shizu Boss Fight
- Sekiro Shadows Die Twice: Headless #2 Boss Fight
- Sekiro Shadows Die Twice: Shichimen Warrior #1 Boss Fight
- Sekiro Shadows Die Twice: Shichimen Warrior #2 Boss Fight
- Sekiro Shadows Die Twice: Headless (underwater) #3 Boss Fight
- Sekiro Shadows Die Twice: Headless #4 Boss Fight
- Sekiro Shadows Die Twice: Headless #5 Boss Fight
- Sekiro Shadows Die Twice: Divine Dragon - Main Boss
- Sekiro Shadows Die Twice: Bosses
- Sekiro Shadows Die Twice: Game guide
You are not permitted to copy any image, text or info from this page. This site is not associated with and/or endorsed by the developers and the publishers. All logos and images are copyrighted by their respective owners.
Copyright © 2000 - 2026 Webedia Polska SA for gamepressure.com, unofficial game guides, walkthroughs, secrets, game tips, maps & strategies for top games.