Sekiro Shadows Die Twice: Sakura Bull of the Palace Boss Fight
This page in our guide to Sekiro: Shadows Die Twice focuses on Sakura Bull of the Palace, one of the mini-bosses. This is your second encounter with a huge bull. This one takes place in Fountainhead Palace. Check our description to learn where you can find this enemy and how to defeat it.
Where can I find Sakura Bull of the Palace?
![Location: Fountainhead Palace [Flower Viewing Stage] - Sakura Bull of the Palace | Sekiro Shadows Die Twice Boss Fight - Bosses - Sekiro Guide and Walkthrough](/sekiro-shadows-die-twice/gfx/word/194259421.jpg)
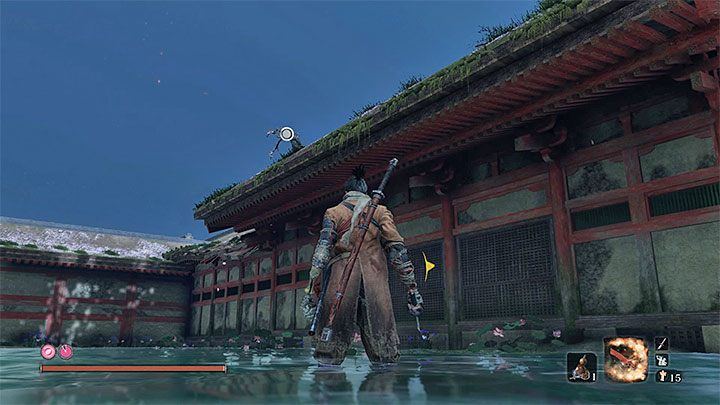
Location: Fountainhead Palace [Flower Viewing Stage]
Rewards: Prayer Bead, A Beast's Karma passive skill - Wolf can carry one extra Spirit Emblem
Sakura Bull of the Palace is in the map's side area. This enemy is easy to miss if you follow the main path. Stop at Flower Viewing Stage Sculptor's Idol. Turn left, move a few steps forward and turn left again. You are walking in shallow water - this place is between a building and a few rocks. The Bull is right around the corner.
Defeating Sakura Bull of the Palace
The fight with this Bull is very similar to the one you had with the Blazing Bull - you faced this enemy right after reaching Ashina Castle for the first time. The biggest change is that you are getting shot by archers standing on top of the left building. You can solve this problem in two ways:
- Find a hook point near the Sculptor's Idol and use it to reach the rooftop (see the picture). Once you get there, kill all the archers.
- Go to the rectangular area from which the Bull has rushed out. The archers shouldn't be able to reach you there.
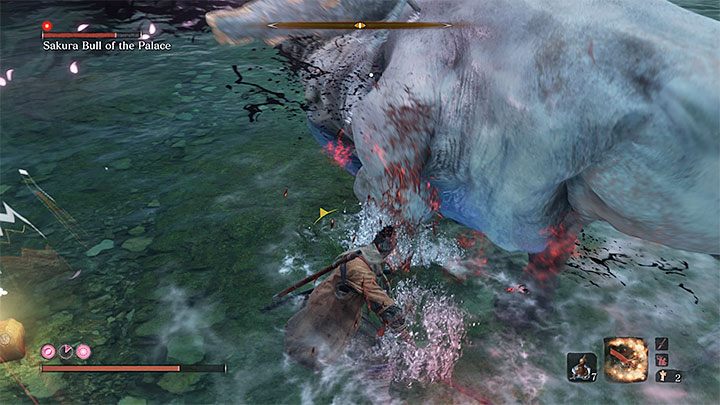
The strategy is the same - you can run around the mini-boss or block its charges with your katana. Attack the creature from behind or from a side.

Shinobi Firecracker is useful in this fight. You can use it to scare the beast and make it vulnerable to attacks. Shinobi Firecracker is also great for stopping the Bull after it starts charging at you.
We recommend eating Ako's Sugar before you start this fight. It will boost your strength which means that you will deal more damage to the Bull.
- Sekiro Guide and Walkthrough
- Sekiro Shadows Die Twice: Game guide
- Sekiro Shadows Die Twice: Bosses
- Sekiro Shadows Die Twice: General Naomori Kawarada Boss Fight
- Sekiro Shadows Die Twice: Chained Ogre Boss Fight
- Sekiro Shadows Die Twice: General Tenzen Yamauchi Boss Fight
- Sekiro Shadows Die Twice: Great Serpent Boss Fight
- Sekiro Shadows Die Twice: Great Serpent - the second and third encounter
- Sekiro Shadows Die Twice: Juzou the Drunkard Boss Fight
- Sekiro Shadows Die Twice: Lady Butterfly Boss Fight
- Sekiro Shadows Die Twice: Unnamed masked purple enemy Boss Fight
- Sekiro Shadows Die Twice: Gyoubu Oniwa Boss Fight
- Sekiro Shadows Die Twice: The Blazing Bull Boss Fight
- Sekiro Shadows Die Twice: Shinobi Hunter Enshin of Misen Boss Fight
- Sekiro Shadows Die Twice: Lone Shadow Longswordsman Boss Fight
- Sekiro Shadows Die Twice: Seven Ashina Spears Boss Fight
- Sekiro Shadows Die Twice: Armored Warrior Boss Fight
- Sekiro Shadows Die Twice: Genichiro Ashina Boss Fight
- Sekiro Shadows Die Twice: Guardian Ape in Sunken Valley Boss Fight
- Sekiro Shadows Die Twice: Headless Guardian Ape in Ashina Depths Boss Fight
- Sekiro Shadows Die Twice: Tokujiro the Glutton Boss Fight
- Sekiro Shadows Die Twice: Mist Noble Boss Fight
- Sekiro Shadows Die Twice: O'Rin of the Water Boss Fight
- Sekiro Shadows Die Twice: Chained Ogre from Ashina Castle Boss Fight
- Sekiro Shadows Die Twice: Lonely Shadow Vilehand Boss Fight
- Sekiro Shadows Die Twice: Long-arm Centipede Sen'un Boss Fight
- Sekiro Shadows Die Twice: Snake Eyes Shirafuji Boss Fight
- Sekiro Shadows Die Twice: Long-arm Centipede Giraffe Boss Fight
- Sekiro Shadows Die Twice: Shinobi Eyes Shirahagi Boss Fight
- Sekiro Shadows Die Twice: Corrupted Monk Boss Fight
- Sekiro Shadows Die Twice: General Kuranosuke Matsumoto Boss Fight
- Sekiro Shadows Die Twice: Shichimen Warrior Boss Fight
- Sekiro Shadows Die Twice: Ashina Elite - Jinsuke Saze Boss Fight
- Sekiro Shadows Die Twice: Headless (underwater) #1 Boss Fight
- Sekiro Shadows Die Twice: Lone Shadow Masanaga Boss Fight
- Sekiro Shadows Die Twice: Emma, the Gentle Blade Boss Fight
- Sekiro Shadows Die Twice: Isshin Ashina Boss Fight
- Sekiro Shadows Die Twice: Great Shinobi Owl Boss Fight
- Sekiro Shadows Die Twice: True Corrupted Monk Boss Fight
- Sekiro Shadows Die Twice: Sakura Bull of the Palace Boss Fight
- Sekiro Shadows Die Twice: Demon of Hatred Boss Fight
- Sekiro Shadows Die Twice: Ashina Elite - Ujinari Mizuo Boss Fight
- Sekiro Shadows Die Twice: Shigekichi of the Red Guard Boss Fight
- Sekiro Shadows Die Twice: Seven Ashina Spears - Shume Masaji Oniwa Boss Fight
- Sekiro Shadows Die Twice: Genichiro & Isshin, the Sword Saint Boss Fight
- Sekiro Shadows Die Twice: Okami Leader Shizu Boss Fight
- Sekiro Shadows Die Twice: Headless #2 Boss Fight
- Sekiro Shadows Die Twice: Shichimen Warrior #1 Boss Fight
- Sekiro Shadows Die Twice: Shichimen Warrior #2 Boss Fight
- Sekiro Shadows Die Twice: Headless (underwater) #3 Boss Fight
- Sekiro Shadows Die Twice: Headless #4 Boss Fight
- Sekiro Shadows Die Twice: Headless #5 Boss Fight
- Sekiro Shadows Die Twice: Divine Dragon - Main Boss
- Sekiro Shadows Die Twice: Bosses
- Sekiro Shadows Die Twice: Game guide
You are not permitted to copy any image, text or info from this page. This site is not associated with and/or endorsed by the developers and the publishers. All logos and images are copyrighted by their respective owners.
Copyright © 2000 - 2026 Webedia Polska SA for gamepressure.com, unofficial game guides, walkthroughs, secrets, game tips, maps & strategies for top games.