Sekiro Shadows Die Twice: Lonely Shadow Vilehand Boss Fight
On this page of our guide to Sekiro: Shadows Die Twice you can find the description considering the duel with Lone Shadow Vilehand boss. This battle takes place shortly before the final stage of the game. From our description you will learn how to weaken the boss, help yourself with the Puppeteer ninjutsu ability, as well as how to defeat the boss by getting to a rather more traditional combat.
How to unlock the duel with Lone Shadow Vilehand boss?
![Location: Ashina Castle [Upper Tower Ashina Dojo] - Lonely Shadow Vilehand | Sekiro Shadows Die Twice Boss Fight - Bosses - Sekiro Guide and Walkthrough](/sekiro-shadows-die-twice/gfx/word/278693578.jpg)
Location: Ashina Castle [Upper Tower Ashina Dojo]
Rewards: Prayer bead, the material to improve the prostetic tool.
Lone Shadow Vilehand is a mini-boss who needs to be dealt with in the final part of the main plot, i.e. after you find three artifacts for Kuro. After returning to Ashina Castle you will witness an attack on the castle. You have to re-cross through this location to re-unlock the sculptor idol in the castle.
To start the duel with the described enemy you need to get to the sculptor idol Dojo Ashina in the Upper Tower. The boss is in the next room. His death is required in order to get to the roof of the castle, where you have to make the final choice of the game.
Description of the duel with the boss
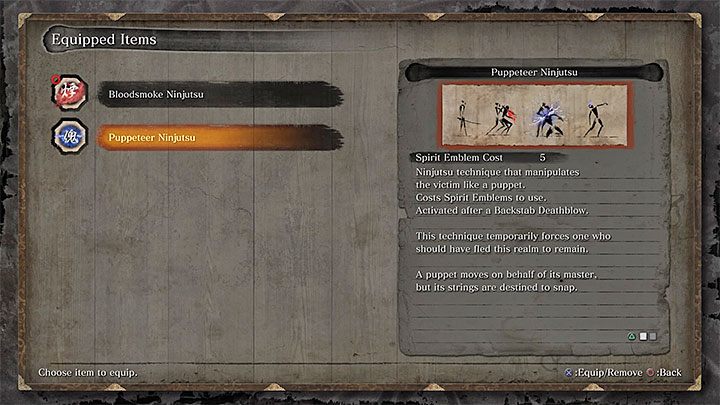
Before entering the room with the boss set the ability of the Puppeteer Ninjutsu as active. Let's remind something about this skill - you will automatically get it thanks to defeating the Folding Screen Monkeys in the illusion of the Senpou Temple. By the way, check whether you have at least 5 ghost symbols - they are essential for the activation of the mentioned ability.

Start to crawl up in stealth even before entering the hall with the boss. Turn left and then check out the purple enemy, who is in the same room. Push the blade into his back to perform a fatal blow and immediately press the attack button again. This activates Puppeteer Ninjutsu ability - its correct implementation is being marked by a change of eye color of the opponent to blue.
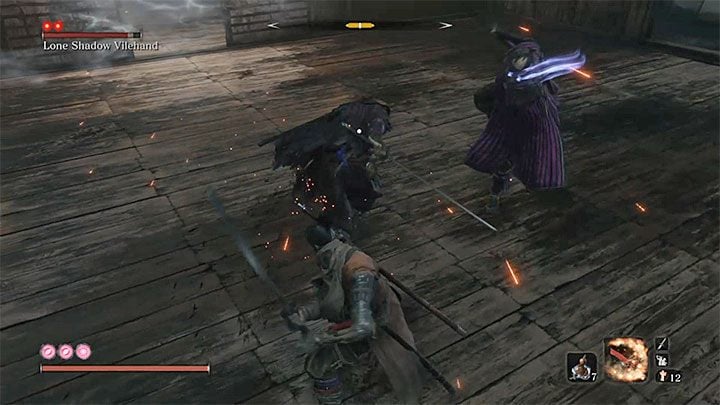
The opponent who is under the influence of "mind control" begins to fight on the side of the hero. Use this, and join him to attack Lone Shadow Vilehand boss together. During the fighting, try to avoid the use of area of effect attacks, so as not to cause unnecessary damage to the purple vanguard you have 'tamed'. He should survive about as long as the first boss will get his posture weakened. So, to the moment when you can inflict the first of two fatal required blows.
Don't ignore the purple opponent's "taming" option. Otherwise, it will also attack your hero and to win you may have to kill two strong enemies. If you don't have ghost symbols - buy at least 5 of them before the fights start.
The boss fight will be more "classic" only after purple assistant will be eliminated. This is a close similar battle to the Lone Shadow Longswordsman boss, who guarded the entrance to the Abandoned Dungeon in the earlier stages of the game.
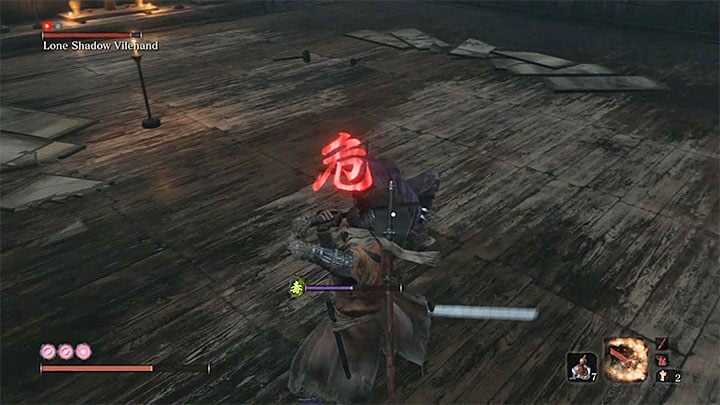
Opponent regularly uses complex combinations of attacks, which can be very troublesome to dodge and parry (or impossible in case of weapon strike). In addition, the threat of strong blows, which allow the boss to simultaneously cover a large distances (one of them is a kick, indicated by a red symbol).
Instead of pairing punches, we recommend to often rely on dodging and leaping backward. Don't get trapped in a corner - the room where the fight with boss takes place is small and you can easily fall out of rhythm. This can happen especially if the camera is locked on an opponent and it will have problems with the correct setting.

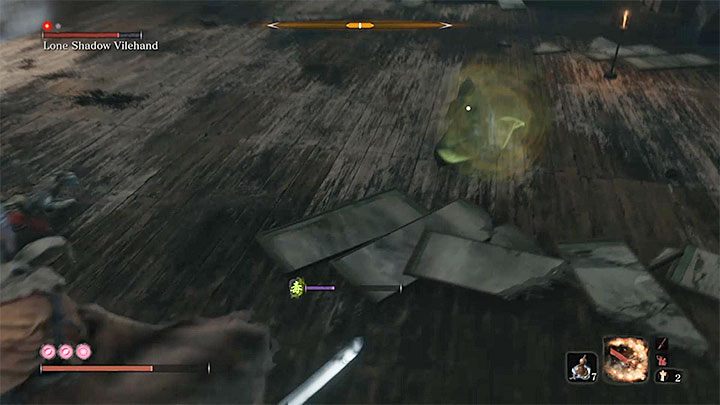
A very good attack to weaken the boss is the Mortal Draw, which you can set as an active Combat Art. It's not a very fast attack, but you should have enough time to use it right after the boss finishes one of the big attack sequences.
Alternatively you can also rely on a combination of oil + Fire Vent, which we recommended while fighting the Lone Shadow Longswordsman. You can, thus, defend from the critical attacks of the boss, but you need to have great reflexes.
- Sekiro Guide and Walkthrough
- Sekiro Shadows Die Twice: Game guide
- Sekiro Shadows Die Twice: Bosses
- Sekiro Shadows Die Twice: General Naomori Kawarada Boss Fight
- Sekiro Shadows Die Twice: Chained Ogre Boss Fight
- Sekiro Shadows Die Twice: General Tenzen Yamauchi Boss Fight
- Sekiro Shadows Die Twice: Great Serpent Boss Fight
- Sekiro Shadows Die Twice: Great Serpent - the second and third encounter
- Sekiro Shadows Die Twice: Juzou the Drunkard Boss Fight
- Sekiro Shadows Die Twice: Lady Butterfly Boss Fight
- Sekiro Shadows Die Twice: Unnamed masked purple enemy Boss Fight
- Sekiro Shadows Die Twice: Gyoubu Oniwa Boss Fight
- Sekiro Shadows Die Twice: The Blazing Bull Boss Fight
- Sekiro Shadows Die Twice: Shinobi Hunter Enshin of Misen Boss Fight
- Sekiro Shadows Die Twice: Lone Shadow Longswordsman Boss Fight
- Sekiro Shadows Die Twice: Seven Ashina Spears Boss Fight
- Sekiro Shadows Die Twice: Armored Warrior Boss Fight
- Sekiro Shadows Die Twice: Genichiro Ashina Boss Fight
- Sekiro Shadows Die Twice: Guardian Ape in Sunken Valley Boss Fight
- Sekiro Shadows Die Twice: Headless Guardian Ape in Ashina Depths Boss Fight
- Sekiro Shadows Die Twice: Tokujiro the Glutton Boss Fight
- Sekiro Shadows Die Twice: Mist Noble Boss Fight
- Sekiro Shadows Die Twice: O'Rin of the Water Boss Fight
- Sekiro Shadows Die Twice: Chained Ogre from Ashina Castle Boss Fight
- Sekiro Shadows Die Twice: Lonely Shadow Vilehand Boss Fight
- Sekiro Shadows Die Twice: Long-arm Centipede Sen'un Boss Fight
- Sekiro Shadows Die Twice: Snake Eyes Shirafuji Boss Fight
- Sekiro Shadows Die Twice: Long-arm Centipede Giraffe Boss Fight
- Sekiro Shadows Die Twice: Shinobi Eyes Shirahagi Boss Fight
- Sekiro Shadows Die Twice: Corrupted Monk Boss Fight
- Sekiro Shadows Die Twice: General Kuranosuke Matsumoto Boss Fight
- Sekiro Shadows Die Twice: Shichimen Warrior Boss Fight
- Sekiro Shadows Die Twice: Ashina Elite - Jinsuke Saze Boss Fight
- Sekiro Shadows Die Twice: Headless (underwater) #1 Boss Fight
- Sekiro Shadows Die Twice: Lone Shadow Masanaga Boss Fight
- Sekiro Shadows Die Twice: Emma, the Gentle Blade Boss Fight
- Sekiro Shadows Die Twice: Isshin Ashina Boss Fight
- Sekiro Shadows Die Twice: Great Shinobi Owl Boss Fight
- Sekiro Shadows Die Twice: True Corrupted Monk Boss Fight
- Sekiro Shadows Die Twice: Sakura Bull of the Palace Boss Fight
- Sekiro Shadows Die Twice: Demon of Hatred Boss Fight
- Sekiro Shadows Die Twice: Ashina Elite - Ujinari Mizuo Boss Fight
- Sekiro Shadows Die Twice: Shigekichi of the Red Guard Boss Fight
- Sekiro Shadows Die Twice: Seven Ashina Spears - Shume Masaji Oniwa Boss Fight
- Sekiro Shadows Die Twice: Genichiro & Isshin, the Sword Saint Boss Fight
- Sekiro Shadows Die Twice: Okami Leader Shizu Boss Fight
- Sekiro Shadows Die Twice: Headless #2 Boss Fight
- Sekiro Shadows Die Twice: Shichimen Warrior #1 Boss Fight
- Sekiro Shadows Die Twice: Shichimen Warrior #2 Boss Fight
- Sekiro Shadows Die Twice: Headless (underwater) #3 Boss Fight
- Sekiro Shadows Die Twice: Headless #4 Boss Fight
- Sekiro Shadows Die Twice: Headless #5 Boss Fight
- Sekiro Shadows Die Twice: Divine Dragon - Main Boss
- Sekiro Shadows Die Twice: Bosses
- Sekiro Shadows Die Twice: Game guide
You are not permitted to copy any image, text or info from this page. This site is not associated with and/or endorsed by the developers and the publishers. All logos and images are copyrighted by their respective owners.
Copyright © 2000 - 2026 Webedia Polska SA for gamepressure.com, unofficial game guides, walkthroughs, secrets, game tips, maps & strategies for top games.