GTA 5: Lamar Down walkthrough
This page of the guide to Grand Theft Auto V has a walkthrough for mission 72 - Lamar Down. Our GTA 5 guide has tips on the sawmill attack, who to play as during the attack, and how to deal with the reinforcements.
- Mission 72 - Lamar Down general information
- Mission 72 - Lamar Down full walkthrough
- Rewards and challenges in mission 72 - Lamar Down
Mission 72 - Lamar Down general information
Way to unlock: You need to complete main mission 70 (The Wrap Up). You can now go to Franklin's villa (letter F on the world map).
Playable characters: Franklin, Michael, Trevor
Additional information: This mission provides a lot of freedom when it comes to the character selection because, throughout the major part of the fight in the sawmill, you will be able to cut freely between the main protagonists. The point of the attack on the sawmill is to free Lamar and, in spite of the presence of numerous Ballas gangsters in the area, you will not find it overly problematic.
Mission 72 - Lamar Down full walkthrough
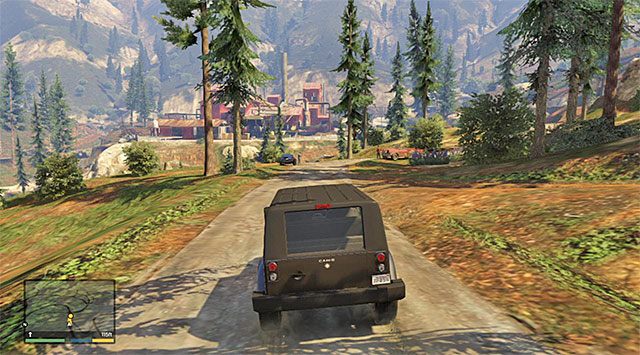
To start this mission, you need to return to your estate, as Franklin, on the Vinewood Hills, in order to meet up with Tanisha. You will learn from the woman about the trouble that Lamar got into, and you will be dispatched to the sawmill. Get into any car and go North. The sawmill is in the North-Western part of the map and, after you get there, you will meet up with Trevor and Michael.

You will now watch a short cutscene of the preparations for the attack. Michael will automatically take his position on the hill and will be conducting a sniper fire. As far as Trevor and Franklin are concerned, the game will let you determine where they should attack the sawmill. Below is a legend to the map shown in the above screenshot.
1 - Main entrance attack- The enemies will spot your character, but you can count on support from Michael.
2 - Side entrance attack - There is a bulldozer here, which you will be able to use in order to get to the sawmill safely, and also squash some of the enemies.
3 - Railroad-side attack - The enemies will not spot your character, and you count on support from Michael.
After you have positioned a character in a given spot, press the button on the D-pad to confirm your choice. Personally, I recommend that you attack as Trevor, from point 1 or 3, and as Franklin from point 2.
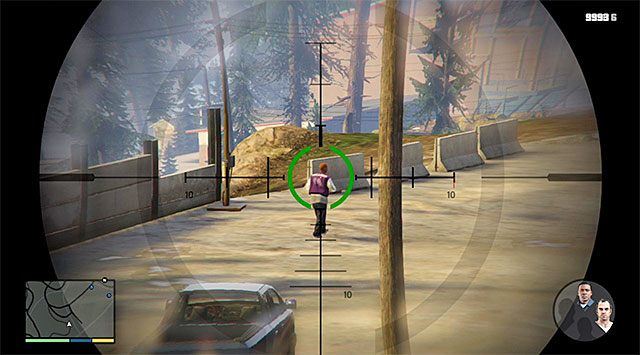
Right after you start the attack on the sawmill, select your favorite character and join the fights. I recommend that, during this mission, you cut between characters on a regular basis because, not only will this increase your chances to complete this mission in 100%, but also you will be able to adjust better to the current situation in the battlefield. While playing as Michael, you should be using the sniper rifle at all times and eliminate, in the first place, the gangsters involved currently in the fire exchange with Franklin and Trevor.
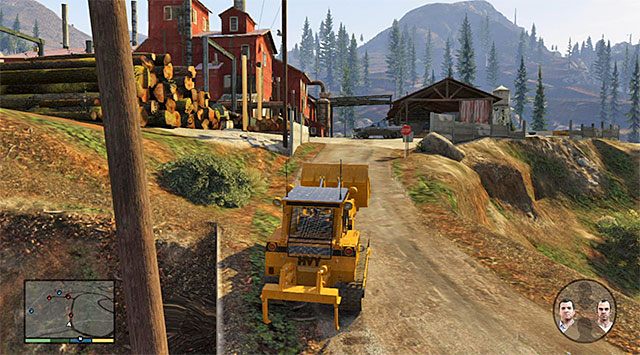
It is a good idea to make use of the abovementioned bulldozer while playing as Franklin, at least to ensure yourself with the opportunity to infiltrate the sawmill safely. Further into the battle, you should rely on covers and perform more standard actions.
While playing as Trevor it is a good idea to rely on his special skill, i.e. the fury mode, thanks to which you will be able to deal with larger groups of enemies more effectively. Thanks to fury, you will also not need to hide behind covers at all times, which will allow you an aggressive attack on the enemy positions.
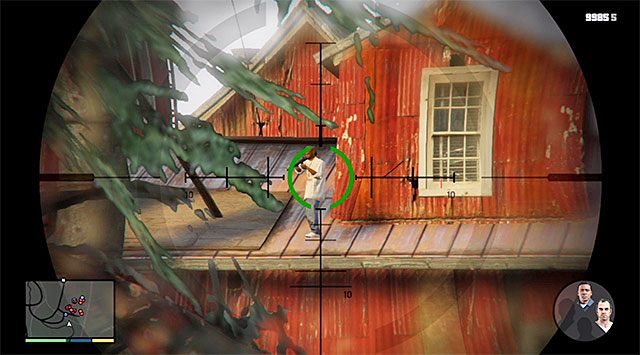
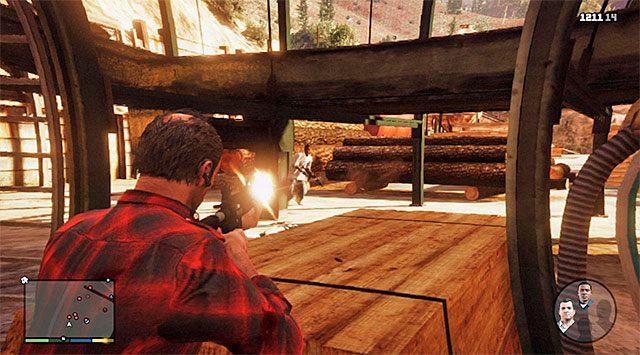
Unfortunately, you need to keep in mind that some of the enemies will join the fights later, and also that there will appear additional threats later into the mission. I recommend that you cut to Michael and eliminate the enemy with the rocket launcher (the above screenshot) and a few enemy snipers.
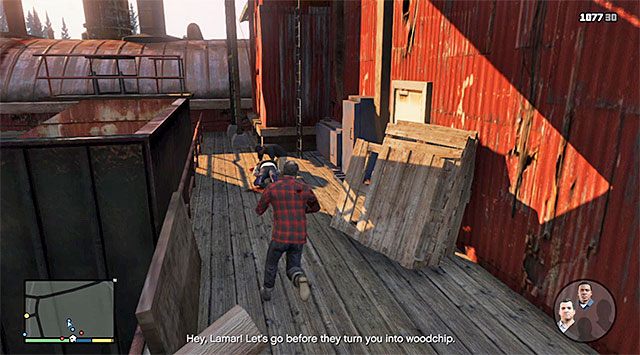
Lamar is being kept outside of the main building, in the place shown in the above screenshot. Reach with any character of your choice and draw your attention to the first-aid-kit attached to the wall of the sawmill. Start cutting through to the exit, accompanied by Lamar. Just like earlier, you can either play as Franklin or Trevor and fight from the ground, or play as Michael and snipe the enemies down from the hill. In the latter case, you should watch out for the enemies who try to come close to Michael, and eliminate them sufficiently early.
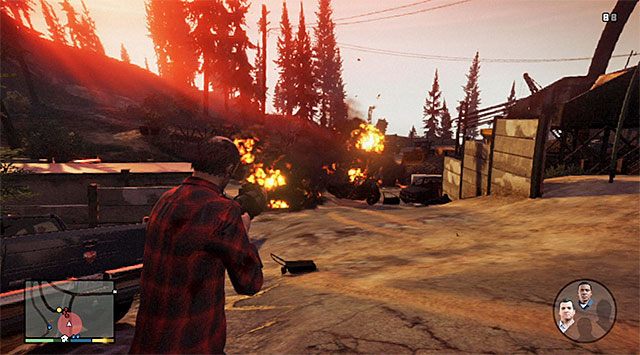
You should keep in mind that there will appear another group of the gangsters at the sawmill's exit and, since they come in cars, you should use the grenade launcher to your advantage. After you have cleared the premises, cut back to Franklin, get into any car and wait for Lamar to join you. Drive to Los Santos. You need to take Lamar home, which will conclude this mission.
Rewards and challenges in mission 72 - Lamar Down
Rewards for the completion of the mission: none
Requirements for the completion of the mission in 100%:
- Headshots - You need to kill 18 enemies by shooting to their heads.
- Accuracy - you need to complete this mission with the accuracy rating of, at least, 70%.
- Three Way - while playing each one of the protagonists, you need to kill, at least, one enemy. Do not forget to cut between Franklin, Trevor and Michael on a regular basis.
- Time - you need to complete this mission within 13 minutes and 30 seconds. Use a fast car to reach the sawmill. Do not waste too much time on planning the attack on the sawmill and, after you launch the attack, deal aggressively with enemies. Towards the end of the mission, quickly reach Lamar's house.

- GTA 5 Guide
- GTA 5: Quests & Missions
- GTA 5: Main missions
- GTA 5: Prologue walkthrough
- GTA 5: Franklin and Lamar walkthrough
- GTA 5: Repossession walkthrough
- GTA 5: Chop walkthrough
- GTA 5: Complications walkthrough
- GTA 5: Father, Son walkthrough
- GTA 5: The Long Stretch walkthrough
- GTA 5: Marriage Counseling walkthrough
- GTA 5: Daddy's Little Girl walkthrough
- GTA 5: Friend Request walkthrough
- GTA 5: The Good Husband, Additional mission walkthrough
- GTA 5: Casing the Jewel Store walkthrough
- GTA 5: Carbine Rifles walkthrough
- GTA 5: The Jewel Store Job, Loud variant walkthrough
- GTA 5: Bugstars Equipment walkthrough
- GTA 5: BZ Gas Grenades walkthrough
- GTA 5: The Jewel Store Job, Smart variant walkthrough
- GTA 5: Mr. Philips walkthrough
- GTA 5: Nervous Ron walkthrough
- GTA 5: Trevor Philips Industries walkthrough
- GTA 5: Crystal Maze walkthrough
- GTA 5: Friends Reunited walkthrough
- GTA 5: Fame or Shame walkthrough
- GTA 5: Hotel Assassination walkthrough
- GTA 5: The Multi Target Assassination walkthrough
- GTA 5: Dead Man Walking walkthrough
- GTA 5: Did Somebody Say Yoga? walkthrough
- GTA 5: Three's Company walkthrough
- GTA 5: By the Book walkthrough
- GTA 5: Hood Safari walkthrough
- GTA 5: Scouting the Port walkthrough
- GTA 5: Minisub walkthrough
- GTA 5: The Merryweather Heist, Freighter variant walkthrough
- GTA 5: Cargobob walkthrough
- GTA 5: Flight School, Additional activity walkthrough
- GTA 5: The Merryweather Heist, Offshore variant walkthrough
- GTA 5: Blitz Play walkthrough
- GTA 5: Getaway Vehicle walkthrough
- GTA 5: Tow Truck walkthrough
- GTA 5: Trash Truck walkthrough
- GTA 5: Masks walkthrough
- GTA 5: Boiler Suits walkthrough
- GTA 5: Blitz Play 2 walkthrough
- GTA 5: I Fought the Law walkthrough
- GTA 5: Eye in the Sky walkthrough
- GTA 5: The Vice Assassination walkthrough
- GTA 5: The Bus Assassination walkthrough
- GTA 5: Mr. Richards walkthrough
- GTA 5: Caida Libre walkthrough
- GTA 5: Deep Inside walkthrough
- GTA 5: Minor Turbulence walkthrough
- GTA 5: The Construction Assassination walkthrough
- GTA 5: Paleto Score Setup walkthrough
- GTA 5: Military Hardware walkthrough
- GTA 5: Predator walkthrough
- GTA 5: The Paleto Score walkthrough
- GTA 5: Derailed walkthrough
- GTA 5: Monkey Business walkthrough
- GTA 5: Hang Ten walkthrough
- GTA 5: Surveying the Score walkthrough
- GTA 5: Bury the Hatchet walkthrough
- GTA 5: Pack Man walkthrough
- GTA 5: Fresh Meat walkthrough
- GTA 5: The Ballad of Rocco walkthrough
- GTA 5: Cleaning Out the Bureau walkthrough
- GTA 5: Reuniting the Family walkthrough
- GTA 5: Architect's Plans walkthrough
- GTA 5: Getaway Vehicle 2 walkthrough
- GTA 5: Fire Truck walkthrough
- GTA 5: The Bureau Raid, Fire Crew variant walkthrough
- GTA 5: The Bureau Raid, Roof Entry variant walkthrough
- GTA 5: The Wrap Up walkthrough
- GTA 5: Legal Trouble walkthrough
- GTA 5: Lamar Down walkthrough
- GTA 5: Meltdown walkthrough
- GTA 5: Parenting 101, additional mission walkthrough
- GTA 5: The Big Score walkthrough
- GTA 5: Stingers walkthrough
- GTA 5: Gauntlet, Pillbox Hill walkthrough
- GTA 5: Gauntlet, Rockford Hills walkthrough
- GTA 5: Gauntlet, Mission Row walkthrough
- GTA 5: The Big Score 2, the Subtle variant walkthrough
- GTA 5: Getaway Vehicle 3 walkthrough
- GTA 5: Driller walkthrough
- GTA 5: Sidetracked walkthrough
- GTA 5: The Big Score 2, the Obvious variant walkthrough
- GTA 5: Endings
- GTA 5: Main missions
- GTA 5: Quests & Missions
You are not permitted to copy any image, text or info from this page. This site is not associated with and/or endorsed by the developers and the publishers. All logos and images are copyrighted by their respective owners.
Copyright © 2000 - 2026 Webedia Polska SA for gamepressure.com, unofficial game guides, walkthroughs, secrets, game tips, maps & strategies for top games.