Hex Commander: Mission 12 - Ice Horn Siege
You'll be defending the fort again. This time, however, you will have to face different enemies - the dwarves. The dwarves are pretty difficult opponents: they have more HP than most of your units. Their Berserkers deal huge damage, have over 110 HP and are able to regenerate 10 HP per turn. Their cannons are more powerful iterations of your catapults.
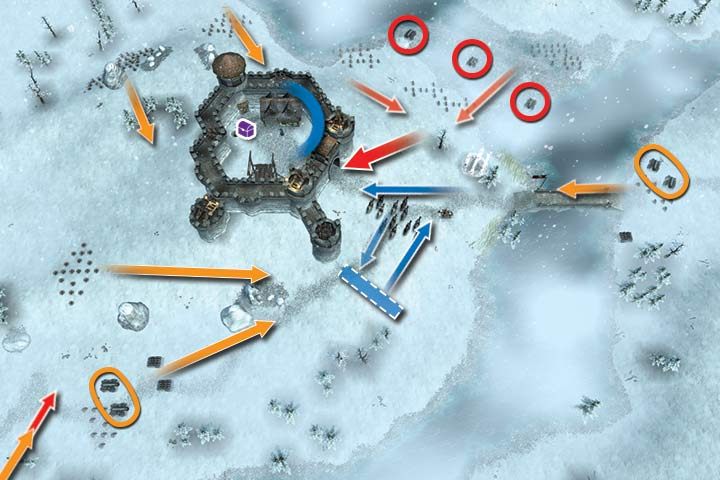
You begin the mission with quite a few units, but the portal is outside the castle. You will have to reshuffle your army inside the castle. You will be controlling a mage, whom you have recently freed. This mage plays like a hero - he can open chests and use potions and scrolls. Additionally, his attacks freeze enemies. Your opponents will attack from only one direction, that is the north (the big red arrow), but this will still be a demanding scenario.
Your main concern will be eliminating the enemy cannons (the red circles). These units are able to get rid of the defenders on your walls. There are a few ways to do that. The first one is to eliminate them with cavalry and your hero - wait until there's a gap between waves of attack and approach the cannons. The disadvantage here is that you cannot use the cavalry to counterattack the enemies at the gate.
You could also use an additional mage - even if you keep him behind the walls, he'll be able to reach the enemies. The simplest solution to get rid of the artillery is using Lightning or Fire Rain scrolls.
When it comes to defending the castle, you should weaken the dwarves with ranged units as much as you can - engage in melee combat only if you have no other alternative. If you freeze enemies at the gate, they won't be able to crush it.
Playing the mission on higher difficulty (orange arrows on the map above) obviously means more enemies. Every new group of dwarves will attack from a different side - the most dangerous groups are those with cannons (the circles), coming from southwest and east, behind the bridge. What doesn't change is the need to prioritize the cannons and ranged units - after destroying them, fighting the infantry should be relatively easy.
- Hex Commander Game Guide
- Hex Commander: Game Guide
- Hex Commander: Human Campaign
- Hex Commander: Mission 1 - Troubling news
- Hex Commander: Mission 2 - Ice Horn
- Hex Commander: Mission 3 - The siege
- Hex Commander: Mission 4 - Tower of Ezerath
- Hex Commander: Mission 5 - The Sun Gate
- Hex Commander: Mission 6 - Escape
- Hex Commander: Mission 7 - Audin Plain
- Hex Commander: Mission 8 - Valendorf
- Hex Commander: Mission 9 - The Hayton Fortress
- Hex Commander: Mission 10 - Frozen Hill
- Hex Commander: Mission 11 - Darkwood
- Hex Commander: Mission 12 - Ice Horn Siege
- Hex Commander: Mission 13 - Tir Assin
- Hex Commander: Mission 14 - Enalone
- Hex Commander: Mission 15 - Hayton Siege
- Hex Commander: Mission 16 - Rauenborn Offensive
- Hex Commander: Mission 17 - Eastern Offensive
- Hex Commander: Mission 18 - Gor Zubul
- Hex Commander: Mission 19 - Kerdan
- Hex Commander: Mission 20 - Kerrash Hill
- Hex Commander: Mission 21 - Elvish Outpost
- Hex Commander: Mission 22 - Alvin's Gate
- Hex Commander: Mission 23 - Counter Strike
- Hex Commander: Mission 24 - Iron Fist
- Hex Commander: Mission 25 - Bazar Dun
- Hex Commander: Mission 26 - Kazad Dir
- Hex Commander: Mission 27 - Dar-Dar Fortress
- Hex Commander: Mission 28 - Towers of Ara
- Hex Commander: Mission 29 - Tower of Light
- Hex Commander: Mission 30 - Dragon's Lair
- Hex Commander: Human Campaign
- Hex Commander: Game Guide
You are not permitted to copy any image, text or info from this page. This site is not associated with and/or endorsed by the developers and the publishers. All logos and images are copyrighted by their respective owners.
Copyright © 2000 - 2026 Webedia Polska SA for gamepressure.com, unofficial game guides, walkthroughs, secrets, game tips, maps & strategies for top games.