Hex Commander: Mission 6 - Defence of Calyril
Table of Contents
Calyril needs help! The fortress is besieged by Orcs and Goblins. You receive a rather large number of siege equipment - their help will be invaluable.
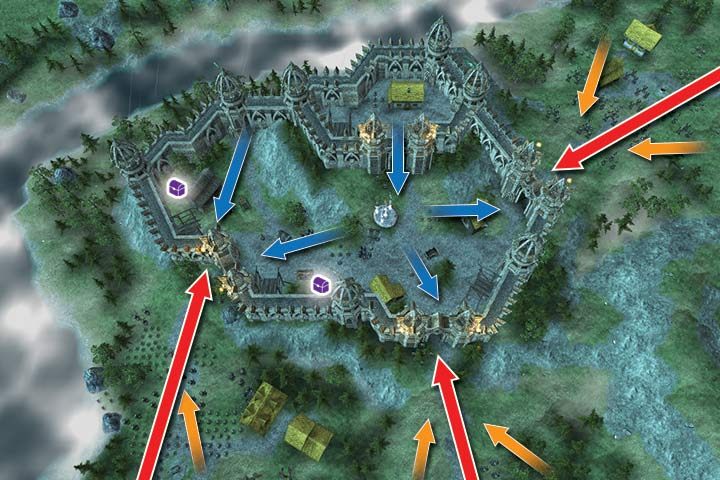
- This mission's objective is to defend the fortress. You get a lot of units including Archers, Scorpions and Ballistae. Thanks to the latter units you will be able to eliminate Orc units with one shot. You have to place all siege equipment on the towers or the walls. This will increase their damage.
- Hold all the gates to win this battle. By doing that the enemy will keep attacking you with small groups that have to cross unfriendly terrains. Move the units from the northern part of the fortress, especially the Archers and the Scorpions, and place them on walls near the gates (use the elevators located in different parts of the fortress). Place a group of Shadow Warriors behind each of the gates - they will eliminate everyone who attacks a gate. A Healer will be very useful here. She can heal units on the walls (especially the siege equipment).
- Most of the attacking units consist of Orcs; Goblins (including Mages) are on the back. Besides that, the middle gate will be assaulted by the enemy hero. He has a great bonus - this hero can reduce most of the damage received from ranged attacks. Focus on other, more threatening units. Try to eliminate them in this order: Goblin Mages, Orc Archers, Goblin Archers, the remaining melee units that are closest to the gate. The Mages have a great reach and can deal the biggest amount of damage. Unless the gates are destroyed, the only threat comes from the ranged units. After that eliminating the rest of the units won't be a problem.
- On higher difficulty levels enemy units are more experienced but you will also have to deal with additional groups of enemies (the orange arrows). The Goblins army receives the biggest reinforcements. Additional Archers or preferably Scorpions will be useful here. An additional Healer will also help. Place them on the opposite gates. To counter a large group of enemies - place a resistant unit on the gate's hex, use any of the Shield scrolls and keep a Healer close to it. The enemy won't attack the gate. Instead, they focus on that particular unit which means that they will waste many turns.
- Hex Commander Game Guide
- Hex Commander: Game Guide
- Hex Commander: Elves Campaign
- Hex Commander: Mission 1 - The Beginning
- Hex Commander: Mission 2 - Sapphire Stream
- Hex Commander: Mission 3 - Stream Ambush
- Hex Commander: Mission 4 - Rocky Path
- Hex Commander: Mission 5 - Druid Circle Battle
- Hex Commander: Mission 6 - Defence of Calyril
- Hex Commander: Mission 7 - Four Fang Hideout
- Hex Commander: Mission 8 - Runaways
- Hex Commander: Mission 9 - Blocked Road
- Hex Commander: Mission 10 - Muzzled Gorge
- Hex Commander: Mission 11 - Wyvern Circle Battle
- Hex Commander: Mission 12 - Passing the Village
- Hex Commander: Mission 13 - Crossing the Blockade
- Hex Commander: Mission 14 - Unexpected Strike
- Hex Commander: Mission 15 - Persistence
- Hex Commander: Mission 16 - Mountain Hideout
- Hex Commander: Mission 17 - Lighting Strikes Twice
- Hex Commander: Mission 18 - Elunore Infection
- Hex Commander: Mission 19 - Elunore Siege
- Hex Commander: Mission 20 - Scorched Chasm
- Hex Commander: Mission 21 - Chasm Ambush
- Hex Commander: Mission 22 - Safety Line
- Hex Commander: Mission 23 - Hide and Seek
- Hex Commander: Mission 24 - Grasped
- Hex Commander: Mission 25 - Before the Stone
- Hex Commander: Mission 26 - Circle of Ice
- Hex Commander: Side mission
- Hex Commander: Elves Campaign
- Hex Commander: Game Guide
You are not permitted to copy any image, text or info from this page. This site is not associated with and/or endorsed by the developers and the publishers. All logos and images are copyrighted by their respective owners.
Copyright © 2000 - 2026 Webedia Polska SA for gamepressure.com, unofficial game guides, walkthroughs, secrets, game tips, maps & strategies for top games.