Hex Commander: Mission 4 - Saving Wyverns
The two heroes escape from the region endangered by flood. Vulpis will decide to free the other Wyverns.
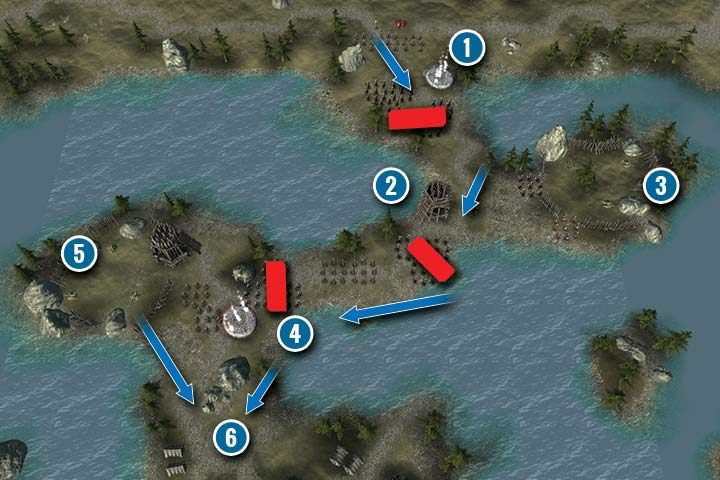
In this mission you will learn how to use Wyverns better. You start in the north (1) and your goal is to eliminate enemies and free the remaining Wyverns. Attack the incoming enemies as fast as you can and try to protect the two Wyverns. They will be very important during the fight with heavily armored infantry.
Wyverns are a specialized unit. A squad consists only of one unit which means that losses won't have impact on damage dealt by this unit. They don't take a lot of health points but a Wyvern's strength lies in its special ability. After attacking, they inflict a special effect that deals 25 full damage per turn (they bypass armor and other defense modifiers). Thanks to this the enemy infantry will die from acid even before they get hit with a sword. The effect lasts a few turns and each attack replenishes the number of turns. However, the effects don't stack up. Effects caused by burning and using acid combine which can make even the most difficult enemies easier.
The Crossbowmen on the tower (2) are easy to defeat. Move your dragon and the Wyvern closer, attack the enemy once and retreat during the next turn. After that you have to wait a few turns - the enemy will die due to fire and acid damage. Then, approach the first imprisoned Wyvern (3). Use your new forces to quickly eliminate the guards.
Time to recapture the second camp (4). There, you will find a teleport and a lot of Crossbowmen. These units are the biggest threat to your Wyverns so send your heroes to defeat them. Your infantry and the Wyverns should fight in the narrow passage with the rest of the melee units. Get closer to the captured Wyvern to add it to your army. Time for dealing with the camp leader who, luckily for you, isn't a big challenge. Remember to quickly attack him with your dragon and a Wyvern. Then you should surround him with your army. If you don't have enough of them then you should retreat and wait for the leader to die from fire and acid.

- Hex Commander Game Guide
- Hex Commander: Game Guide
- Hex Commander: Greenskins' Campaign
- Hex Commander: Mission 1 - The Flood
- Hex Commander: Mission 2 - Heavy Rain
- Hex Commander: Mission 3 - Defence of Vraakt
- Hex Commander: Mission 4 - Saving Wyverns
- Hex Commander: Mission 5 - Human Lands
- Hex Commander: Mission 6 - Myrefall
- Hex Commander: Mission 7 - Myrefall Ambush
- Hex Commander: Mission 8 - Crossing the Border
- Hex Commander: Mission 9 - Meeting Orcs
- Hex Commander: Mission 10 - Shallow Pass
- Hex Commander: Mission 11 - Shallow Camp
- Hex Commander: Mission 12 - Lower Thealon
- Hex Commander: Mission 13 - Upper Thealon
- Hex Commander: Mission 14 - Wisted Hills
- Hex Commander: Mission 15 - Source of Rain
- Hex Commander: Mission 16 - Taking the Blame
- Hex Commander: Mission 17 - Defense of Drogor
- Hex Commander: Mission 18 - Frozen Peaks
- Hex Commander: Mission 19 - Siege Preparations
- Hex Commander: Mission 20 - Rimedohr Siege
- Hex Commander: Mission 21 - Old Allies
- Hex Commander: Mission 22 - A Common Enemy
- Hex Commander: Mission 23 - Harmstead
- Hex Commander: Mission 24 - Percival's Tomb
- Hex Commander: Mission 25 - Chilling Gallows
- Hex Commander: Mission 26 - Avodany, the Arcane Academy
- Hex Commander: Mission 27 - Ancient Ruse
- Hex Commander: Mission 28 - Altar of Flames
- Hex Commander: Mission 29 - Before the Dome
- Hex Commander: Mission 30 - Battle for Arradan
- Hex Commander: Greenskins' Campaign
- Hex Commander: Game Guide
You are not permitted to copy any image, text or info from this page. This site is not associated with and/or endorsed by the developers and the publishers. All logos and images are copyrighted by their respective owners.
Copyright © 2000 - 2026 Webedia Polska SA for gamepressure.com, unofficial game guides, walkthroughs, secrets, game tips, maps & strategies for top games.