Hex Commander: Mission 20 - Scorched Chasm
Sylvius and Arcaena are hunting Silverwing. They find her in a gorge near Elunore's stronghold.
Slaying the wyvern is rather difficult, especially since, you won't be able to summon additional units. The wyvern will move between two points. When it lands, it will spray acid over all the units in range, then, it will perform a normal attack. Next, it will continue fighting for a couple of turns and fly to the other side of the canyon. When there, it will attack all units in its range and continue attacking for some time, after what, it will fly back to the other side.
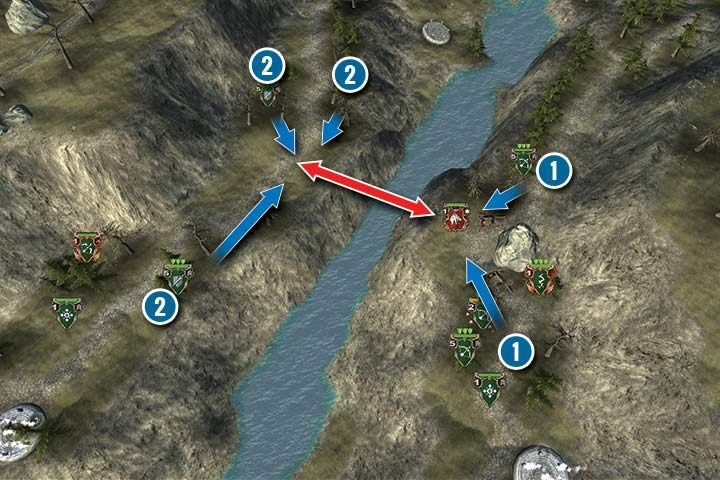
There are many hiding spots on both sides of the valley. Use the woods and Stones to hide your units before Silverwing arrives. On the right side of the map, Sylvus along with the ballistas and archers await the wyvern. (1). Move your units behind the forest, so that the wyvern won't be able to spill acid over any of them. Then, advance with your archers and ballistas. Try to place one archer unit with full health close to the wyvern. Then her regular attack in the next round will reach the archers, not the ballistas. Such attack will cause more damage (reducing the number of archers decreases their combat value).
After the wyvern flies off to the other side, hide your units. Use the same tactics on the other side (2). Hide Arcaena and the infantry in the forest, however, don't position them on the outskirts. Staying deep in the woods will protect them against acid attacks. Now simply get closer to the wyvern and keep attacking until it flies away. If you're having trouble positioning your units, it's best to place them the same way as depicted on the map above.
After depleting most of its health, the wyvern will fly away to the north. Your units will receive a speed bonus for the next few turns. Move your small army north and wait for the wyvern to attack. From this point on, it will only perform normal attacks, which makes the fight much easier. Send all your units, use the forest for cover, and keep the ballistas at a sufficient distance. This way you will swiftly deal with Silverwing.

- Hex Commander Game Guide
- Hex Commander: Game Guide
- Hex Commander: Elves Campaign
- Hex Commander: Mission 1 - The Beginning
- Hex Commander: Mission 2 - Sapphire Stream
- Hex Commander: Mission 3 - Stream Ambush
- Hex Commander: Mission 4 - Rocky Path
- Hex Commander: Mission 5 - Druid Circle Battle
- Hex Commander: Mission 6 - Defence of Calyril
- Hex Commander: Mission 7 - Four Fang Hideout
- Hex Commander: Mission 8 - Runaways
- Hex Commander: Mission 9 - Blocked Road
- Hex Commander: Mission 10 - Muzzled Gorge
- Hex Commander: Mission 11 - Wyvern Circle Battle
- Hex Commander: Mission 12 - Passing the Village
- Hex Commander: Mission 13 - Crossing the Blockade
- Hex Commander: Mission 14 - Unexpected Strike
- Hex Commander: Mission 15 - Persistence
- Hex Commander: Mission 16 - Mountain Hideout
- Hex Commander: Mission 17 - Lighting Strikes Twice
- Hex Commander: Mission 18 - Elunore Infection
- Hex Commander: Mission 19 - Elunore Siege
- Hex Commander: Mission 20 - Scorched Chasm
- Hex Commander: Mission 21 - Chasm Ambush
- Hex Commander: Mission 22 - Safety Line
- Hex Commander: Mission 23 - Hide and Seek
- Hex Commander: Mission 24 - Grasped
- Hex Commander: Mission 25 - Before the Stone
- Hex Commander: Mission 26 - Circle of Ice
- Hex Commander: Side mission
- Hex Commander: Elves Campaign
- Hex Commander: Game Guide
You are not permitted to copy any image, text or info from this page. This site is not associated with and/or endorsed by the developers and the publishers. All logos and images are copyrighted by their respective owners.
Copyright © 2000 - 2026 Webedia Polska SA for gamepressure.com, unofficial game guides, walkthroughs, secrets, game tips, maps & strategies for top games.