Hex Commander: Mission 23 - Hide and Seek
Although you have made it to Orvin's encampment, he managed to escape. You have to eliminate his forces before approaching him.
Taking the enemy encampment isn't as easy as it may seem. The moment you unleash your attack, enemy support units will come to aid their brethren.
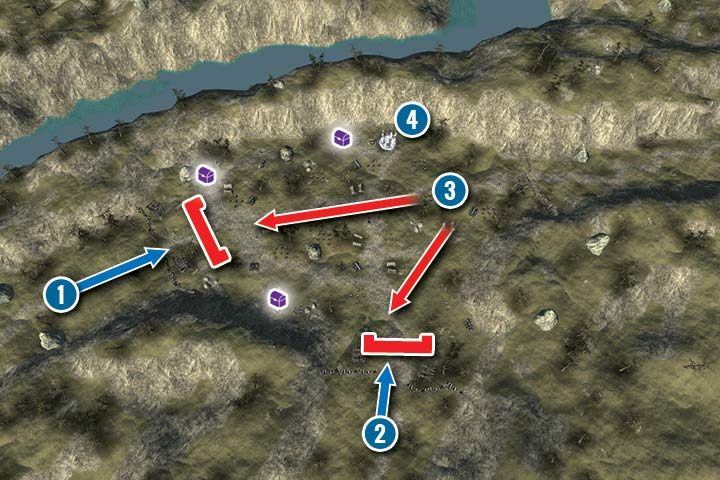
You start in two separate places. Arcaen's squad is in the west (1); use it to attack the first enemy position. Use your hero and mages to eliminate guards on the towers. There's also a mortar nearby, which should be destroyed using mages. Don't try to push through the entrance because there are many units there. The camp gate is a good spot to defend against enemy counterattacks. There's an open space in the camp, which can harm a tactical approach. Mortars and cannons are scattered across the camp, which makes it difficult to simply storm your way inside it.
Sylvius' squad (2) is south from the encampment. Eliminate the guards at the gate but don't pass through. The placement of this group is less fortunate than Arcaen's. If you go through the gate, you will be in range of cannon and mortar strikes. Additionally, enemy support units (3) attack the closest targets, which are Sylvius' units. It's best to hold the choke point and stop enemy units using Sylvius' while the archers deal damage and reduce enemy count. Sometimes it's better to attack your enemies from a distance, especially those behind the first line of units which are being blocked. It's better to maintain this "barricade" than to destroy it by attacking those units first.
When most of the units from the camp start moving towards your position, you can try to make a diversion with a smaller squad(4). It's best to summon unicorns, which move very quickly and have high chances of finding and eliminating enemy siege machines. First, take care of the mortars, then the cannons. The first can attack units ignoring terrain obstacles. After that, take care of the cannons by approaching them from the safe side, where they can't attack your units.

- Hex Commander Game Guide
- Hex Commander: Game Guide
- Hex Commander: Elves Campaign
- Hex Commander: Mission 1 - The Beginning
- Hex Commander: Mission 2 - Sapphire Stream
- Hex Commander: Mission 3 - Stream Ambush
- Hex Commander: Mission 4 - Rocky Path
- Hex Commander: Mission 5 - Druid Circle Battle
- Hex Commander: Mission 6 - Defence of Calyril
- Hex Commander: Mission 7 - Four Fang Hideout
- Hex Commander: Mission 8 - Runaways
- Hex Commander: Mission 9 - Blocked Road
- Hex Commander: Mission 10 - Muzzled Gorge
- Hex Commander: Mission 11 - Wyvern Circle Battle
- Hex Commander: Mission 12 - Passing the Village
- Hex Commander: Mission 13 - Crossing the Blockade
- Hex Commander: Mission 14 - Unexpected Strike
- Hex Commander: Mission 15 - Persistence
- Hex Commander: Mission 16 - Mountain Hideout
- Hex Commander: Mission 17 - Lighting Strikes Twice
- Hex Commander: Mission 18 - Elunore Infection
- Hex Commander: Mission 19 - Elunore Siege
- Hex Commander: Mission 20 - Scorched Chasm
- Hex Commander: Mission 21 - Chasm Ambush
- Hex Commander: Mission 22 - Safety Line
- Hex Commander: Mission 23 - Hide and Seek
- Hex Commander: Mission 24 - Grasped
- Hex Commander: Mission 25 - Before the Stone
- Hex Commander: Mission 26 - Circle of Ice
- Hex Commander: Side mission
- Hex Commander: Elves Campaign
- Hex Commander: Game Guide
You are not permitted to copy any image, text or info from this page. This site is not associated with and/or endorsed by the developers and the publishers. All logos and images are copyrighted by their respective owners.
Copyright © 2000 - 2026 Webedia Polska SA for gamepressure.com, unofficial game guides, walkthroughs, secrets, game tips, maps & strategies for top games.