Hex Commander: Mission 9 - The Hayton Fortress
This is the first scenario where you will be attacking a castle, which will obviously require a new approach. You'll have to siege the stronghold, but you will also get some appropriate units. There's no time limit, so don't rush and think your moves through.
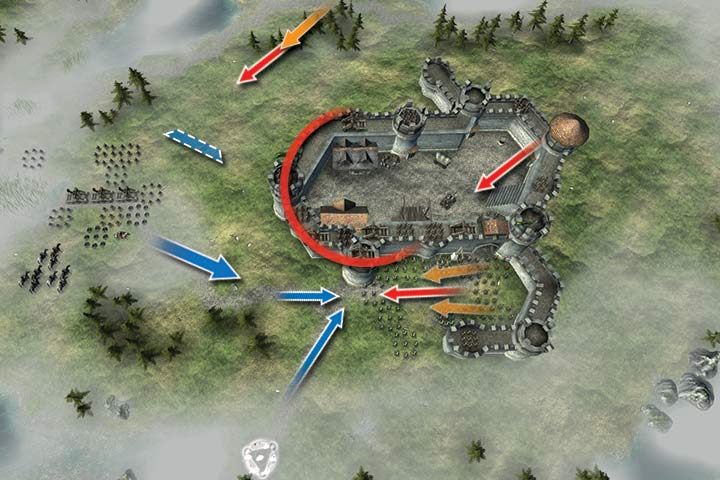
You begin near the castle, on the west side. There's a single portal in the south, which may make things difficult. The most important units of your army are the three catapults. They're very powerful and have greater range than the crossbowmen. Use them to eliminate the troops on the walls or to respond to counterattacks. At the beginning, approach the walls slowly and start eliminating the crossbowmen (the enemy's main defense line is marked with the half-circle); a small group of cavalry will attack from the north, the troops from the gate will mount an offensive against you, and some crossbowmen from the walls will switch their positions.
The most powerful units of the enemy will also be the catapults. There's a simple solution to that, though. You can use the Lightning or Fire Rain scrolls, summon the Undead on the walls or use Rage on the catapults. Another - more reasonable solution - is summoning a Battle Mage, who can disable or even destroy the catapults. In the mean time, approach the walls with your troops and eliminate the remaining forces and crush the gate.
Playing the mission on higher difficulty (orange arrows on the map above) will require you to fight against a much greater garrison and some additional units of cavalry in the north. Each difficulty level increases the number of catapults on the walls, especially on the west side. The Fire Rain will be particularly useful for eliminating large groups of enemies, even despite their defense bonuses. Before you commence the main attack on the castle, wait until all the units from the north and from the gate strike at you.
- Hex Commander Game Guide
- Hex Commander: Game Guide
- Hex Commander: Human Campaign
- Hex Commander: Mission 1 - Troubling news
- Hex Commander: Mission 2 - Ice Horn
- Hex Commander: Mission 3 - The siege
- Hex Commander: Mission 4 - Tower of Ezerath
- Hex Commander: Mission 5 - The Sun Gate
- Hex Commander: Mission 6 - Escape
- Hex Commander: Mission 7 - Audin Plain
- Hex Commander: Mission 8 - Valendorf
- Hex Commander: Mission 9 - The Hayton Fortress
- Hex Commander: Mission 10 - Frozen Hill
- Hex Commander: Mission 11 - Darkwood
- Hex Commander: Mission 12 - Ice Horn Siege
- Hex Commander: Mission 13 - Tir Assin
- Hex Commander: Mission 14 - Enalone
- Hex Commander: Mission 15 - Hayton Siege
- Hex Commander: Mission 16 - Rauenborn Offensive
- Hex Commander: Mission 17 - Eastern Offensive
- Hex Commander: Mission 18 - Gor Zubul
- Hex Commander: Mission 19 - Kerdan
- Hex Commander: Mission 20 - Kerrash Hill
- Hex Commander: Mission 21 - Elvish Outpost
- Hex Commander: Mission 22 - Alvin's Gate
- Hex Commander: Mission 23 - Counter Strike
- Hex Commander: Mission 24 - Iron Fist
- Hex Commander: Mission 25 - Bazar Dun
- Hex Commander: Mission 26 - Kazad Dir
- Hex Commander: Mission 27 - Dar-Dar Fortress
- Hex Commander: Mission 28 - Towers of Ara
- Hex Commander: Mission 29 - Tower of Light
- Hex Commander: Mission 30 - Dragon's Lair
- Hex Commander: Human Campaign
- Hex Commander: Game Guide
You are not permitted to copy any image, text or info from this page. This site is not associated with and/or endorsed by the developers and the publishers. All logos and images are copyrighted by their respective owners.
Copyright © 2000 - 2026 Webedia Polska SA for gamepressure.com, unofficial game guides, walkthroughs, secrets, game tips, maps & strategies for top games.