Hex Commander: Mission 8 - Valendorf
You've been entrusted with quenching an enemy rebellion and received quite a big army. The topography of the battlefield and the composition of the enemy's army require a strategic approach.
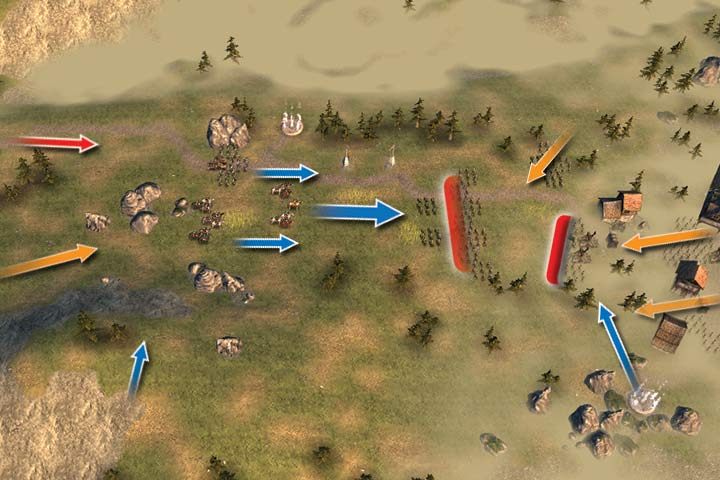
You begin in the center of the map with a considerable force. A frontal assault will mean heavy losses, particularly if the second line becomes engaged in the defense (the red markings). On normal difficulty, you can just summon additional Cavalry and Mages. Place them behind the forest and try to have the catapults in range. Order Mages to freeze enemies that can get closer to you or attack the Catapults. Unlike the classic ranged units, their reach isn't obstructed by environment obstacles. However, they are extremely vulnerable to all sorts of attacks..
Use your main force to crush the first line of defense. Try to spread your units rather than keep them in a tight cluster - this will allow all your units to use their charge and attack the enemy during the same turn. After a few turns, some enemies will appear behind your forces and attack from the rear (the red arrow). Use infantry and the catapult to get rid of them. If you can, use some of your cavalry to aid them.
Playing the mission on higher difficulty (orange arrows on the map above) obviously means you will be dealing with increased enemy presence - more enemies in the first line, more cavalry at the rear and a stronger garrison in the city. Attacking from the direction of the second teleport will prompt a counteroffensive from the city, so be careful. The army in the city consists mostly of pikemen and range units, so take additional crossbowmen, mages or a catapult. Mages can be particularly useful, since they can help you jam the streets with enemy units. Rage and Fire Rain scrolls will be especially effective.
- Hex Commander Game Guide
- Hex Commander: Game Guide
- Hex Commander: Human Campaign
- Hex Commander: Mission 1 - Troubling news
- Hex Commander: Mission 2 - Ice Horn
- Hex Commander: Mission 3 - The siege
- Hex Commander: Mission 4 - Tower of Ezerath
- Hex Commander: Mission 5 - The Sun Gate
- Hex Commander: Mission 6 - Escape
- Hex Commander: Mission 7 - Audin Plain
- Hex Commander: Mission 8 - Valendorf
- Hex Commander: Mission 9 - The Hayton Fortress
- Hex Commander: Mission 10 - Frozen Hill
- Hex Commander: Mission 11 - Darkwood
- Hex Commander: Mission 12 - Ice Horn Siege
- Hex Commander: Mission 13 - Tir Assin
- Hex Commander: Mission 14 - Enalone
- Hex Commander: Mission 15 - Hayton Siege
- Hex Commander: Mission 16 - Rauenborn Offensive
- Hex Commander: Mission 17 - Eastern Offensive
- Hex Commander: Mission 18 - Gor Zubul
- Hex Commander: Mission 19 - Kerdan
- Hex Commander: Mission 20 - Kerrash Hill
- Hex Commander: Mission 21 - Elvish Outpost
- Hex Commander: Mission 22 - Alvin's Gate
- Hex Commander: Mission 23 - Counter Strike
- Hex Commander: Mission 24 - Iron Fist
- Hex Commander: Mission 25 - Bazar Dun
- Hex Commander: Mission 26 - Kazad Dir
- Hex Commander: Mission 27 - Dar-Dar Fortress
- Hex Commander: Mission 28 - Towers of Ara
- Hex Commander: Mission 29 - Tower of Light
- Hex Commander: Mission 30 - Dragon's Lair
- Hex Commander: Human Campaign
- Hex Commander: Game Guide
You are not permitted to copy any image, text or info from this page. This site is not associated with and/or endorsed by the developers and the publishers. All logos and images are copyrighted by their respective owners.
Copyright © 2000 - 2026 Webedia Polska SA for gamepressure.com, unofficial game guides, walkthroughs, secrets, game tips, maps & strategies for top games.